_%20Collections%2C%20Dynamic%20Pages%20%26%20Best%20Practices.jpg)
June 24, 2026
# min Read


Explore expert insights, practical guides, and proven strategies to help you build, scale, and optimize high-performing digital experiences.
If you have spent any time researching website platforms for a content-heavy business, you have probably run into the same question more than once. Is Webflow CMS actually ready to replace WordPress, or is it still just a design tool with a database bolted on? After building and maintaining CMS-driven sites for agencies, e-commerce brands and SaaS companies, the honest answer is that Webflow CMS has matured into a genuinely capable content system, but only when it is set up correctly from day one.
This Webflow CMS guide is written from the perspective of people who actually build with it every week, not from a marketing page. We will walk through how collections work, how dynamic pages get generated, the setup process step by step, the SEO structure that actually moves rankings, the mistakes that quietly hurt performance, and where Webflow still falls short. By the end, you will know exactly how to plan and structure a Webflow CMS tutorial 2026 ready build, whether you are doing this for the first time or migrating an existing site.
Webflow CMS is the content management layer built into the Webflow visual builder. Instead of typing content directly into static pages, you create structured content types, called collections, and then design templates that automatically pull that content into live pages. Think of it as a hybrid between a traditional CMS like WordPress and a structured database, wrapped inside a visual design canvas.
For teams that have only used page builders or static HTML, this is the part that takes a little getting used to. You are not designing one page at a time. You are designing a template once, and Webflow CMS reuses that template for every item in a collection, whether that is 10 blog posts or 2,000 product listings. This is the foundation of what makes dynamic pages in Webflow possible, and it is also the reason agencies use Webflow for client sites that need to scale content without rebuilding pages from scratch every time.
A useful way to frame it for beginners: a collection is similar to a custom post type in WordPress, a collection item is similar to a single post, and a collection page template is similar to a single.php template, except everything is visual and you can see your changes update live as you build.
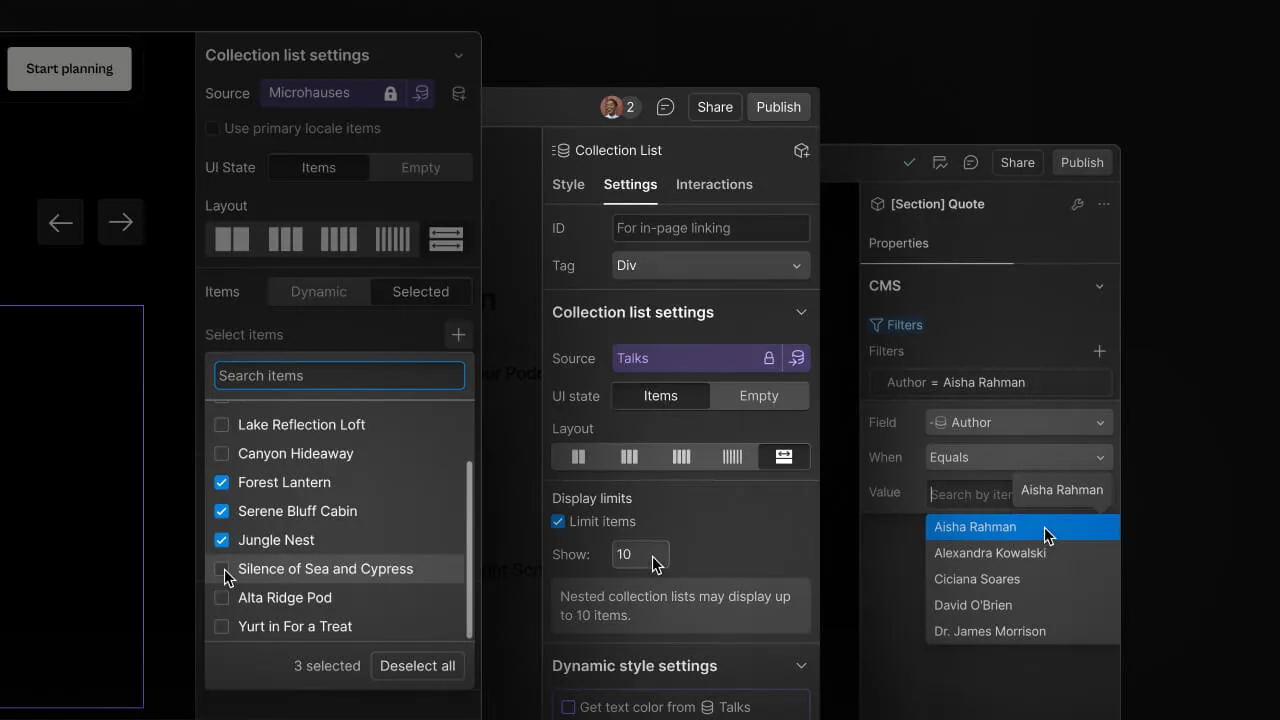
Under the hood, Webflow CMS works on three connected layers. First, there is the collection schema, where you define fields such as text, rich text, images, references, numbers and switches. Second, there is the collection list, which is a visual component you drop onto a page to display multiple items, often used for blog grids, team listings or case study rollups. Third, there is the collection page template, which is the dynamic page that gets generated automatically for every single item inside that collection.
When someone publishes a new blog post by adding a new collection item, Webflow does not require you to design a new page. It simply slots that item's data into the existing template structure. This single mechanism is what allows a content team to publish dozens of pages a month without ever touching the Designer. It also means your SEO structure, your internal linking pattern and your page layout stay consistent across every single dynamic page, which matters more than most people realize when search engines are evaluating site quality.
Reference and multi-reference fields are where Webflow CMS becomes genuinely powerful. You can connect a blog post to an author collection, a category collection and a related services collection at the same time. This relational structure is exactly what supports a strong Webflow SEO structure, because it lets you build contextual internal links automatically across hundreds of pages instead of manually placing links on every single one.
Collections are the backbone of any serious Webflow CMS setup, and getting the schema right at the start saves enormous rework later. A collection is essentially a content type with defined fields. A blog collection might include title, slug, summary, body content, featured image, author reference, category reference and publish date. A real estate site might use a property collection with fields for price, location, square footage and image gallery.
When agencies talk about Webflow collections explained in practical terms, the real skill is not creating the fields, it is planning the relationships between collections before you build a single page. A common agency-level insight is to separate your taxonomy collections, such as categories and tags, from your content collections, such as blog posts and case studies, so they can be reused across multiple templates without duplication.
Webflow allows up to 50 fields per collection on most plans and supports nested reference fields, which means a single project might include a service collection connected to a case study collection connected to a testimonial collection. This is how a CMS development services build can support a fully interlinked content architecture rather than isolated, disconnected pages.
One practical tip from real client projects: always create a dedicated category or tag collection rather than using a plain text field for categorization. A reference field gives you a filterable, linkable archive page automatically, while a plain text field gives you nothing but static text that cannot power dynamic filtering or related content sections.
Dynamic pages are the actual live URLs generated from your collection items. If you have a blog collection with 200 entries, Webflow generates 200 individual pages automatically based on the single template you designed. This is the single biggest reason content-heavy businesses choose Webflow CMS over building static pages by hand.
Designing dynamic pages in Webflow well requires thinking in terms of conditional visibility. Not every item in a collection will have the same fields filled in, so you need conditional logic to hide empty elements gracefully. For example, if a case study does not have a client testimonial yet, the testimonial block should not render as an empty box. Webflow's conditional visibility settings handle this without writing a line of code, but only if you remember to set the condition on every dynamic element during setup.
Pagination is another area worth planning early. Webflow's native collection list pagination works fine for moderate volumes, but for very large collections, many agencies pair it with Finsweet's CMS Library or a Jetboost integration to add filtering, search and load more functionality, particularly useful for landing page design projects where users need to filter listings without a full page reload.
From an SEO standpoint, dynamic pages inherit the template's metadata structure unless you override it per item, so it is worth setting up dynamic SEO title and meta description fields directly inside the collection schema. This single setup decision affects every page generated from that collection, which is why agencies offering webflow seo services treat this as a non-negotiable step rather than an afterthought.
A clean Webflow CMS setup follows a predictable sequence, and skipping steps almost always causes rework later. Here is the process used on most agency builds.
This sequence matters because changing a collection's field structure after dozens of items have been published can create cleanup work, particularly with reference fields that are already connected. Teams that work with a hire webflow developer arrangement for the initial architecture phase, then bring in content writers afterward, tend to avoid most of this rework entirely.
Webflow CMS best practices for SEO start with the same fundamentals as any platform: clean URL structures, fast load times, and a logical internal linking pattern. Where Webflow CMS specifically helps is in how easily you can template that consistency across hundreds of pages at once.
Slug structure deserves real attention. A common mistake is leaving default auto-generated slugs that include unnecessary words or inconsistent casing. Planning a clean, descriptive slug pattern at the collection level, before publishing content, keeps your Webflow SEO structure tidy without needing bulk edits later.
Image optimization is another area where Webflow CMS has built-in advantages most beginners do not use. Webflow automatically serves responsive image sizes and supports lazy loading natively, but you still need to compress source images before upload and write descriptive alt text inside the collection field rather than leaving it blank, since alt text left empty on dynamic pages multiplies the issue across every generated page.
Internal linking inside collection templates is one of the most underused SEO levers in Webflow. Because reference fields connect collections, you can build a related services block, a related case studies section or a contextual link to a webflow development services page directly inside the dynamic template, and it will appear correctly formatted on every single page generated from that collection without manual work. Pairing this structure with ongoing seo services keeps rankings stable even as the collection grows.
Page speed on CMS-heavy Webflow sites usually comes down to image weight and excessive third party embeds rather than the CMS itself. Compressing assets, limiting custom code embeds on collection templates, and avoiding unnecessary interactions on dynamic pages keeps Core Web Vitals scores healthy even as the collection grows into the hundreds of items.
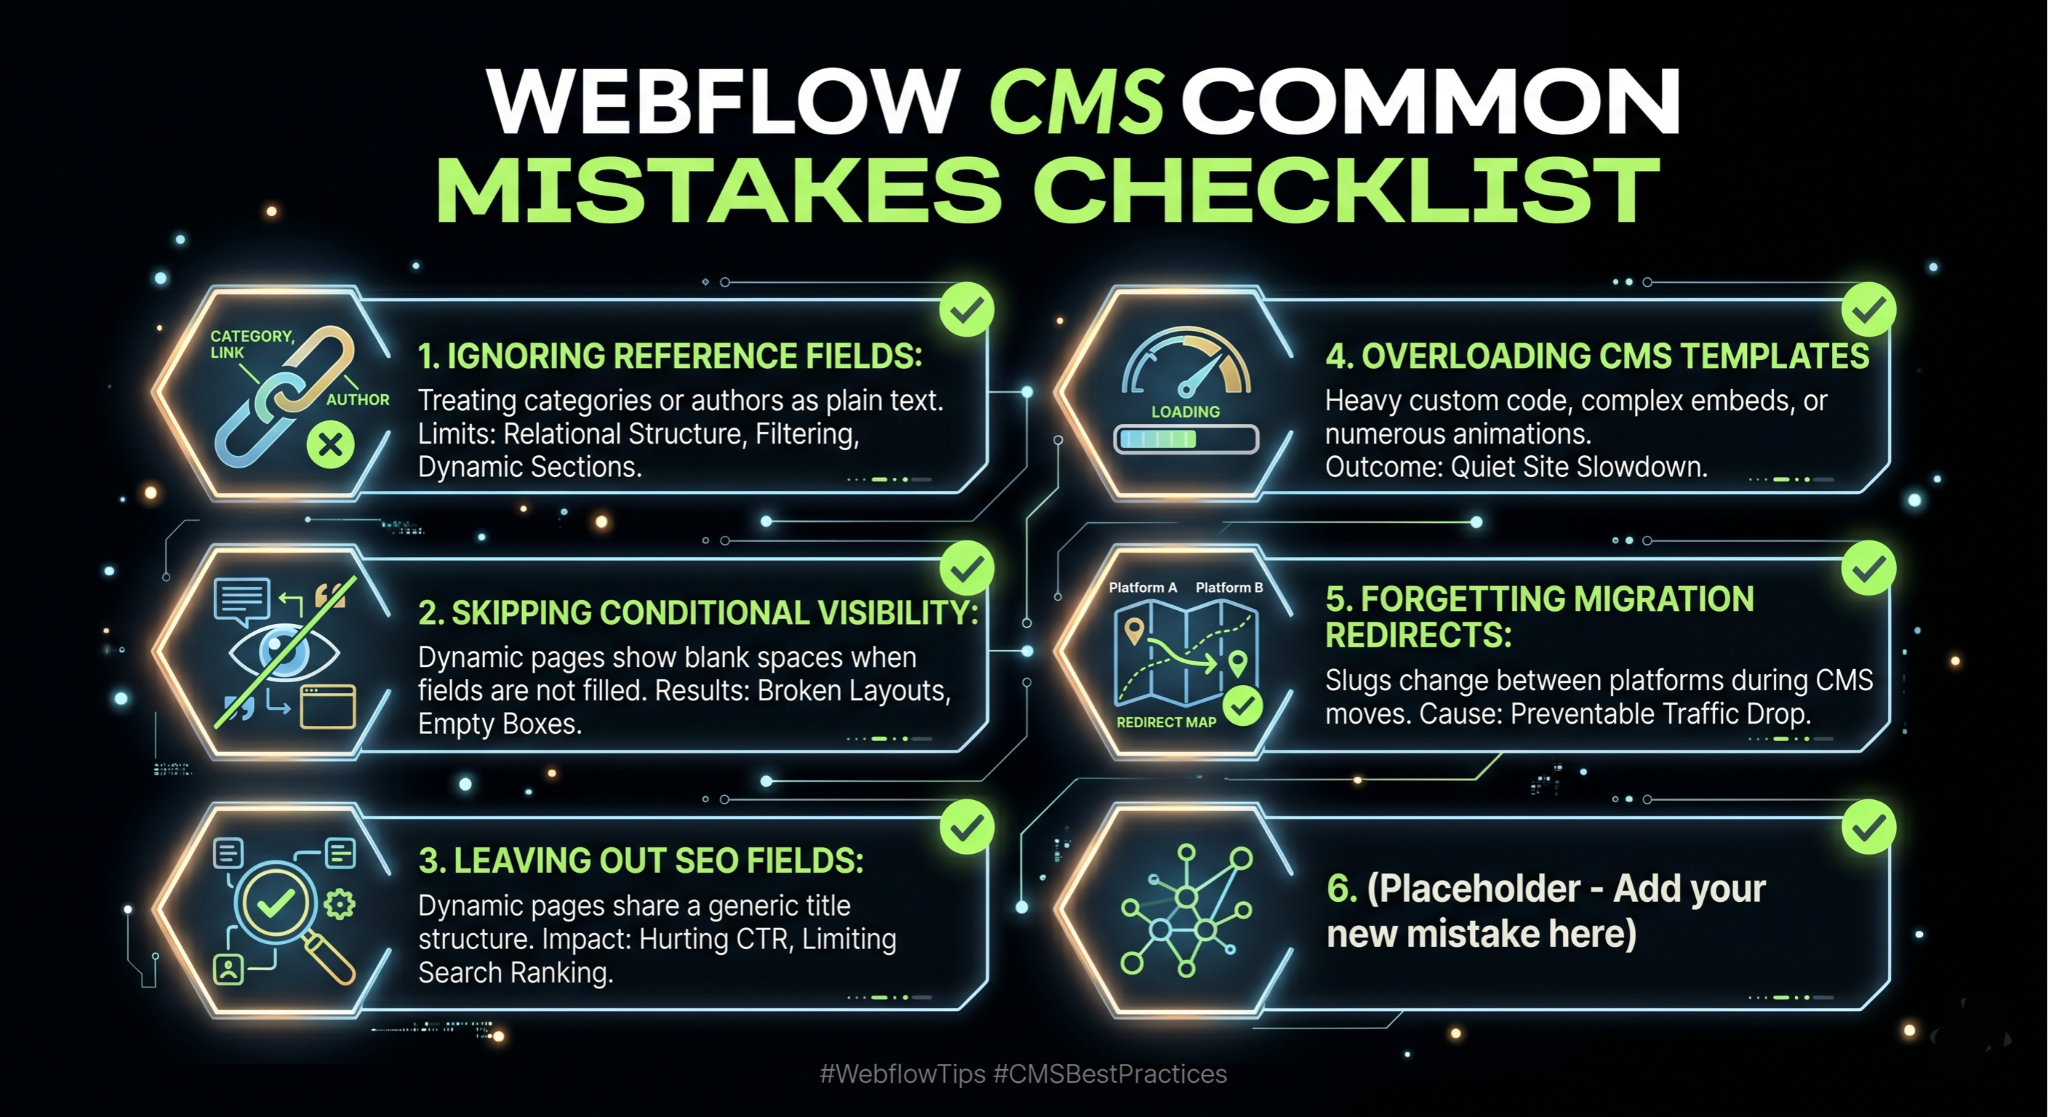
After reviewing dozens of client projects, a handful of mistakes show up again and again, and most of them are avoidable with a bit of planning.
The first is treating every field as a plain text field instead of using reference fields for categories, authors and related content. This flattens what could have been a relational content structure into disconnected text, which limits filtering, related content sections and internal linking later on.
The second is skipping conditional visibility settings, which leads to dynamic pages displaying empty boxes, blank quote marks or broken layouts whenever a field is not filled in for a particular item. This is especially visible on case study or testimonial sections where not every item has the same amount of content.
The third is leaving SEO fields out of the collection schema entirely and relying only on the static page title. This means every dynamic page shares a generic title structure, which directly hurts click-through rate and rankings across the entire collection at once rather than just one page.
The fourth is overloading collection templates with heavy custom code embeds, animations or third party widgets that were designed for a single static page, not hundreds of generated pages. What looks fine on one page can quietly slow down an entire site once it is multiplied across a large collection.
Finally, many teams forget to set up proper redirects during a CMS migration, particularly when slugs change between platforms. This is one of the most common causes of traffic drops after moving a site, and it is entirely preventable with a redirect map built before launch.
No platform is perfect, and being upfront about Webflow CMS limitations is part of giving honest advice rather than a sales pitch. The most commonly cited limit is the item cap per collection, which varies by plan, generally ranging from 2,000 items on lower CMS plans up to higher limits on Business and Enterprise plans. For most blogs, service sites and portfolio sites this is not a practical concern, but for very large catalogs or directory-style sites, it is worth checking current plan limits before committing to the platform.
Webflow also limits the number of fields per collection and the number of collections per site depending on plan tier, which means very complex data models, such as those used by large scale marketplaces, may need a more custom backend or a headless approach using Webflow as the front end with an external database feeding content through the API.
Multi-language and localization support has improved with Webflow's localization feature, but it still requires careful planning around collection structure and is not as plug-and-play as some dedicated multilingual CMS plugins on other platforms.
Bulk content operations are another area worth knowing about. Editing hundreds of items at once is not as straightforward inside the Webflow Designer as it is with a spreadsheet-style bulk editor, which is why many teams use the Webflow API or third party import tools when migrating large volumes of content rather than entering everything manually.
The Webflow CMS vs WordPress conversation comes up in almost every discovery call, and the honest answer depends heavily on what the business actually needs rather than which platform is objectively better.
WordPress wins on raw content volume, plugin ecosystem and long-term flexibility, particularly for sites with very large content libraries, complex membership systems or deep e-commerce needs through WooCommerce. It also has a much larger pool of available developers and a mature plugin marketplace covering nearly every use case imaginable.
Webflow CMS wins on design control, build speed, hosting reliability and the absence of plugin maintenance overhead. There is no need to manage updates, security patches or plugin conflicts, since Webflow handles hosting and infrastructure natively. For agencies that have dealt with a WordPress site breaking after a plugin update, this is a meaningful advantage in terms of long term website maintenance.
Performance out of the box also tends to favor Webflow CMS, since it runs on a global CDN by default without needing additional caching plugins, while a comparable WordPress site usually needs caching, a CDN and image optimization plugins layered on top just to reach similar speeds. This is also why many agencies offering broader web design services now default to Webflow for client builds that prioritize speed and visual polish over deep plugin customization.
For a business deciding between the two, a reasonable rule of thumb is this: if the project needs heavy e-commerce functionality, a huge content library well beyond CMS item limits, or deep custom backend logic, WordPress or a custom build may be the better fit. If the project values design quality, fast publishing for moderate content volumes, and low maintenance overhead, Webflow CMS is usually the stronger choice, and this is exactly the kind of decision worth discussing with a team offering cms migration support before committing either way.
Once the core Webflow CMS setup is stable, the next level of maturity comes from automation and integrations that reduce manual publishing work. The Webflow API allows external tools to create, update and publish collection items programmatically, which opens the door to genuinely powerful workflows.
A common setup involves connecting Webflow to Make or Zapier so that new entries from a Google Sheet, an Airtable base or a form submission automatically create draft collection items in Webflow, ready for a content editor to review and publish. This is particularly useful for agencies managing content across many client sites at once.
For teams using AI-assisted content production, the Webflow API can also be paired with a content generation pipeline that drafts blog posts, formats them with proper headings, and pushes them into the CMS as unpublished drafts for human review before going live. This keeps a human in the loop for quality control while removing the repetitive copy-paste work of manual publishing.
Integration with analytics and search console data is another layer worth building out. Pulling performance data back into a dashboard alongside your collection content helps identify which dynamic pages are underperforming on click-through rate or rankings, so content updates can be prioritized based on actual data rather than guesswork.
More advanced teams sometimes pair Webflow's CMS with a headless commerce backend or a custom database synced through the API, effectively using Webflow as the presentation layer while a more complex backend system handles inventory, pricing or user accounts, particularly relevant for webflow ecommerce builds that have outgrown the native commerce feature set.
A B2B software company used a service-area collection connected to a case study collection to generate dozens of location and industry specific landing pages from a single template, each one automatically pulling in relevant testimonials and case studies without a designer touching individual pages.
An e-commerce brand running a smaller catalog used Webflow's native commerce features layered on top of a CMS-driven blog, connecting product references inside blog content so that buying guides could automatically link to the exact products being discussed, improving both user experience and internal linking for SEO at the same time.
A multi-location service business built a locations collection with fields for address, service area and local testimonials, generating a consistent, locally optimized page for every city they served, which is one of the more practical applications of dynamic pages in Webflow for local search visibility.
An agency managing several client blogs used a shared component library across collection templates so that updating a call-to-action design across one template instantly updated it across every dynamic page generated from that collection, saving hours of manual editing every time a design update was needed.
At Appsrow, Webflow CMS implementation is not a side service, it is a core part of how we build and scale client websites. Our team has handled CMS architecture for service businesses, SaaS companies and content publishers, which means the collection structures, dynamic page templates and SEO field setups described throughout this guide are not theoretical, they reflect decisions we make on real client projects every week.
Our approach to any new build starts with content modeling before a single design decision is made, because a collection structure that is planned properly from the start scales cleanly into hundreds of pages without rework later. We have handled CMS migrations from WordPress, rebuilt item-heavy collections that were hitting plan limits, and set up automated publishing pipelines that connect Webflow to client content workflows through the API.
Scalability and SEO structure are the two things we get asked about most, and they are connected more than people expect. A well structured Webflow CMS build with proper dynamic SEO fields, conditional visibility and internal linking through reference collections tends to outperform a rushed build with the exact same content, simply because search engines reward consistency and crawlability across a site's full page set, not just a handful of hero pages.
Whether the project is a brand new build, a CMS migration, or scaling an existing Webflow site that has outgrown its original collection structure, our team works through the same disciplined process outlined in this guide, adjusted to the specific content model and business goals of each client.
Webflow CMS has genuinely earned its place as a serious option for content-driven websites, not just a design tool with a CMS feature bolted on for marketing purposes. The platform rewards teams that plan their content model carefully, set up SEO fields at the collection level, and treat dynamic pages as templates that need to handle every possible content variation gracefully.
Whether you are working through your first Webflow CMS tutorial 2026 style build, comparing Webflow CMS vs WordPress for a client decision, or planning a CMS migration from an aging WordPress install, the principles in this Webflow CMS guide apply the same way: structure first, SEO fields from day one, and conditional logic on every dynamic element. Get those three things right, and Webflow CMS will scale with your content rather than against it.
Webflow's AI site builder has become one of the most talked about features in the no code world this year. You type a prompt, describe your business, and within minutes a multi page website appears inside the Webflow Designer. It looks like magic the first time you watch it happen. The question that actually matters for a business owner or a marketing team is quieter and more practical. What does it really build, and where does it stop being useful?
We build Webflow sites for a living, so we have run the AI site builder across a wide range of briefs, from fintech landing pages to SaaS marketing sites. This guide is an honest field report rather than a hype piece. It covers what the tool does well in 2026, where it quietly leaves gaps, and how to use it so the output works for your business instead of against it. If you are still deciding whether the platform suits your project at all, it helps to first understand what Webflow actually is before judging the AI layer sitting on top of it.
The Webflow AI site builder turns a single prompt into a multi page, production ready site.
Webflow frames the feature with a simple promise: start fast, build right. You give it a prompt, and it turns that prompt into a fully customized, production ready website. The phrase that separates it from older AI website tools is production ready. It is not generating a flat mockup or a throwaway template that you abandon later. It builds a real Webflow project that opens directly in the Designer, where you keep full control over every element on the page.
On the product page, Webflow shows three example prompts that reveal the intended audience: a fintech enterprise, an AI startup, and a design agency. These are not hobby blogs or weekend portfolios. The tool is aimed at businesses that need a credible web presence quickly and a team that wants to keep refining it afterward. Webflow points to brands such as Monday.com, the New York Times, TED, and Docusign, which sets the tone for the quality level it is targeting.
This is where the 2026 version genuinely impresses. From a single prompt, here is what lands in your account.
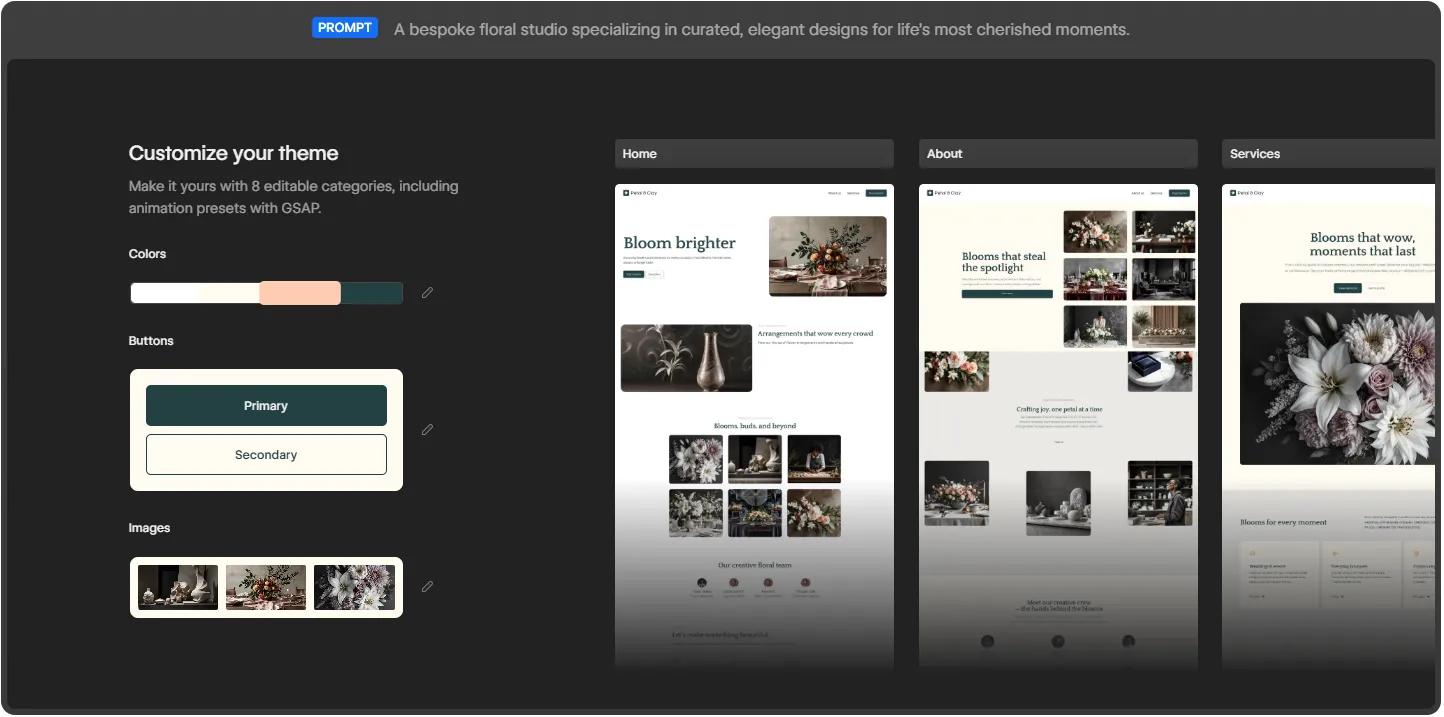
Older AI builders dropped one page on the screen and called it finished. Webflow takes a different route. It launches a website with more than just a layout. You get a functional, multi page site with a foundational design system underneath it. In the examples Webflow demonstrates, a single prompt produces a Home page, an About page, and a Services page, each filled with real sections rather than empty boxes.
Sites created with the AI site builder are built on Webflow Flowkit, Webflow's modular CSS framework. This matters more than it first sounds. Flowkit gives the generated site a structured system of reusable utilities, components, and variables. In plain terms, the colors, spacing, type, and buttons are connected through a shared logic that you can adjust globally. Change a primary color once and it updates everywhere. That is the difference between a site you can grow cleanly and a pile of disconnected styles you later have to untangle by hand.
Once the draft exists, you can make it yours through eight editable categories. These cover colors, buttons in both primary and secondary styles, images, typography, and more, including animation presets powered by GSAP. GSAP is the industry standard animation library, so having presets wired in from the start means your AI generated site can carry motion that feels designed rather than default and flat.
The tool fills the draft with images and copies that match your prompt, so the first version does not look empty. You see a coherent page with a hero, supporting sections, and visuals already in place. This is genuinely useful for getting buy-in fast, because a client or a manager can react to something real on screen instead of imagining it from a description.
Because the site is built in Webflow, it arrives ready to evolve and scale. Everything you would normally reach for is still there: the CMS, hosting, SEO controls, interactions, and the full Designer canvas. The AI does not trap you in a limited sandbox. It hands you a normal Webflow project that simply happened to be assembled quickly. If budget is part of your thinking, it helps to understand Webflow pricing for 2026 before you connect the site to a paid plan.
Webflow AI is not only a one time generator. Inside the editor you can use it to generate new pages and CMS Collection items, optimize with native SEO and AEO features, and even answer your questions while you build. That last point is quietly important in 2026, because answer engine optimization now shapes how people discover sites through AI assistants, and Webflow has been pushing its AEO features hard this year.
Webflow lays the process out in four stages, and in practice it really does follow this shape.
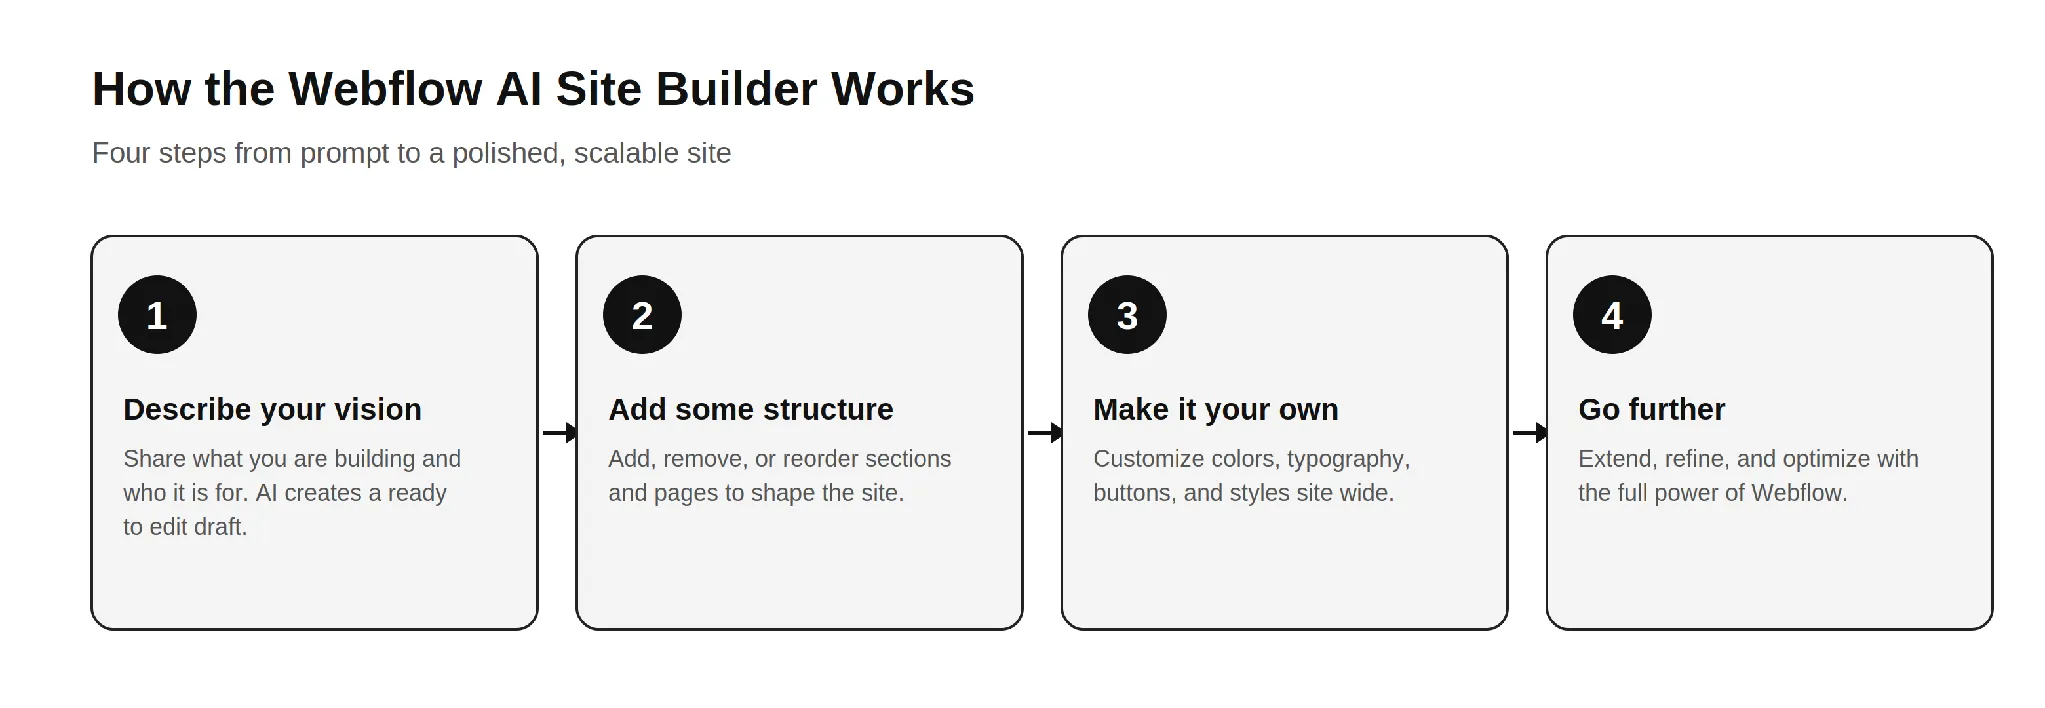
The four step Webflow AI workflow: describe, structure, customize, and refine.
The honest read on this flow is that steps one and two are where the AI saves you real time. Steps three and four are where your skill, or your agency's skill, decides whether the final site is good or merely fine. A founder using the tool recently described it as a great starting point that lets a client see the overall vision much earlier, before refining it into a polished site. That is the right expectation to carry into it.
Based on how it behaves across real projects, the tool fits a few situations very well.
If you are weighing whether to bring this in house or hire help, it is worth reading how a Webflow development company actually scopes these projects, because the AI changes where the effort goes, not whether effort is needed.
Now the part the marketing pages will not spell out. None of these are reasons to avoid the tool. They are the gaps you plan around so the final site holds up.
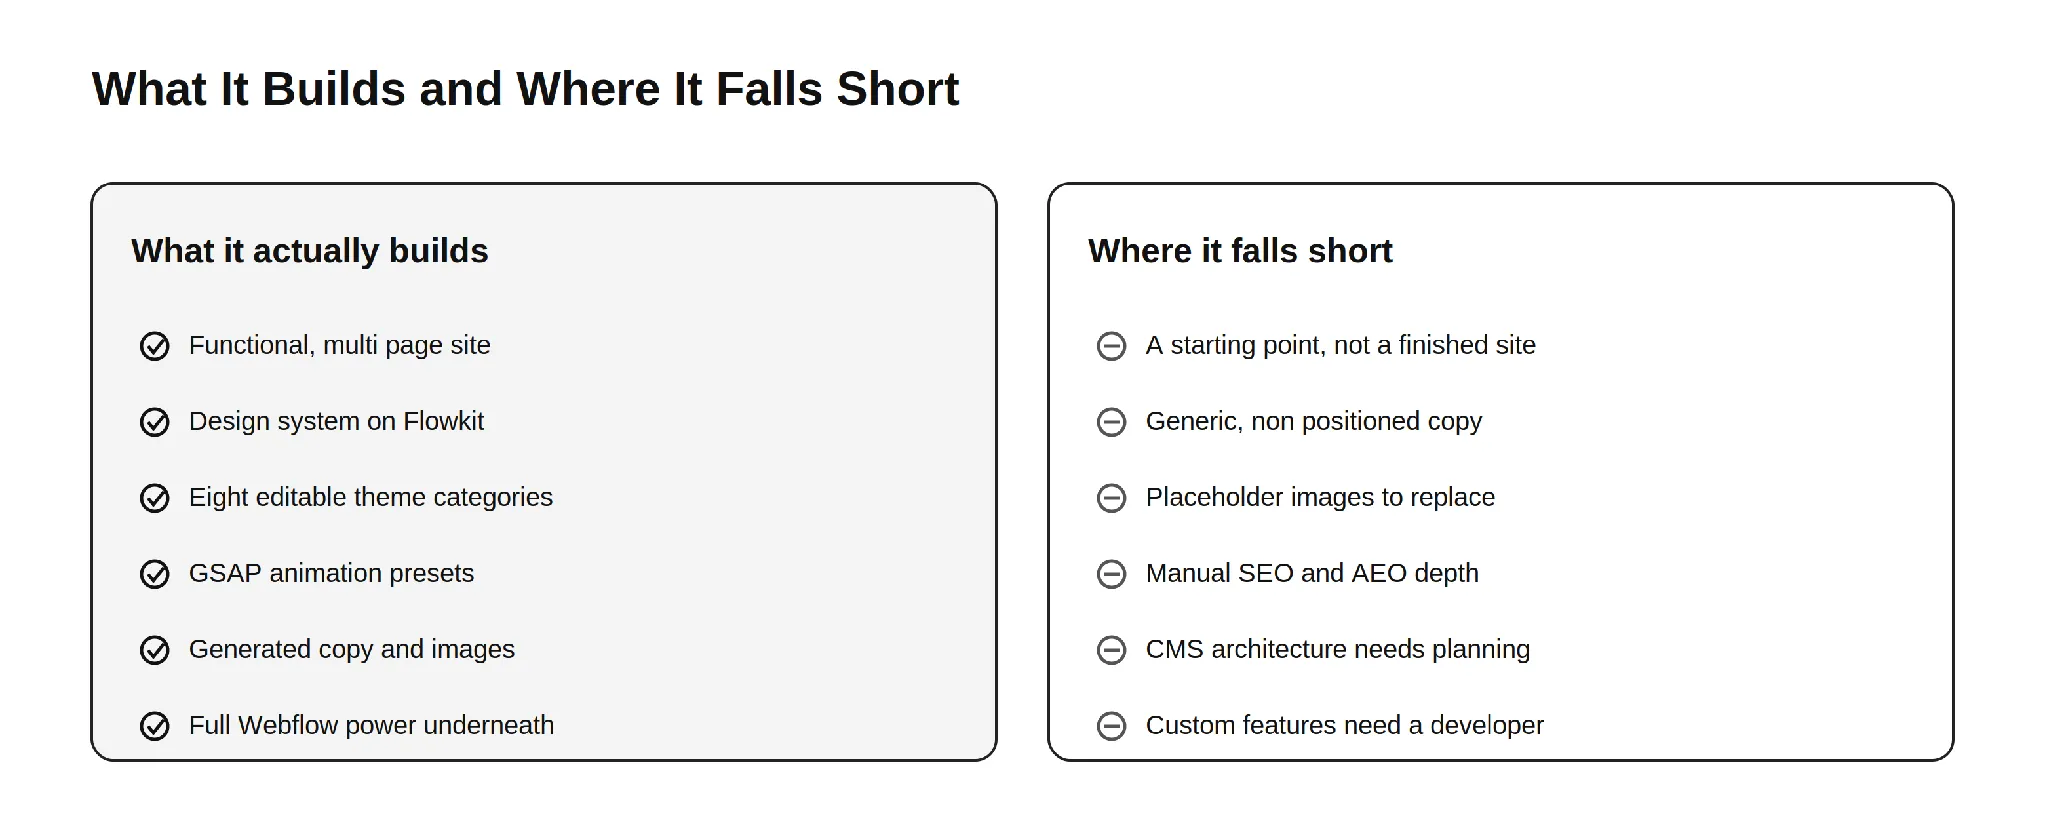
What the Webflow AI site builder delivers out of the box, and what still needs human work.
This is the single most important thing to understand. The AI site builder produces a strong first draft, not a launch ready business site. Webflow itself frames the output as a draft and a foundation. The generated copy reads as competent filler, the images are generic, and the structure is sensible but not strategic. Everything that makes a site convert, the message hierarchy, the proof, the offers, and the calls to action that match your funnel, still has to be designed by a human who understands your business.
AI generated body copy describes a business in the abstract. It does not know your differentiators, your pricing logic, your customer objections, or the exact words your buyers use. For a simple brochure site that may be tolerable for a short while. For a site that has to sell, the copy needs a rewrite grounded in real positioning. This is the same reason a thin template rarely ranks or converts on its own.
The visuals the AI places look fine at a glance, but they are placeholder quality. They are not your product, your team, or your real work. Visitors and search engines both reward authentic imagery, and original photography or properly designed graphics will always outperform generic AI fills. Plan to swap them before launch.
Webflow gives you native SEO and AEO controls, and the AI can assist, but strong organic performance is not automatic. Title tags, meta descriptions, heading structure, internal linking, schema markup, and content that genuinely answers search intent all require deliberate work. The AI hands you a clean technical base. It does not hand you a content strategy. This is where most AI generated sites quietly underperform in search and in AI answer results.
The AI can generate CMS Collection items, but designing a CMS structure that scales, with the right collections, reference fields, and relationships, is an architecture decision. Get it wrong early and you pay for it later in painful migrations and rebuilds. This is one of the clearest places where experience matters more than automation. The same is true when you compare ways to sell online, which is why teams research Webflow Ecommerce versus Shopify before committing a store to either platform.
A site that looks good is not the same as a site that performs. Conversion rate optimization, clear value propositions, friction free forms, trust signals, and tested layouts come from understanding user behavior, not from a prompt. The AI gives you a tidy canvas. Turning that canvas into a site that books demos or drives sales is human work.
Because many sites start from the same Flowkit foundation and similar prompts, AI generated sites can drift toward a recognizable sameness. If your competitors use the same tool with similar instructions, your site risks looking like theirs. Standing out still requires custom design thinking, which is exactly what a strong Webflow development partner brings to the table.
Memberships, gated content, advanced ecommerce logic, custom integrations with your CRM or product, API connections, and bespoke interactions go beyond what the AI assembles. The moment your site needs to do something specific to your business, you are back in developer territory. This is normal and expected. The AI handles the common majority of the build and leaves the valuable, specialized part to people.
The AI site builder lowers the effort to start, but it does not change Webflow's commercial model. To connect a custom domain you still need a paid Site plan, and the cost of running the site depends on the plan you choose. If you want to budget accurately, it helps to understand the reasons behind Webflow hosting costs before you commit.
After running this tool across many briefs, the pattern that produces the best results is consistent. Let the AI do what it is good at, then bring in skill for what it cannot do.
Use the AI to generate the first structural draft and to align stakeholders quickly. Keep the Flowkit foundation, because it is genuinely well built. Then replace the generic copy with positioning that reflects your real value, swap placeholder images for authentic visuals, architect the CMS for how you actually publish, layer in proper SEO and AEO, and design the conversion paths that match your funnel. Finally, add the custom functionality and integrations your business depends on. This is the same division of labor the most effective teams already use, and it is why businesses still seek out top Webflow development companies to take a generated draft the rest of the way.
A few habits make the output noticeably better.
The Webflow AI site builder in 2026 is a genuinely strong tool, and the honest framing is the useful one. It actually builds a functional, multi page website on a real design system, with editable themes, GSAP animation, generated content, and the full power of Webflow underneath. That is a real leap beyond the gimmicky AI builders of a few years ago.
Where it falls short is equally clear. It produces a starting point, not a finished business site. The copy is generic, the images are placeholders, the SEO and AEO depth is manual, the CMS needs real architecture, conversion design is absent, and anything specific to your business still needs a developer. None of that makes the tool weak. It makes it a head start. Use the AI for the sprint at the start, and bring in expertise for the finish. For deeper grounding, our guide to everything you need to know about Webflow and our breakdown of Shopify to Webflow migration both pair well with what the AI gives you out of the box.
Here is something most marketing teams have started to notice: people are not always clicking search results anymore. They are asking ChatGPT, Perplexity, Google AI Overviews, and other AI-powered tools a question and getting a direct answer. No scrolling. No clicking. Just an answer, often with one or two brand citations buried inside it. If your brand is not one of those citations, you are functionally invisible to a growing segment of your audience, regardless of how well you rank on page one of Google.
This is the reality that answer engine optimization (AEO) addresses. And in May 2026, Webflow made it significantly easier to act on by launching AEO agents natively inside its platform. If your site is on Webflow, you now have one of the most powerful AEO toolsets available built directly into the same interface where your site lives. In this guide, we walk through everything you need to know: what Webflow AEO agents actually do, how the closed-loop system works, how to get started, and what best practices will help you earn consistent citations in AI answers.
Answer engine optimization is the practice of making your website content easy for AI systems to find, understand, and cite. Where traditional SEO focuses on ranking on a results page, AEO focuses on being the source that an AI tool references when it constructs a direct answer for a user.
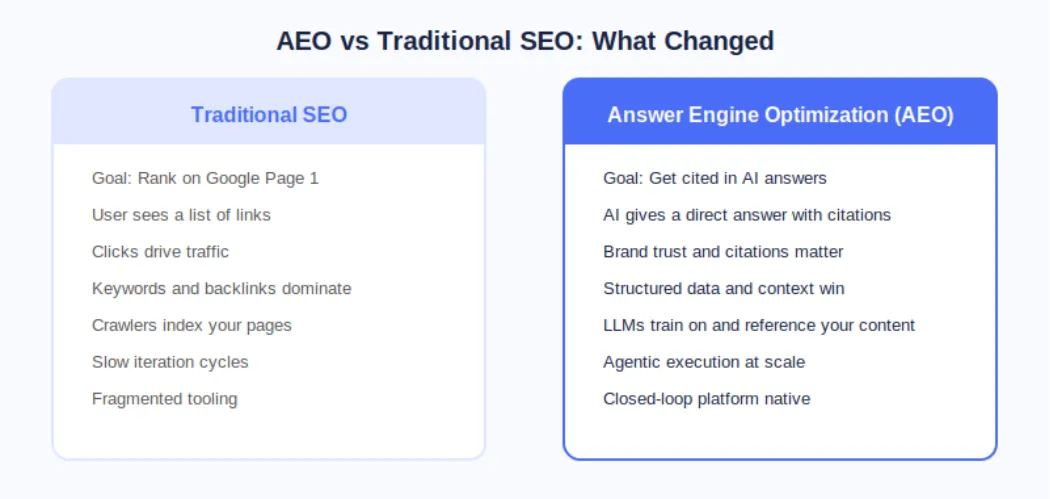
The distinction matters because AI answer engines operate fundamentally differently from search engines. A search engine crawls, indexes, and ranks pages. An AI answer engine does all of that, but it also synthesizes information and presents a curated response. The brands that show up are not necessarily the ones with the most backlinks; they are the ones whose content is structured, authoritative, technically clean, and contextually relevant to the question being asked.
According to Webflow's own research cited at launch, 93% of marketing leaders now consider AEO important for their brand. That number reflects a fundamental shift in how buyers discover and evaluate products and services before ever landing on a company website.
On May 21, 2026, Webflow made AEO agents generally available as part of its new Team and Enterprise Platform plans. This was a meaningful step beyond what most AEO tools offer because Webflow's agents do not just flag problems; they help you fix them at scale inside the same platform where your site is built and published.
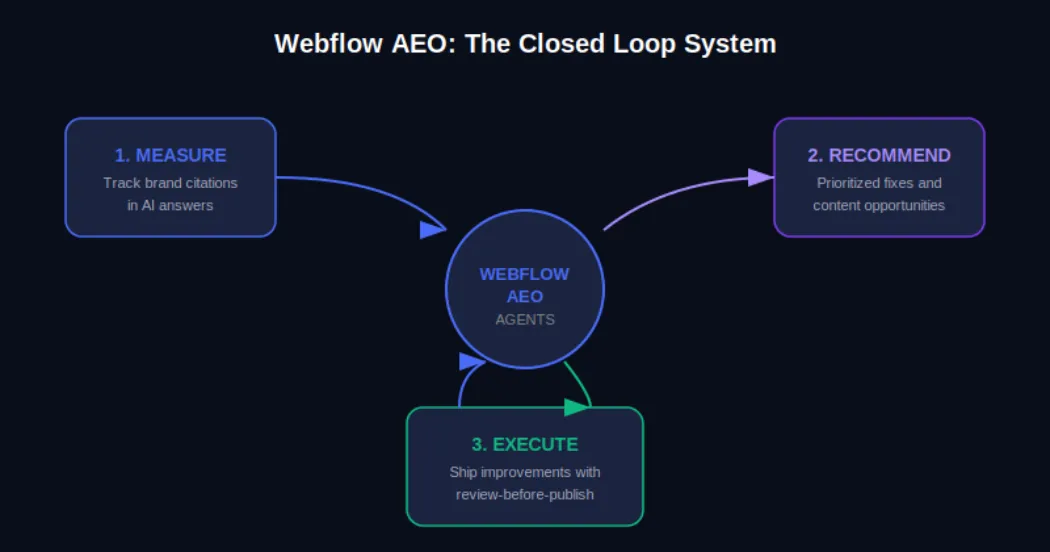
The Webflow AEO system operates around a closed loop with three distinct functions. First, it measures how your brand appears across AI answer engines. Second, it surfaces prioritized recommendations for improvement. Third, it helps your team execute those improvements and publish them directly from within Webflow, with a review step built in so nothing goes live without your approval.
AEO Analytics via Webflow Analyze: Teams can now track how often their brand is cited in AI answer engines, which prompts trigger those citations, and how AI-driven visibility connects to on-site engagement and conversions. No data instrumentation or separate analytics tool is required.
AEO Agents for Technical and Content Recommendations: The agents scan your Webflow site and surface a prioritized list of improvements, including broken links, outdated metadata, missing schema markup, and content gaps tied to the prompts you are actively tracking.
Review-Before-Publish Execution: Your team reviews each recommendation before anything changes on the live site. You can accept, edit, or dismiss suggestions individually or in bulk, and then publish directly from Webflow's centralized dashboard.
The Team plan bundles AEO agents alongside 10 seats, 100 CMS Collections, Localization, page branching, single-page publishing, publishing workflows, and 30TB of bandwidth. The Enterprise plan extends this further for larger organizations needing custom governance and dedicated support.
Webflow's own CPO Rachel Wolan described the launch this way: Webflow allows customers to work inside a system that already knows their brand, their voice, and what they are trying to say. The platform closes the loop between insight and shipped improvement automatically, so teams move from analysis to live changes without switching tools.
Understanding the mechanics of Webflow AEO agents helps you get more out of them from day one. Here is how the system moves from site scan to published improvement.
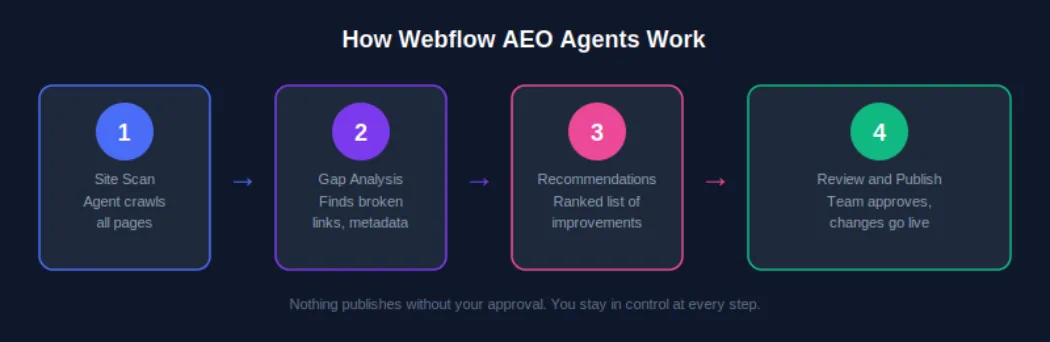
AEO agents require a Team or Enterprise Platform plan. Once you are on the correct plan, navigate to your Workspace settings and confirm that the Workspace AI toggle is enabled. This is the master switch that activates all Webflow AI features, including AEO agents. If you are managing multiple sites under one Workspace, enabling this once covers all sites under that plan.
Once AEO is activated, the agents perform an initial crawl of your site. This is not a surface-level check. The scan evaluates technical elements such as metadata completeness, schema markup presence, internal link health, and page structure, and it also assesses content-level signals like how clearly your pages answer specific question formats that AI systems are trained to respond to.
After the scan, you receive a ranked list of recommendations inside the Webflow dashboard. These are not generic suggestions. Because Webflow already holds your brand context, site structure, and content, the recommendations are specific to your pages and tied to the AI prompts you are tracking. A recommendation might be as straightforward as updating a meta description on a key service page, or as strategic as creating a new FAQ section for a product category that is generating AI-driven queries.
For each recommendation, your team has full control. You can accept it as-is, edit the suggested change before applying it, or dismiss it if it does not align with your brand voice or strategy. This step matters because AEO optimization is not purely mechanical; what reads well for an AI system also needs to read well for a human. Webflow's review step keeps your team in the editorial seat.
Once you have reviewed and approved changes, you can publish them individually or in bulk from the centralized view. For enterprise teams managing hundreds of pages, this bulk publishing capability is one of the most practically valuable aspects of the system. Work that previously required a developer or a week of manual edits can now be reviewed, approved, and live within a single session.
Executing AEO agent recommendations uses AI credits, which are now bundled with every Workspace plan from Core through Enterprise. Teams should monitor credit usage via the new AI usage dashboard, particularly after the credit enforcement window that began June 29, 2026. More details are available on the Webflow AEO overview page at Appsrow.
Measurement is where effective AEO strategy starts, and Webflow Analyze now provides the visibility data your team needs to understand where you stand in AI-generated search before you start optimizing.
From the Analyze dashboard, you can see which AI answer engines are sending traffic to your site, which prompts are triggering your brand citations, how citation frequency is changing over time, and how AI-driven traffic correlates with on-site engagement metrics like time on page and conversion events.
The practical value of this data is that it transforms AEO from a guessing game into an iterative improvement cycle. You can see what is working, identify gaps, feed those gaps back to your AEO agents as new prompt targets, and measure whether your changes produce the citation uplift you expected.
Webflow AEO agents handle the technical layer. The content layer is equally important, and it requires a deliberate writing strategy. AI systems do not just favor authoritative content; they favor content that is structured in a way that makes extraction and summarization easy.
Direct answer paragraphs: Lead each section with a clear, self-contained answer to the question the heading implies. If someone asks 'What is Webflow AEO?', your first paragraph should answer that in two to three sentences before elaborating.
FAQ sections: Structured question-and-answer formatting maps directly onto how AI systems construct responses. Every key landing page and blog post should have a FAQ section covering the most common queries in your topic area.
Listicles and how-to steps: Numbered steps and bulleted lists are among the most commonly extracted content formats in AI-generated answers. When describing processes, always default to structured list formats.
Expert opinion and proprietary data: AI systems increasingly favor sources that offer unique insight. Original research, survey data, case studies, and expert opinions are more likely to be cited than repackaged information that already exists at scale elsewhere.
Structured schema markup: FAQ schema, HowTo schema, Article schema, and Organization schema all help AI systems understand the structure and authority of your content. Webflow AEO agents will flag missing schema and suggest implementations, but having a proactive schema strategy speeds up your AEO results significantly.
For a deeper look at content strategy for AEO, see the Appsrow AEO content guide which covers format-specific tactics for B2B and B2C brands.
Content strategy matters, but AI systems will not reliably cite a site with significant technical issues. Webflow AEO agents surface technical problems as part of their initial scan, but understanding why these issues matter will help your team prioritize fixes intelligently.
Webflow's built-in AI SEO tools introduced at Webflow Conf 2025 already handle auto-generation of alt text, meta descriptions, and schema markup for many content types. Webflow AEO agents extend this by evaluating the output of those tools in the context of your current AEO performance and recommending targeted corrections. For a complete technical AEO checklist, explore the Appsrow technical AEO resources.
One of the less discussed but increasingly important aspects of AEO is entity recognition. AI systems do not just parse individual pages; they develop an understanding of what a brand is, what it does, who it serves, and what it is known for. The more consistently and clearly this information is represented across your site and across the web, the more likely AI systems are to treat your brand as a credible citation source.
Consistent brand descriptions: Every page that references your company should describe it in consistent terms. Your tagline, your core service description, and your value proposition should not vary significantly across your homepage, about page, and blog author bios.
Wikipedia and knowledge graph presence: For established brands, a Wikipedia page and Google Knowledge Graph listing are among the strongest authority signals for AI citation systems. If your brand does not yet have these, building toward them through press coverage and third-party mentions is a long-term AEO investment worth making.
Consistent NAP data: For local or regional businesses, Name, Address, and Phone consistency across directories, your Webflow site, and third-party citations builds the kind of entity coherence that AI systems use to verify brand legitimacy.
Author entity markup: If your team publishes content under named authors, adding Person schema and linking to author profiles with consistent credentials strengthens the E-E-A-T signals that AI systems use to evaluate content trustworthiness.
These brand signals take time to build, but the Webflow AEO agent recommendations will increasingly point you in this direction as your technical foundation strengthens. Track progress through the AEO analytics dashboard and measure citation growth month over month.
AEO agents are available on both the new Team and Enterprise Platform plans that Webflow launched in May 2026. Understanding what is included in each tier helps you plan the right investment for your team's scale.
The Team plan is Webflow's new mid-market offering designed for fast-growing teams that have outgrown self-serve plans but are not yet ready for a full Enterprise commitment. It is annual billing only and includes: AEO agents and AEO analytics, 10 seats, 100 CMS Collections, Localization, page branching, single-page publishing, publishing workflows, site activity log, custom SSL certificates, security headers, and 30TB of bandwidth. For teams managing a primary marketing site with a content team of five to ten contributors, the Team plan gives access to the full AEO agent system without requiring Enterprise-level negotiations.
Enterprise adds competitive AEO benchmarking, advanced governance controls, custom publishing workflows, dedicated support, and the ability to manage AEO across multiple sites at scale. For organizations with dozens or hundreds of pages across multiple properties, Enterprise is the tier where the closed-loop AEO system delivers its full value. Enterprise customers were also the first to access AEO in the initial rollout, meaning the system has been refined based on real-world usage at scale before broader availability.
To understand which plan makes sense for your team and how to structure your AEO deployment, the Appsrow Webflow consulting team offers a free AEO readiness assessment for brands considering the upgrade.
Do not try to optimize your entire site at once. Identify the five to ten pages that address the questions your ideal customers are most likely to ask AI tools, typically your homepage, key service or product pages, and your most trafficked blog posts. Run AEO agent recommendations on those first, implement the changes, and measure the citation impact before expanding to the full site.
Webflow AEO analytics tracks which prompts trigger your brand citations. Make sure you are actively tracking the prompts that matter most to your business, not just broad category keywords. For a B2B software company, the difference between tracking 'project management software' and 'best project management software for remote engineering teams' is the difference between vanity metrics and pipeline-relevant visibility.
AEO is not a one-time setup. AI systems update their training data and citation algorithms regularly. Plan a monthly review of your AEO analytics data, run a fresh agent scan, and process new recommendations. Teams that build this into their regular content operations cadence see compounding citation growth over time rather than a one-time spike followed by stagnation.
Every new piece of content you publish should be evaluated through an AEO lens before it goes live. Webflow AEO agents will catch technical issues after publication, but building AEO-friendly structure, FAQ sections, and schema markup into your content creation workflow reduces the remediation work significantly. For practical templates and workflows, see the Appsrow AEO content playbook.
Enterprise customers have access to competitive AEO benchmarking inside Webflow Analyze. Use this to identify specific prompts where competitors are earning citations that you are not. These gaps represent the highest-value content and technical optimization opportunities because they confirm there is an AI-generated audience for that topic and that your competitors are already capturing it.
Several standalone AEO tools have emerged alongside the shift toward AI-mediated search. Most operate as separate analytics dashboards that identify citation gaps and recommend content changes. What makes Webflow AEO different is the native closed loop.
Standalone tools typically require you to export their recommendations, translate them into actionable tasks, hand them off to a developer or content editor, wait for changes to be made in your CMS, and then re-import analytics to measure the result. Each of those handoffs is a friction point where execution slows down or breaks entirely.
Because Webflow AEO operates inside the platform that already holds your site, content, and brand context, the step from recommendation to published change is compressed into a single review-and-publish action. For teams that are already using Webflow, this is a structurally meaningful advantage over any external tool that requires platform switching.
Adobe LLM Optimizer, announced at Adobe Summit 2026, offers a comparable agentic approach for Adobe Experience Manager customers. For brands not on Webflow, that may be a relevant alternative. For Webflow users, the native integration makes the comparison straightforward. Explore more at appsrow.com/blog/webflow-aeo.
The May 2026 launch is a foundation, not a ceiling. Based on Webflow's stated platform roadmap and the direction of the AEO market, several developments are worth watching.
Stay current on Webflow AEO developments by following the Appsrow Webflow and AEO blog where we publish regular updates on Webflow platform changes and AEO strategy.
AI-generated answers are already shaping how buyers discover, evaluate, and choose brands. The question is not whether AEO matters for your business; that was settled when 93% of marketing leaders told Webflow it does. The question is whether your team has the tools and the execution speed to act on it.
Webflow's May 2026 launch of native AEO agents removes the most common obstacle: the gap between knowing what to fix and being able to fix it at scale. For Webflow users on Team or Enterprise plans, the closed-loop system is available now. The brands that start building their AEO presence today are the ones that will dominate AI-generated citations when those citations become the primary discovery channel for their category.
If you are ready to start showing up in AI answers, the first step is understanding where you stand today. The Appsrow AEO readiness guide gives you a clear picture of your current citation presence, your technical gaps, and the highest-impact actions to take with Webflow AEO agents.
There is a moment every marketer remembers: the first time they asked ChatGPT for a product recommendation and realised, with a jolt, that their brand was nowhere in the answer. No link. No mention. Just someone else getting the citation. If that moment has not happened to you yet, it will. Search is no longer just Google. It is a constellation of AI engines, answer systems, and generative interfaces that are collectively absorbing more than 65% of queries without ever sending a user to a website (Similarweb, 2025). For Webflow site owners, this is both a warning and an opportunity.
The opportunity is real. Webflow's own SEO team publicly reported that 8% of all new signups now come from AI search as of June 2025, up from just 2% in October 2024. A fourfold increase in eight months is not a rounding error. It is a channel shift, and the teams who respond earliest will capture territory that takes years for late movers to reclaim.
This guide is your complete roadmap for Generative Engine Optimization on Webflow. We cover the strategy, the technical architecture, the content frameworks, and the measurement systems. We also share how Appsrow, a Webflow Premium Partner with 300+ projects delivered, approaches GEO implementation for clients from early-stage SaaS startups to scaling enterprises. By the end, you will have a clear plan, not just a reading list.
Generative Engine Optimization (GEO) is the discipline of structuring your website, content, and digital presence so that AI systems, including ChatGPT, Perplexity, Google AI Overviews, Claude, and Microsoft Copilot, understand, trust, and cite your brand when answering relevant user queries.
Traditional SEO is fundamentally about signals to a ranking algorithm: keywords, backlinks, crawlability, page speed. GEO adds a different layer. AI systems do not rank pages in a list; they synthesise answers from multiple sources and credit the ones they trust most. Getting cited requires something closer to authority-building and source hygiene than classic on-page optimisation.
Webflow GEO specifically refers to the implementation of these principles inside Webflow's visual development environment, using its native features (semantic HTML output, CMS, custom code embed, schema markup tooling) in combination with content strategy and off-site authority signals.
The numbers from 2024 to 2026 tell a clear story. Here are the figures that matter most:
Perhaps the most telling data point comes from research by GEO firm Brandlight: the overlap between top Google links and AI-cited sources has dropped from 70% to below 20%. Ranking on Google no longer guarantees a seat at the AI table. These are two separate games now, and you need to play both.
Most platforms require you to fight their technical defaults before you can optimise for AI. Webflow does the opposite. Its architecture produces clean, semantic HTML by default, which is exactly what AI retrieval systems need to parse and trust your content. Here is why Webflow gives you a structural head start.
AI engines, like search engine crawlers, rely on HTML semantics to understand the hierarchy and meaning of your content. When you use headings correctly in Webflow (H1 for the page title, H2 for major sections, H3 for subsections), the platform writes valid HTML that LLMs can parse into a coherent knowledge structure. Unlike WordPress with its plugin conflicts, or page builders that wrap everything in nested divs, Webflow's output is honest markup.
This matters because LLMs are statistically 28 to 40% more likely to cite content with clear hierarchical structure (HubSpot GEO Statistics, 2026). A Webflow site built with discipline is already ahead of the majority of the web on this dimension.
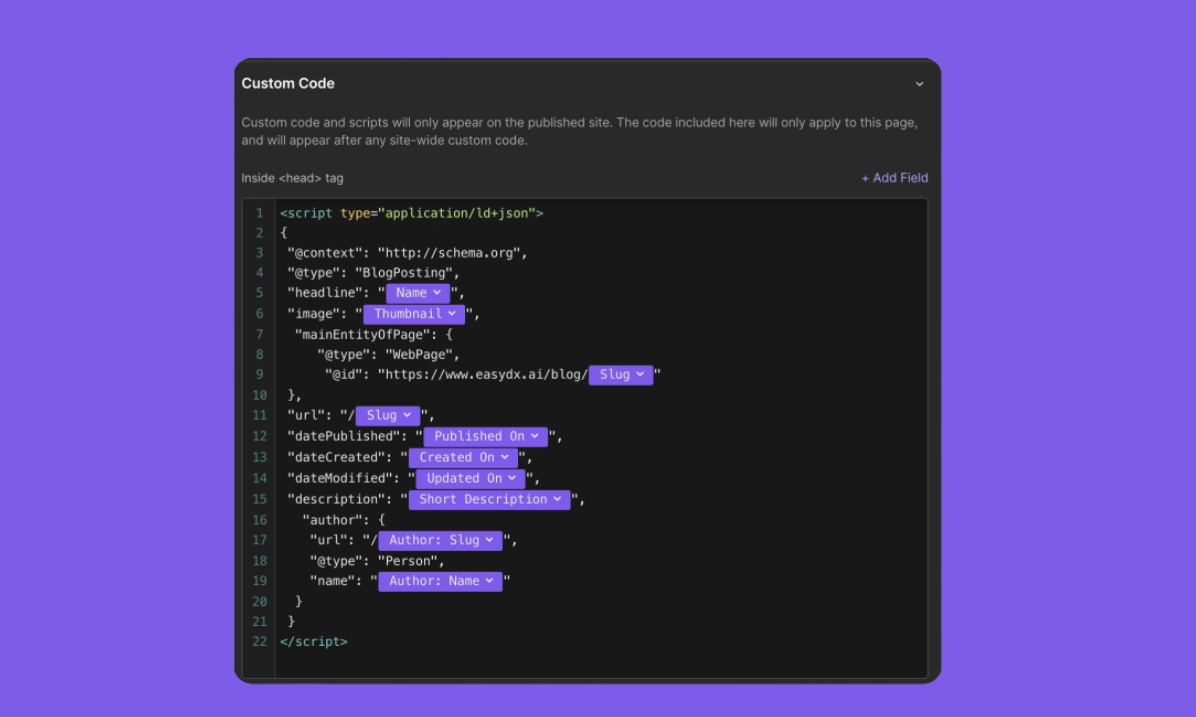
In April 2026, Webflow launched a native schema markup tool with AI-generation capability, directly inside Page Settings. You can now generate contextually relevant JSON-LD structured data for any page with a single click, then refine it and bind it to CMS fields for dynamic collection pages. This makes schema implementation at scale dramatically more accessible than custom code-only approaches.
Webflow also launched its closed-loop AEO system in April 2026, which tracks brand citations across answer engines, surfaces prioritised optimisation recommendations, and lets teams ship those improvements directly in the platform. When a tool of this scale adds these capabilities, it signals that GEO has moved from experimental to foundational.
Webflow hosts on a global CDN with automatic asset compression, clean CSS output, and lazy loading. These are not cosmetic benefits. AI platforms prefer content that is 25.7% fresher than content cited in traditional search (Dataslayer, 2025), and they tend to favour fast, consistently available pages. Core Web Vitals are a proxy for trustworthiness, and Webflow sites routinely score in the top quartile out of the box.
For a deeper technical breakdown of how Webflow's architecture supports AI visibility, the Webflow University schema markup guide is an excellent reference alongside this article.
GEO is not a single tactic. It is a system. Each pillar below addresses a different layer of how AI systems discover, evaluate, and cite your site. Miss one, and the whole structure weakens. Master all seven, and you build a compounding advantage that most competitors will not replicate quickly.
The first and most important pillar is your content structure. AI engines scan for clarity: a clear question, a direct answer, supporting evidence, and a logical hierarchy. If your content is written the way a good consultant answers a question, you are most of the way there.
Specifically, this means:
One pattern that consistently outperforms is the question-and-answer paragraph structure. Write a bold question as a short subheading, then answer it in two to three sentences. Repeat. This is not only excellent for human readers; it maps directly to how retrieval-augmented generation (RAG) systems chunk and index your content.
Schema markup is the technical vocabulary AI systems use to extract machine-readable facts from your pages. A study cited by Digidop shows GPT-4's content extraction accuracy jumps from 16% to 54% when structured data is present. That is a staggering delta, and it represents one of the highest-ROI technical investments available to a Webflow site owner.
The schema types with the greatest impact on GEO are:
In Webflow, static schema goes in the custom code section of Page Settings. Dynamic schema for CMS collection pages requires binding schema properties to CMS fields, which Finsweet's Webflow SEO guide covers in detail. Always validate your implementation with Google's Rich Results Test before publishing.
Experience, Expertise, Authoritativeness, and Trustworthiness (E-E-A-T) is Google's framework, but it maps directly to what AI engines look for in a citable source. AI systems are trained to distinguish authoritative voices from generic content farms, and the signals are remarkably similar to what a careful human editor would look for.
Building E-E-A-T on a Webflow site means:
FAQs deserve their own pillar because they are disproportionately powerful in GEO. Generative engines are fundamentally question-answering machines. When your content is structured as well-formed questions and concise answers, and those questions match the phrasing real users type, the alignment between user intent and your content is nearly perfect.
Reddit saw a 450% increase in AI citations between March and June 2025, according to HubSpot's GEO statistics. The reason is structural: Reddit threads are already formatted as questions and answers. You can replicate this format intentionally in a far more authoritative context.
Best practices for FAQ architecture in Webflow GEO:
In 2024, a community standard emerged for helping AI systems understand which pages on your site are most relevant for training and retrieval: the llms.txt file. Placed at the root of your domain (e.g., yourdomain.com/llms.txt), it provides a structured index of your most important pages, written in plain language, along with brief descriptions of what each page covers.
Think of it as a sitemap, but written for language models rather than crawlers. The format is simple: a brief introduction to your brand, followed by a list of URLs and one-sentence descriptions of the content at each URL. It is optional, but as AI systems increasingly support it, early adoption signals that your site is prepared for machine understanding.
In Webflow, you can host an llms.txt file by creating a static page at /llms.txt using a Page Embed or by uploading it as an asset. For implementation guidance, AppsRow's AEO services page includes llms.txt setup as a core part of their technical GEO implementation framework.
Performance is trust. AI systems and their users share the same expectation: a page that loads slowly, shifts during load, or responds sluggishly to interaction signals unreliability. Core Web Vitals are measurable proxies for that trustworthiness, and they matter for GEO just as they do for traditional SEO.
For Webflow sites, the key technical GEO performance tasks are:
A technically clean Webflow build will outperform a WordPress site burdened with plugin overhead on most of these metrics without requiring ongoing intervention. This is one reason Webflow clients tend to see GEO gains faster after initial optimisation.
AI systems do not only read your website. They synthesise information from across the web to form a picture of who you are and whether you can be trusted. Your off-site presence is part of your GEO stack.
The channels that most reliably feed AI knowledge graphs include:
AppsRow is a Webflow Premium Partner and Webflow Global Leader based in Ahmedabad, India, with 8 years of digital expertise and more than 300 projects delivered across SaaS, AI, healthcare, manufacturing, and e-commerce. Their clients include early-stage funded startups and scaling enterprises across the US, UK, and Europe. The agency holds a 4.8-star client rating.
What distinguishes AppsRow's approach to GEO is that it is not theoretical. As a full-service team that combines design, development, and marketing under one roof, they build the technical foundations that AI discovery depends on from the ground up. GEO is not a retrofit; it is part of the architecture from day one.
1. AI-Ready Technical Foundation
Every AppsRow Webflow build includes clean semantic HTML structure, proper heading hierarchy, and performance optimisation as baseline deliverables. Schema markup implementation covering Organization, FAQPage, Article, and Service types is standard. They also implement llms.txt during launch, ensuring the site is immediately navigable by AI retrieval systems.
2. Answer-First Content Architecture
AppsRow works with clients to restructure existing content and build new content using answer-first frameworks. This includes rewriting key service pages as question-and-answer formats, building comprehensive FAQ sections with proper FAQPage schema, and mapping content to the natural language queries their target audience asks AI systems.
3. E-E-A-T Authority Signals
The agency creates and optimises author pages for every content contributor, ensures NAP consistency across all directory listings, and implements the Organisation and Person schema types to build a coherent entity graph. For clients seeking deeper authority, AppsRow coordinates guest publishing and directory presence as part of their retainer services.
4. Webflow AEO Integration
AppsRow was among the first agencies to implement Webflow's native AEO system, launched in April 2026. They use it to monitor brand citation rates across ChatGPT, Perplexity, and Google AI Overviews, surface prioritised improvement recommendations, and track AI referral traffic through Google Analytics 4. This closes the measurement loop that most GEO implementations lack.
5. Ongoing Optimisation and Reporting
GEO is not a one-time project. AI models update their retrieval patterns, new engines emerge, and content freshness signals evolve. AppsRow offers retainer support that includes quarterly content audits, schema validation, Core Web Vitals monitoring, and AI citation tracking. For clients who want to go deeper, explore Appsrow's complete Webflow development services and their dedicated AEO and GEO optimisation offering.
'Our perspective on AEO is not theoretical. We build the technical foundations that AI discovery depends on: answer-first content architecture, structured data and schema implementation, llms.txt setup, clean and fast Webflow builds, and the kind of consistent entity and authority signals that help brands get cited.' That is how AppsRow describes their approach on their website, and it matches what their client outcomes consistently reflect.
Traditional SEO has Google Search Console. GEO does not yet have an equivalent single-pane dashboard, but the measurement landscape is maturing quickly. Here is how to track what matters.
Set up a custom channel group in GA4 to capture traffic from AI sources. The referral domains to track include: chat.openai.com, perplexity.ai, gemini.google.com, claude.ai, bing.com (which includes Copilot traffic), and you.com. Create a segment for these sources and monitor monthly sessions, conversion rate, and revenue contribution.
AI-sourced traffic currently converts at approximately 1.2 times the rate of organic search (WebFX, 2026). Users arrive with more context, more intent, and further through the decision process. Even a small volume of AI referral visits can have outsized revenue impact.
Once a month, test 10 to 15 queries that your ideal customer would realistically ask ChatGPT, Perplexity, and Google AI Overviews. Queries like 'best Webflow agencies for SaaS', 'how to optimise a Webflow site for AI search', or 'which agency should I use for Webflow AEO'. Record whether your brand appears, in what context, and with what framing. This qualitative audit complements the quantitative referral traffic data.
Use Google's Rich Results Test and Schema.org validator monthly to confirm your structured data is parsing correctly. A schema error can silently kill your AI citation potential without showing up in traffic reports until it is too late.
AI platforms prefer content that is demonstrably up to date. Set a quarterly calendar reminder to review your most important pages: update statistics to current figures, add new case studies, and refresh FAQ answers to reflect current best practices. Every update is a signal of active maintenance.
Webflow makes it easy to create stunning visual designs. It also makes it easy to use text elements styled to look like headings without actually being heading tags. If your H1 is a styled div and your visual hierarchy has nothing to do with your HTML hierarchy, AI engines see noise, not structure. Fix: audit your HTML output in browser DevTools and ensure your heading tags match your intended content hierarchy.
Schema that is added once and never validated becomes a liability. Webflow updates, CMS changes, and new page types can all break structured data without obvious visible symptoms. Fix: add schema validation to your quarterly content audit process.
GEO rewards content that answers questions the way a knowledgeable human would in conversation. Keyword-stuffed content that reads as if it was written for a 2015 search algorithm will not be cited by AI systems that have access to the entire web. Fix: rewrite your top 10 pages using the answer-first framework described in Pillar 1.
A Webflow site with perfect on-page GEO but no consistent off-site presence is a one-legged stool. AI systems triangulate authority across multiple sources. If your LinkedIn, Clutch profile, and Google Business Profile all say something different about your company, the AI cannot build a reliable entity entry. Fix: audit your brand presence across all major platforms and align your name, description, and category data.
Most teams discover their AI referral traffic is significant only after they have been ignoring it for six months. By that point, they have no baseline to measure improvement against. Fix: set up your GA4 AI channel group today, even before you begin any GEO optimisation. Data from the starting state is invaluable for demonstrating ROI later.
The search landscape of 2026 is not the landscape of 2023. The brands that appear in AI answers were not chosen randomly. They built authority, structured their content for machines as well as humans, implemented schema markup before it was fashionable, and published original research that gave AI systems something genuinely worth citing.
Webflow is an exceptional platform for this transition. Its clean output, native schema tools, performance infrastructure, and new AEO system give you a technical foundation that most platforms cannot match without significant custom engineering. The platform advantage is real. But it is only an advantage if you act on it.
The seven pillars covered in this guide, semantic content architecture, schema markup, E-E-A-T signals, FAQ architecture, llms.txt, Core Web Vitals, and multi-platform authority, are not a checklist to complete once. They are an ongoing practice. The teams that treat GEO as a compounding long-term investment will look back in two years and see a moat that took half a decade for competitors to cross.
If you are ready to implement Webflow GEO with expert support, Appsrow has delivered GEO-ready Webflow builds for 300+ clients across SaaS, AI, healthcare, and e-commerce. Their full-service team covers design, development, content architecture, and ongoing optimisation. Explore their Webflow AEO services or read their complete AEO guide to see the full scope of what is possible.
A few years ago, ranking on page one of Google was the whole game. Today there is a quieter battle happening one layer up. When someone asks ChatGPT how to choose a VoIP provider, or asks Perplexity which Webflow agency handles enterprise builds, an answer appears in seconds. That answer was assembled from a handful of sources the model decided to trust. The question that should keep every marketing team awake is simple: was your site one of them?
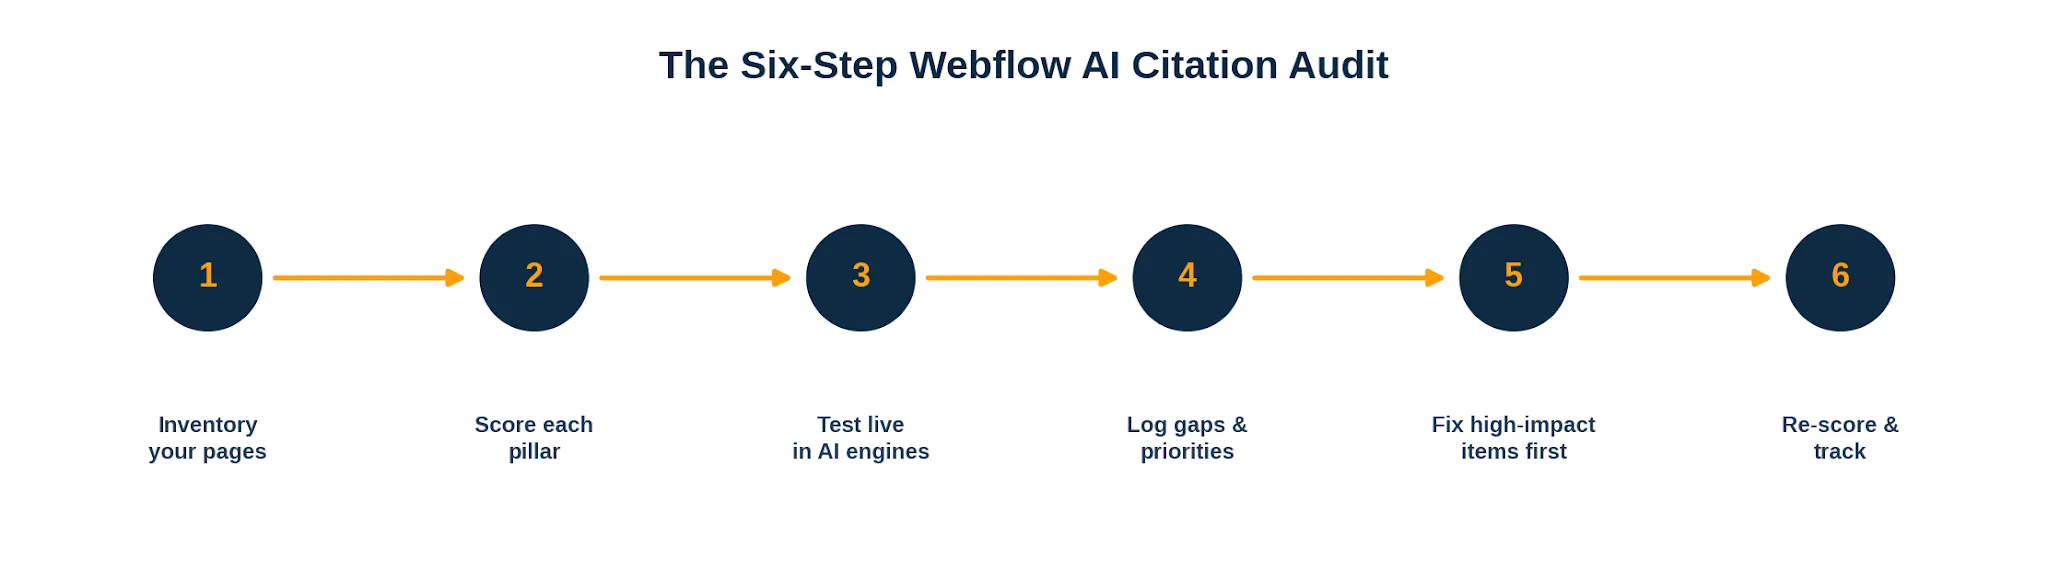
We build and optimize Webflow sites for a living, and over the last year the single most common request we hear has shifted. It used to be "help us rank." Now it is "help us get cited." Those are related goals, but they are not the same goal, and the audit you run for one is not the audit you run for the other. This guide walks through exactly how we audit a Webflow site for AI-citation readiness, the checklist we work through page by page, and the 100-point scoring system we use to turn a vague feeling of "are we visible in AI" into a number you can act on and track over time.
Nothing here requires a developer to sit beside you. If you can edit pages in the Webflow Designer and read your own site critically, you can run this audit on a small site in an afternoon. Larger sites take longer, but the framework stays the same.
AI-citation readiness is the degree to which large language models and answer engines can find your content, understand it, trust it, and quote it as a source. It sits next to traditional SEO but pulls in a few extra concerns. A page can rank perfectly well in classic search yet never get pulled into an AI answer, because the model could not extract a clean, self-contained claim from it, or could not verify who wrote it, or could not parse the page at all.
Answer engines such as ChatGPT Search, Perplexity, Google AI Overviews, and Gemini do not read pages the way a human visitor does. They favor content that states a claim plainly, supports it with evidence, and is wrapped in signals that vouch for its credibility. Readiness, then, is less about keyword density and more about clarity, structure, and trust. The audit below measures all three.
It helps to separate two ideas. Visibility is whether an engine can technically access and read your page. Citability is whether, having read it, the engine considers your page worth quoting over the dozens of alternatives it also read. A complete audit grades both, because a flawless trust profile means nothing if a crawler cannot reach the page, and perfect crawlability means nothing if the content is too vague to lift.
Webflow gives you an unusual amount of control over the exact HTML that ships to a crawler, which is a genuine advantage for AI citation. You can set clean semantic headings, add custom meta and schema in page settings, control your sitemap, and publish a tidy URL structure without fighting a plugin ecosystem. Teams that use Webflow well tend to produce lean, fast, well-structured pages, which is precisely what answer engines reward.
The flip side is that the same flexibility lets problems hide in plain sight. Rich Webflow interactions can bury text inside elements that render awkwardly for extraction. Designers sometimes style a visual heading with a plain div instead of a real heading tag, so the document outline a model reads does not match what a human sees. CMS collection pages can ship without per-item schema. None of this is unique to Webflow, but it surfaces in a recognisable pattern, which is why a generic checklist tends to miss it. If you would rather hand the fixes to a specialist team, our Webflow development services cover the technical work this audit uncovers.
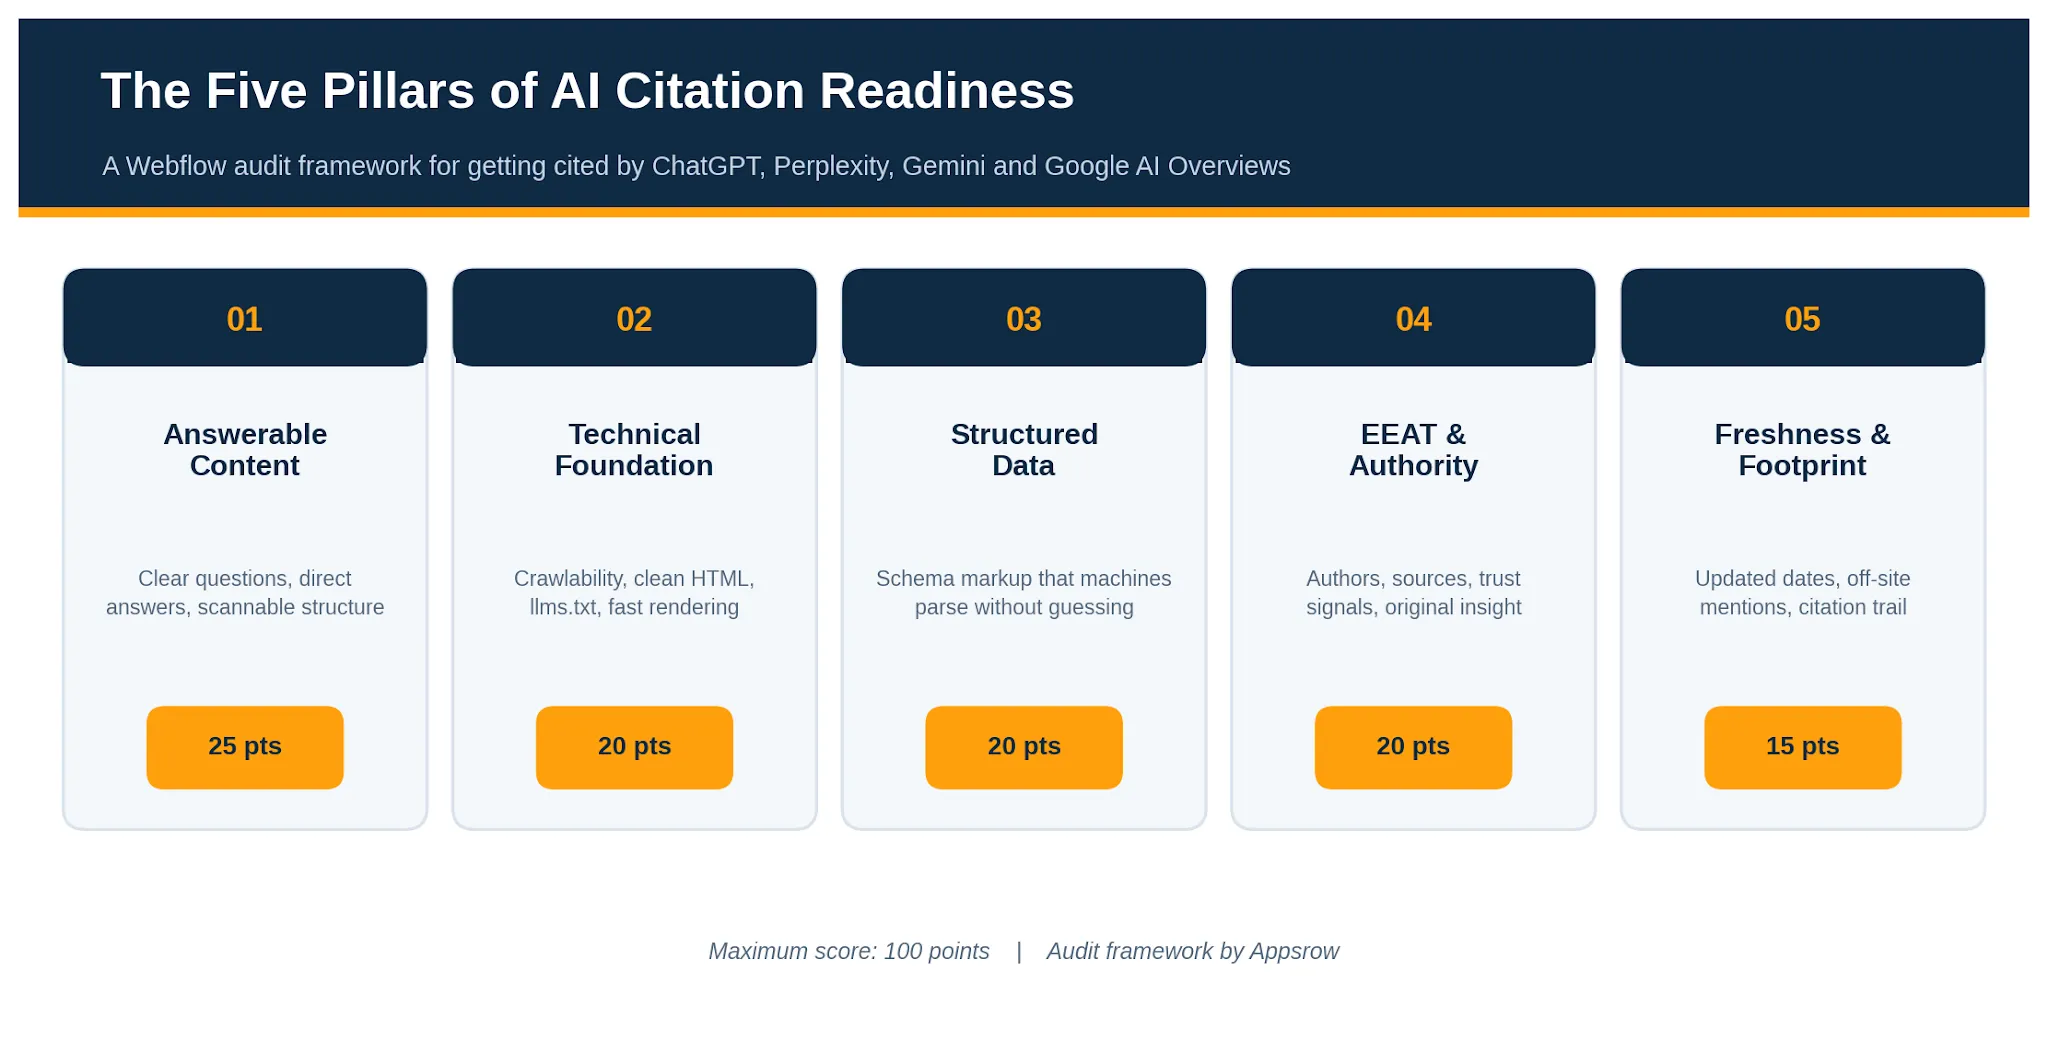
We grade every page, and the site as a whole, across five pillars. Each pillar carries a fixed weight, and the weights reflect how much each factor moves the needle on getting cited rather than merely indexed. The result is a single score out of 100 that tells you where you stand and, just as usefully, where to spend your next hour of effort.
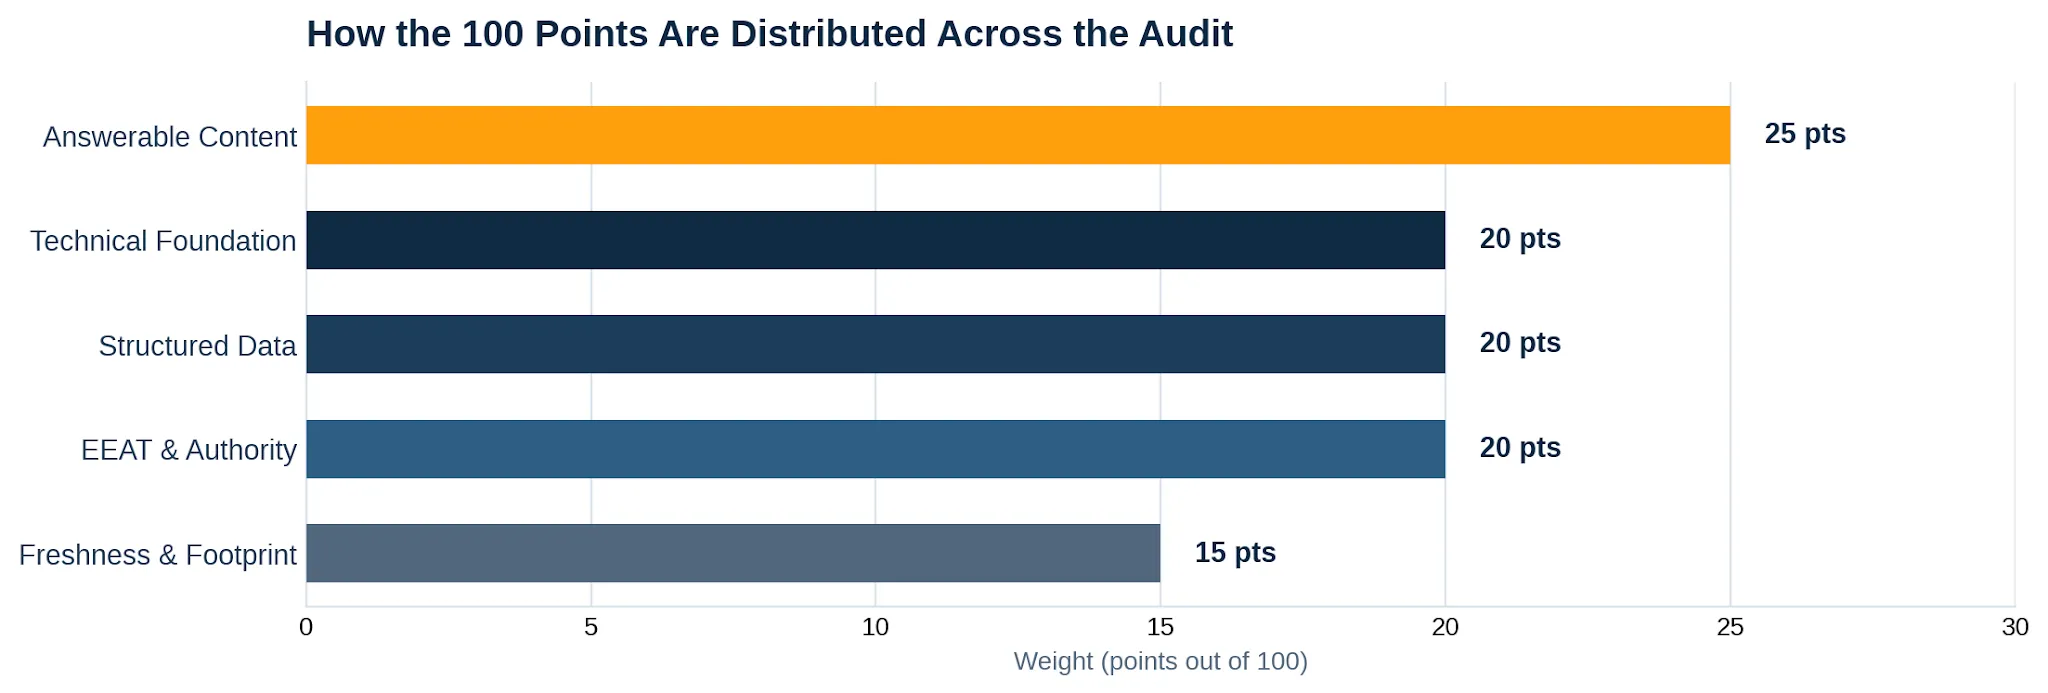
This is the heaviest pillar because it is the one most teams get wrong. Answer engines lift self-contained statements. If your page makes a reader assemble the answer from three scattered paragraphs, a model will usually skip it in favor of a competitor who said the same thing in one clean sentence. The goal is to write so that any single passage, read in isolation, still makes sense and still answers a real question.
Practically, that means leading with the answer and then supporting it, rather than building up to it. It means phrasing subheadings as the questions people actually ask. It means short, declarative claims with concrete numbers, names, and dates that a model can quote without ambiguity. Walls of qualifier-heavy prose are hard to extract, so trim them.
Work through this scored checklist for your most important pages:
If a crawler cannot reach or render your content, nothing else matters. This pillar checks that your Webflow site is open, fast, and legible to the bots that feed answer engines. Most of these checks take minutes, and most failures are quick fixes once you find them.
Start with access. Confirm your robots settings are not accidentally blocking AI crawlers, that your sitemap is published and current, and that important pages return a clean status without redirect chains. Then check legibility: real heading tags in the right order, descriptive alt text, and text that lives in the HTML rather than locked inside an image or a script-dependent interaction.
A newer signal worth adding is an llms.txt file, a plain-text map that points models to your most important content. It is easy to publish on Webflow and we treat it as a low-effort, high-clarity win. For the broader picture of how these technical signals fit together, our guide to answer engine optimization walks through the full stack.
Schema markup is how you tell a machine what your content is without making it guess. A model that can read explicit Article, FAQPage, Organization, and Author markup spends less effort interpreting your page and more confidence trusting it. On Webflow you can add JSON-LD in the page settings of static pages and bind dynamic fields on CMS templates, so even a large blog or product catalogue can carry per-item schema.
The common failure is partial coverage: a homepage with Organization schema but blog posts with nothing, or an FAQ section on the page with no matching FAQPage markup behind it. Aim for consistency. Every content page should declare what it is, who published it, and when.
If hand-writing JSON-LD across a CMS feels fragile, automating it is worth the setup. We cover that in our Webflow schema markup service, which keeps structured data in sync as content changes.
Experience, Expertise, Authoritativeness, and Trust are not abstract virtues here. They are the signals an answer engine uses to decide whether your claim is safe to repeat. A model is far more likely to cite a page that names a real author with relevant credentials, links to primary sources, and is published by an organization with a verifiable identity than an anonymous page making the same assertion.
Experience shows up as first-hand detail: original data, real screenshots, lessons from actual projects rather than recycled summaries. Expertise shows up in author bios and the depth of the writing. Authoritativeness comes from how others reference you. Trust comes from the boring but essential things: a clear about page, contact details, accurate citations, and honest, current information.
This is also where original assets matter. Custom diagrams, data, and even tasteful Lottie animations signal a page made by people who invested in it, not a thin reproduction. To learn how we operationalise these trust signals as a service, see our Webflow technical SEO page.
Answer engines lean toward recent, corroborated information. A page that was accurate in 2023 and never touched since reads as stale, and a claim that appears only on your own site is harder for a model to trust than one echoed across several reputable places. This pillar grades both how current your content looks and how widely your name travels.
Freshness is partly real and partly signalled. Genuinely update pages when facts change, and make sure the update is visible through dated content and accurate schema timestamps. Footprint is the harder, slower work: getting mentioned, linked, and quoted on sites the models already trust, so that when they assemble an answer your name keeps appearing from more than one direction.
Add the five subtotals for a single page, or average them across a representative sample of pages for a site-level view. The result lands in one of four bands. The bands are deliberately blunt, because the point is to trigger action, not to admire a decimal.
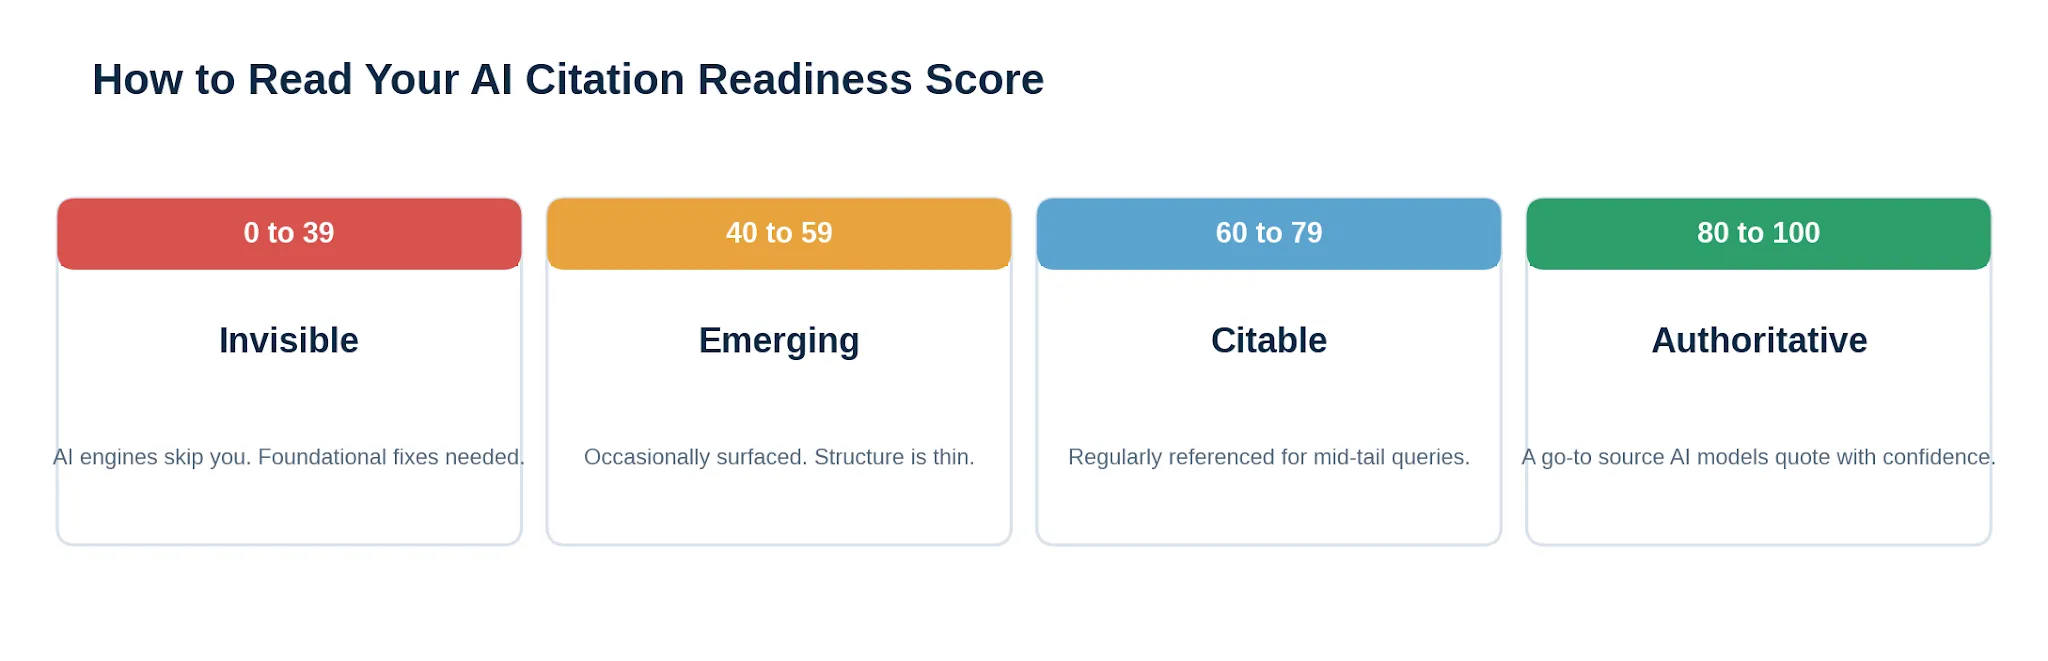
Most sites we audit for the first time land in the 40 to 59 band. They have solid content and decent SEO, but their claims are not quite quotable, their schema is patchy, and their authorship is thin. The encouraging part is that moving from Emerging to Citable rarely requires new content. It usually means sharpening what already exists: tightening answers, adding author bios, and filling schema gaps. The audit shows you exactly which of those moves earns the most points for the least effort.
A handful of issues come up again and again, and knowing them in advance saves you a full audit cycle.
A score is only useful if it changes what you do next. Treat the number as a baseline, fix the highest-weighted gaps first, and re-measure in ninety days. If you would rather not run this manually across a large site, that is squarely the kind of work we take on, from the technical fixes to the content sharpening to the schema automation. The framework stays the same whether you run it yourself or hand it over.
For a long time, Webflow sat in a fairly clear box in most people's heads. It was the place you built a beautiful marketing site, a place where designers could move fast without waiting on engineering, and a place where content teams could update pages without breaking the layout. That reputation was earned. But it also created a ceiling. The moment a project needed a login flow, a dashboard, an API route or a database, the conversation usually moved somewhere else, to a separate host, a separate repo and a separate set of tools to babysit.
Webflow Cloud is the answer to that exact friction. It takes the full-stack work you would normally ship elsewhere and gives it a home right next to your site. The recent update goes a step further and lets those apps run on their own domains, with no Webflow site required at all. That single change quietly redraws the line of what Webflow is for.
We have spent years building on this platform as a Webflow design and development partner, so this guide is written from the chair of people who actually ship on it. We will walk through what Webflow Cloud is, what changed, how deployment works, what your apps get for free, and the part that matters most for ambitious teams: how this scales toward enterprise. No fluff, no hype, just a clear picture of where Cloud fits.
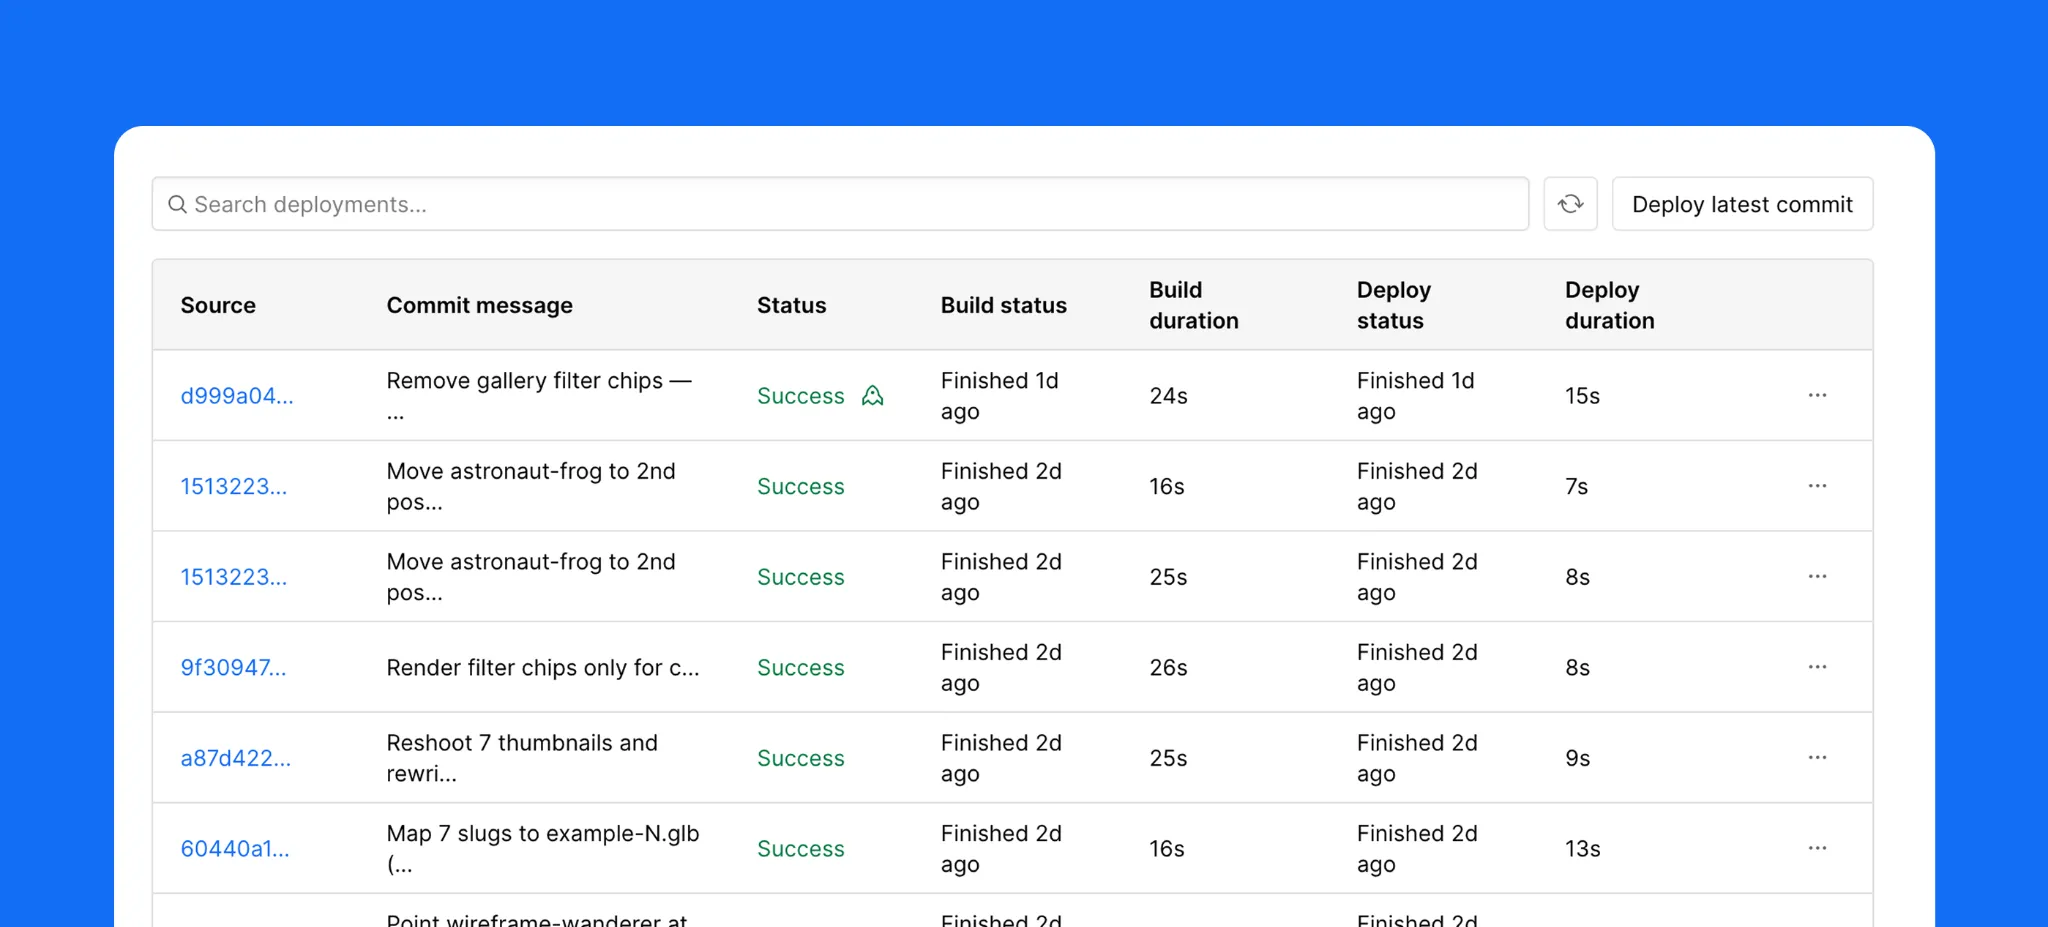
Webflow Cloud is application hosting baked into the Webflow platform. You point it at a code repository, it builds and deploys your app on managed infrastructure, and it hands you back a live URL. There is no special Webflow flavored framework to learn and no proprietary format to convert your project into. If you can build a Next.js or Astro app, you can run it on Cloud.
The mental model worth holding on to is this. When JavaScript frameworks took over front-end work, the line between a website and an application basically dissolved. Almost every modern web project is an app in some sense, with routing, data fetching and interactivity. Webflow Cloud leans into that reality. Any Next.js or Astro project you deploy to it is, by definition, a Cloud app. That is the whole idea.
What changed recently is the important part. Until now, a Cloud app had to be tied to a Webflow site and lived at a sub-path of that site, something like yourbrand.com/app. That was fine for many cases, but it boxed apps into a supporting role. With the new app project types, a Cloud app can now be deployed as a standalone project on its own domain, or it can still live alongside an existing Webflow site. You choose the arrangement that fits the build. Either way, it runs in the same workspace and uses the same deploys, storage and logs.
A Cloud app is your code, running on Webflow. That is the short version. The longer version is that Webflow handles the entire lifecycle around it. Deployments are automated and triggered by a git push, so your workflow stays exactly as familiar as it already is. If your project needs more than one environment, for example a staging build and a production build, you map those to Git branches. Push to a branch, get an environment. Push to main, go live.
This matters because the developer experience is where many no-code adjacent platforms fall down. They ask you to give up your tooling. Webflow Cloud does the opposite. Your repo stays your repo, your framework stays your framework, and the deploy loop is the one your team already knows. The only thing that changes is where it lands.
Once you accept that a Cloud app is just your code on Webflow, the next decision is where it lives. There are two arrangements, and the right one depends on what you are building.
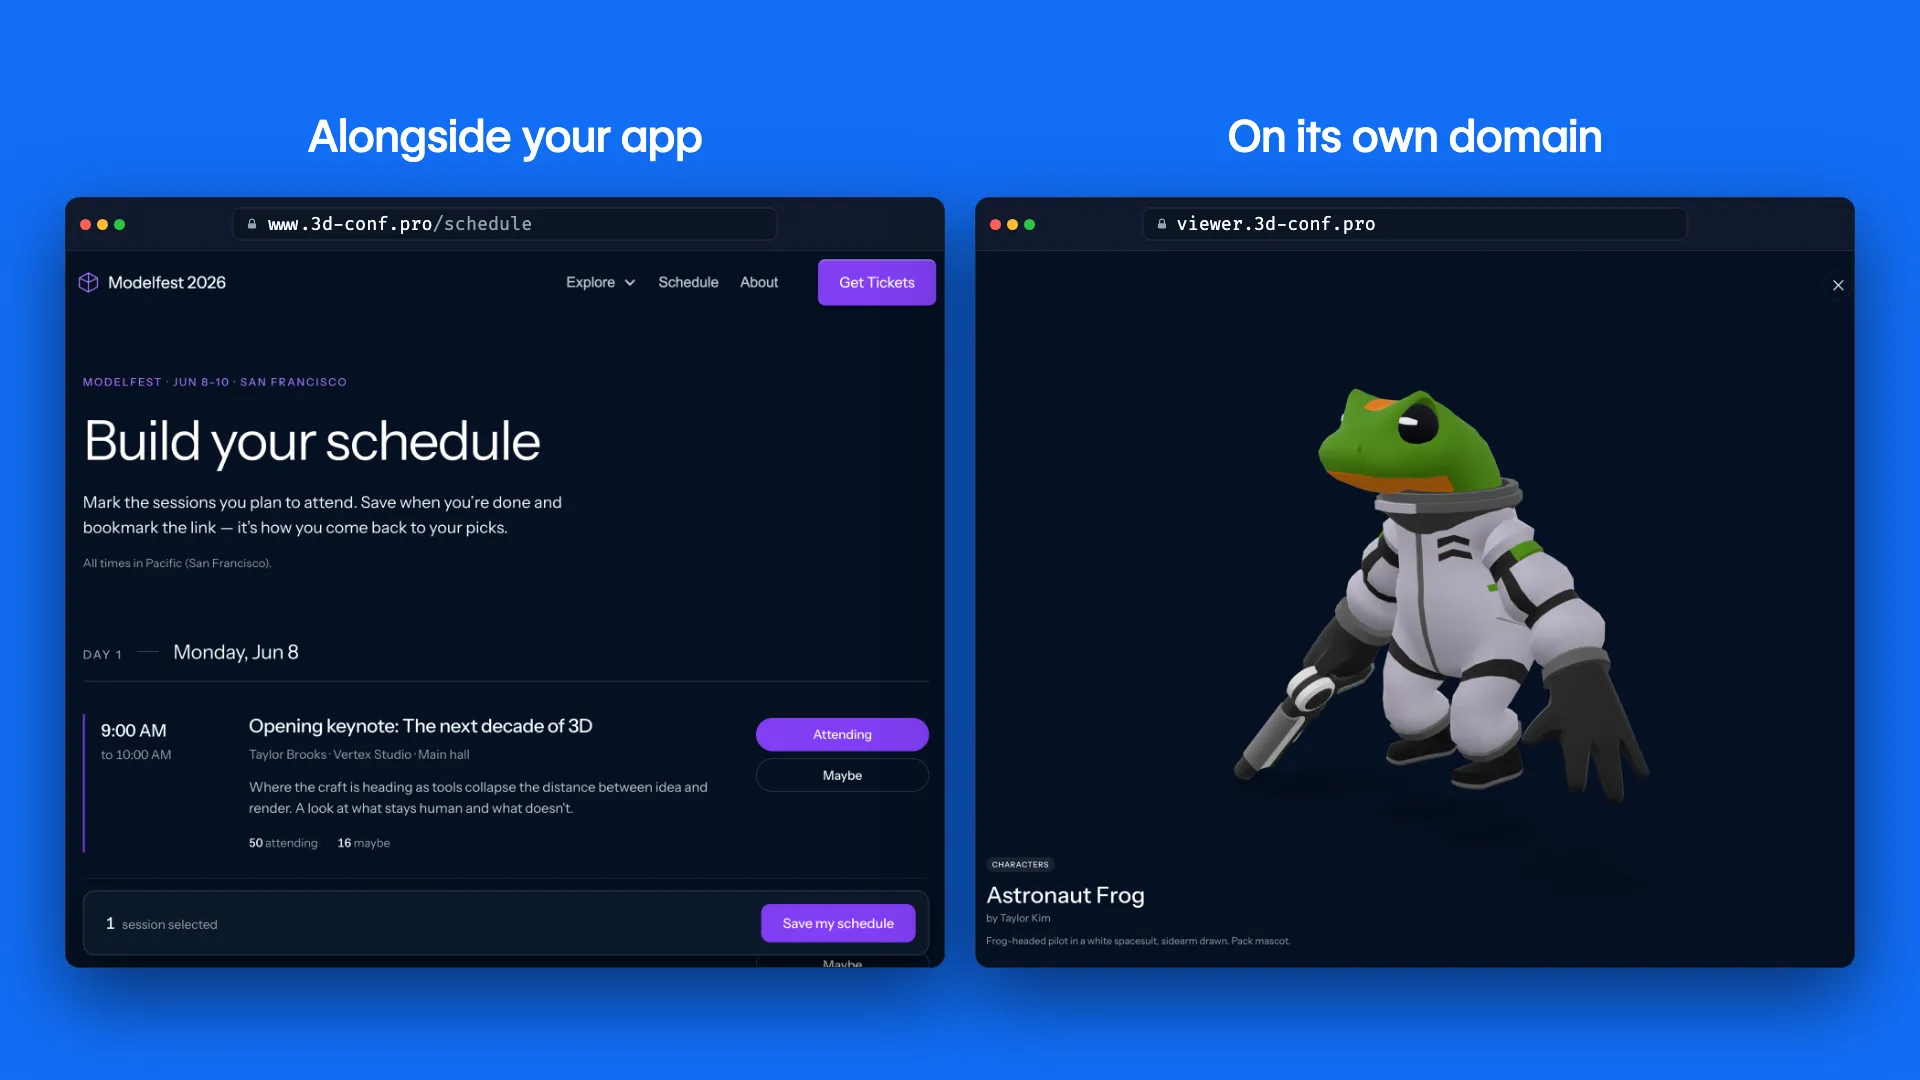
Standalone on its own domain, or mounted alongside your Webflow site.
Standalone, on its own domain
This is the new capability and the one most developers have been waiting for. Your app runs at its own address, for example app.yourbrand.com, with no marketing site attached. This suits products, customer portals, internal tools, dashboards and anything that is the destination rather than a feature bolted onto a site. You get the full Cloud runtime without having to pretend your app is a page on a website.
Alongside your Webflow site
The other arrangement mounts the app on a sub-path of your existing Webflow site, so a visitor moves from the marketing pages into the app without ever feeling a seam. This is the path you want when the app is an extension of the brand experience, a pricing calculator, a member area, an interactive product tour. The goal here is that nobody notices where the Webflow site ends and the Cloud app begins. We will come back to how DevLink makes that seamlessness real.
Getting an app onto Cloud is deliberately undramatic, which is a compliment. Open your project dashboard, create a new app, and connect your GitHub account. From there you have two clear routes.
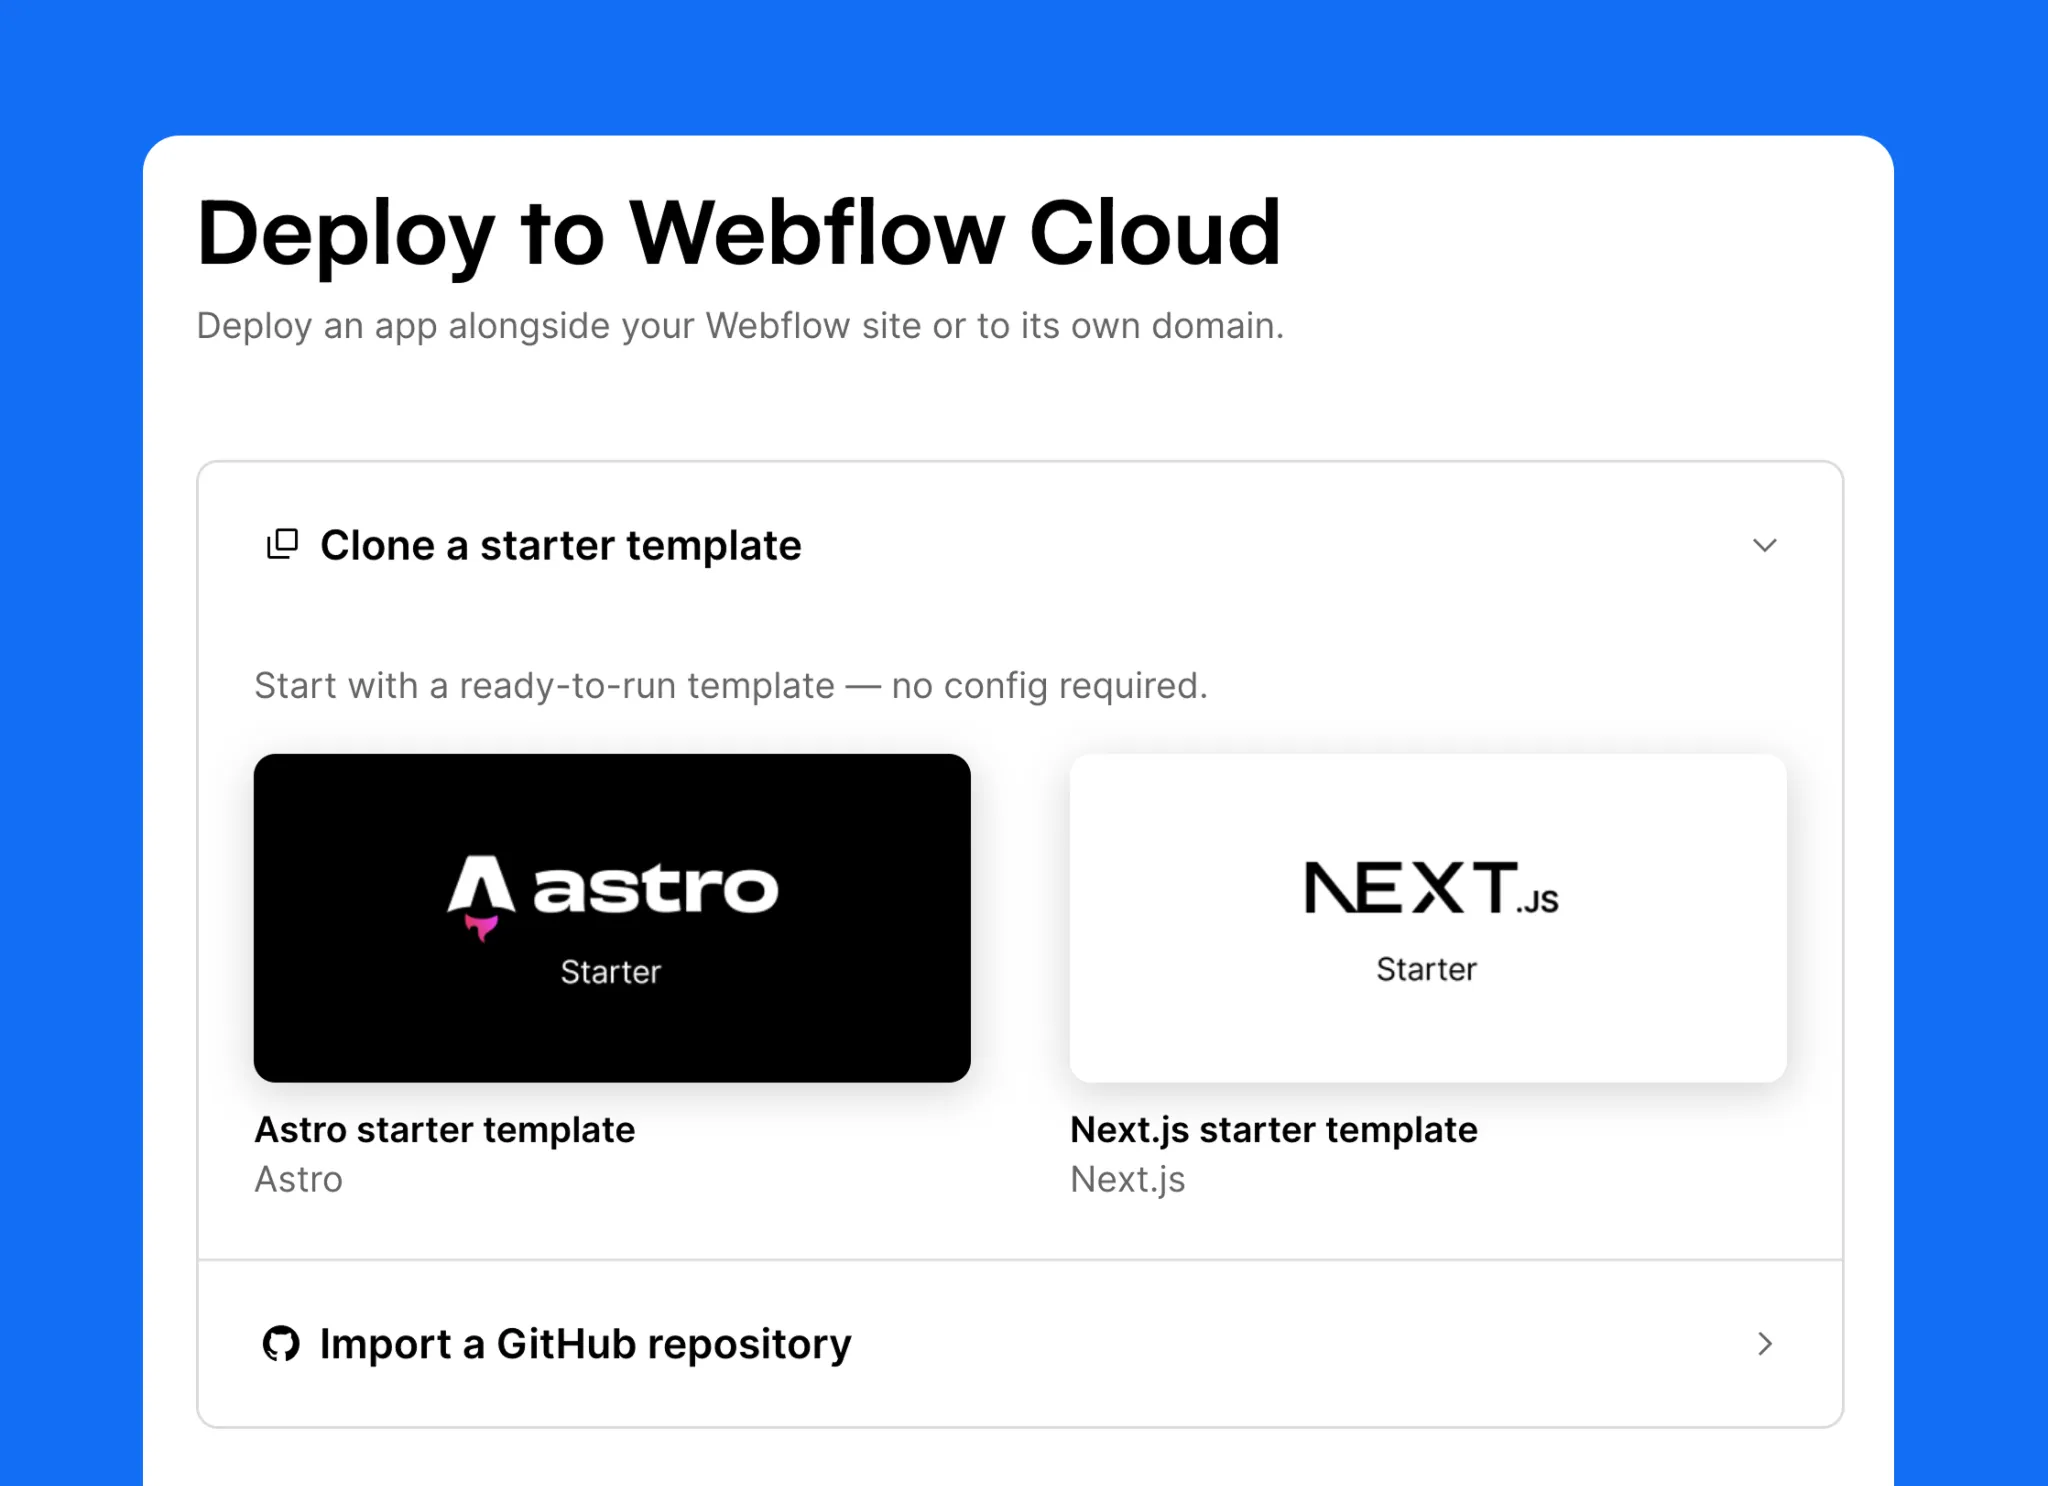
Five steps from dashboard to live app. The CLI mirrors every one of them.
Route one: import an existing repo
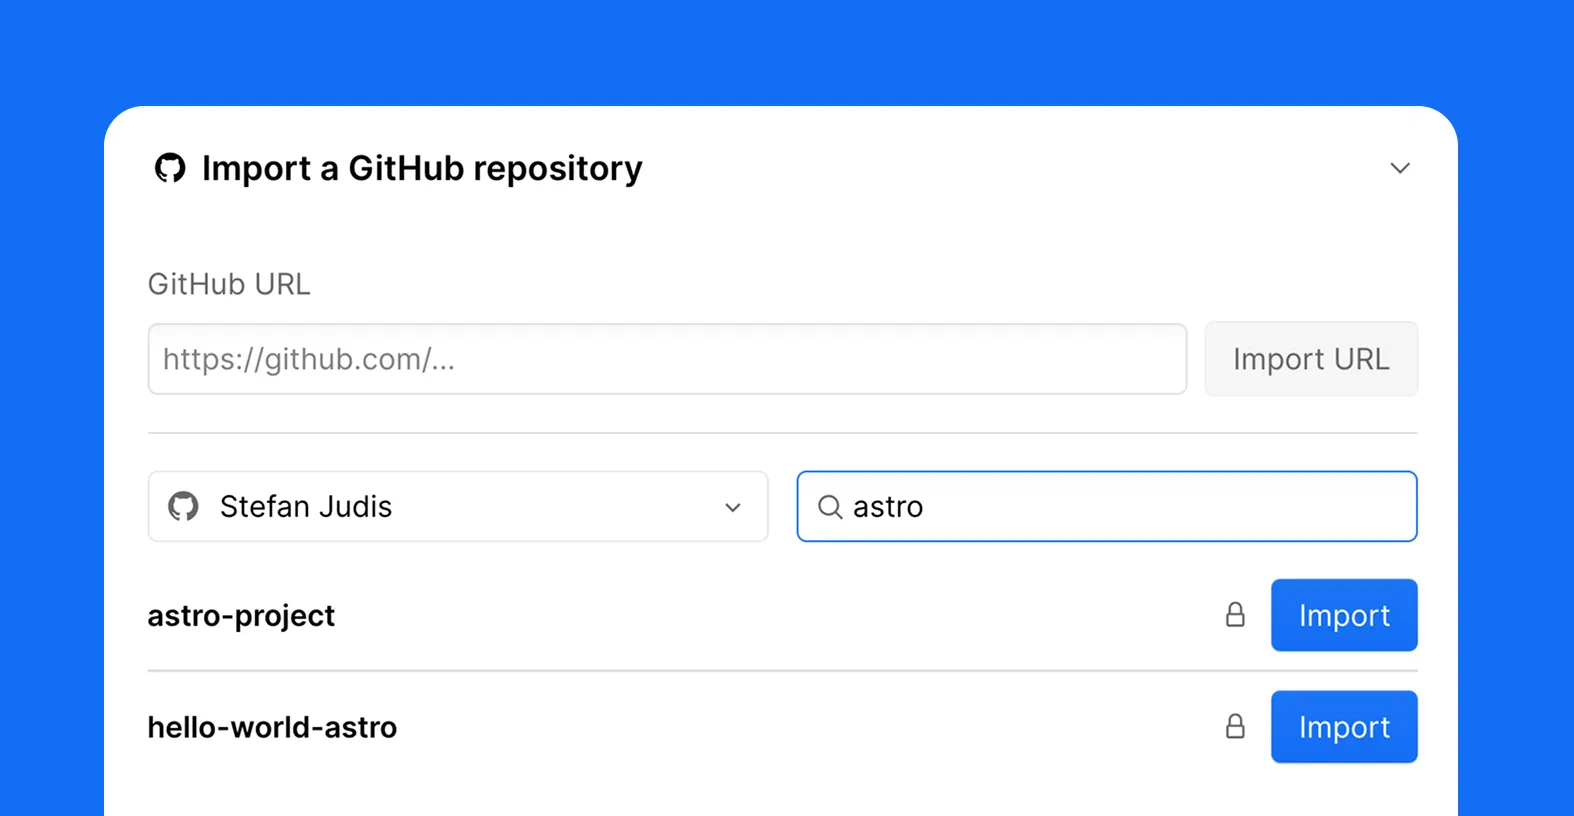
This is what most teams will do. Point Webflow at the repository that holds your Next.js or Astro app, give the project a name, and choose whether it lives on its own domain or alongside a Webflow site. Hit deploy. Webflow builds the app and returns a live URL. That is the entire ceremony.
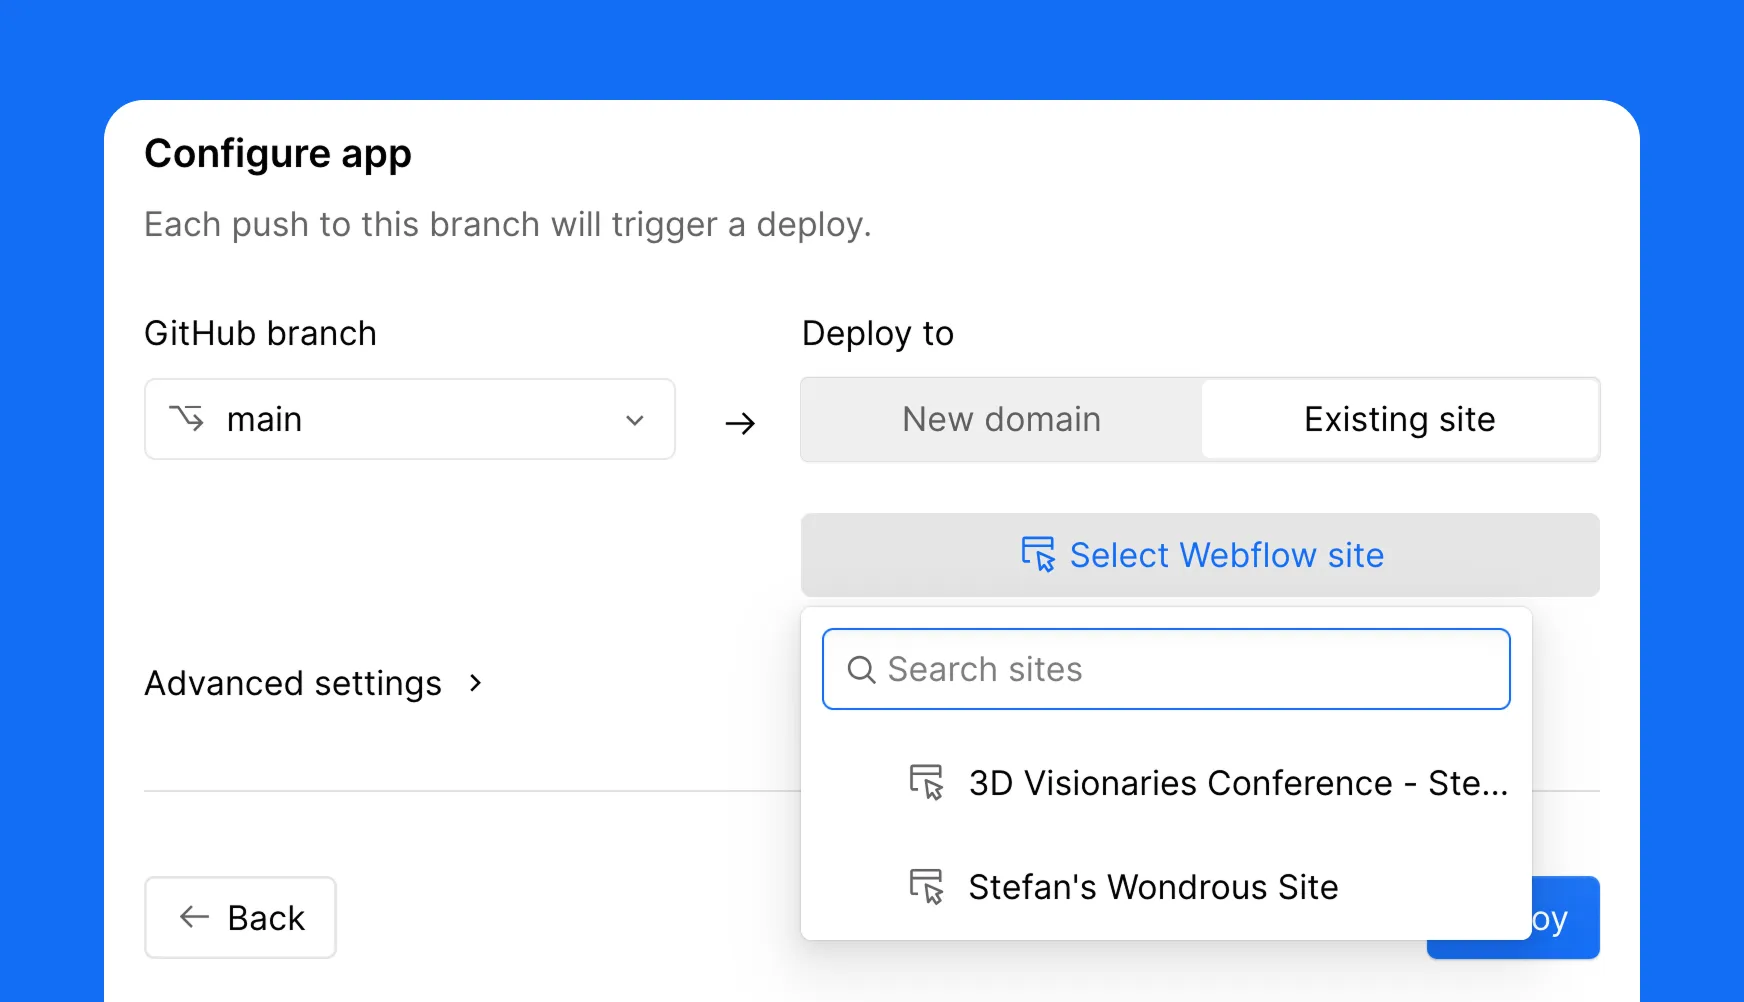
Route two: one click deploy a starter
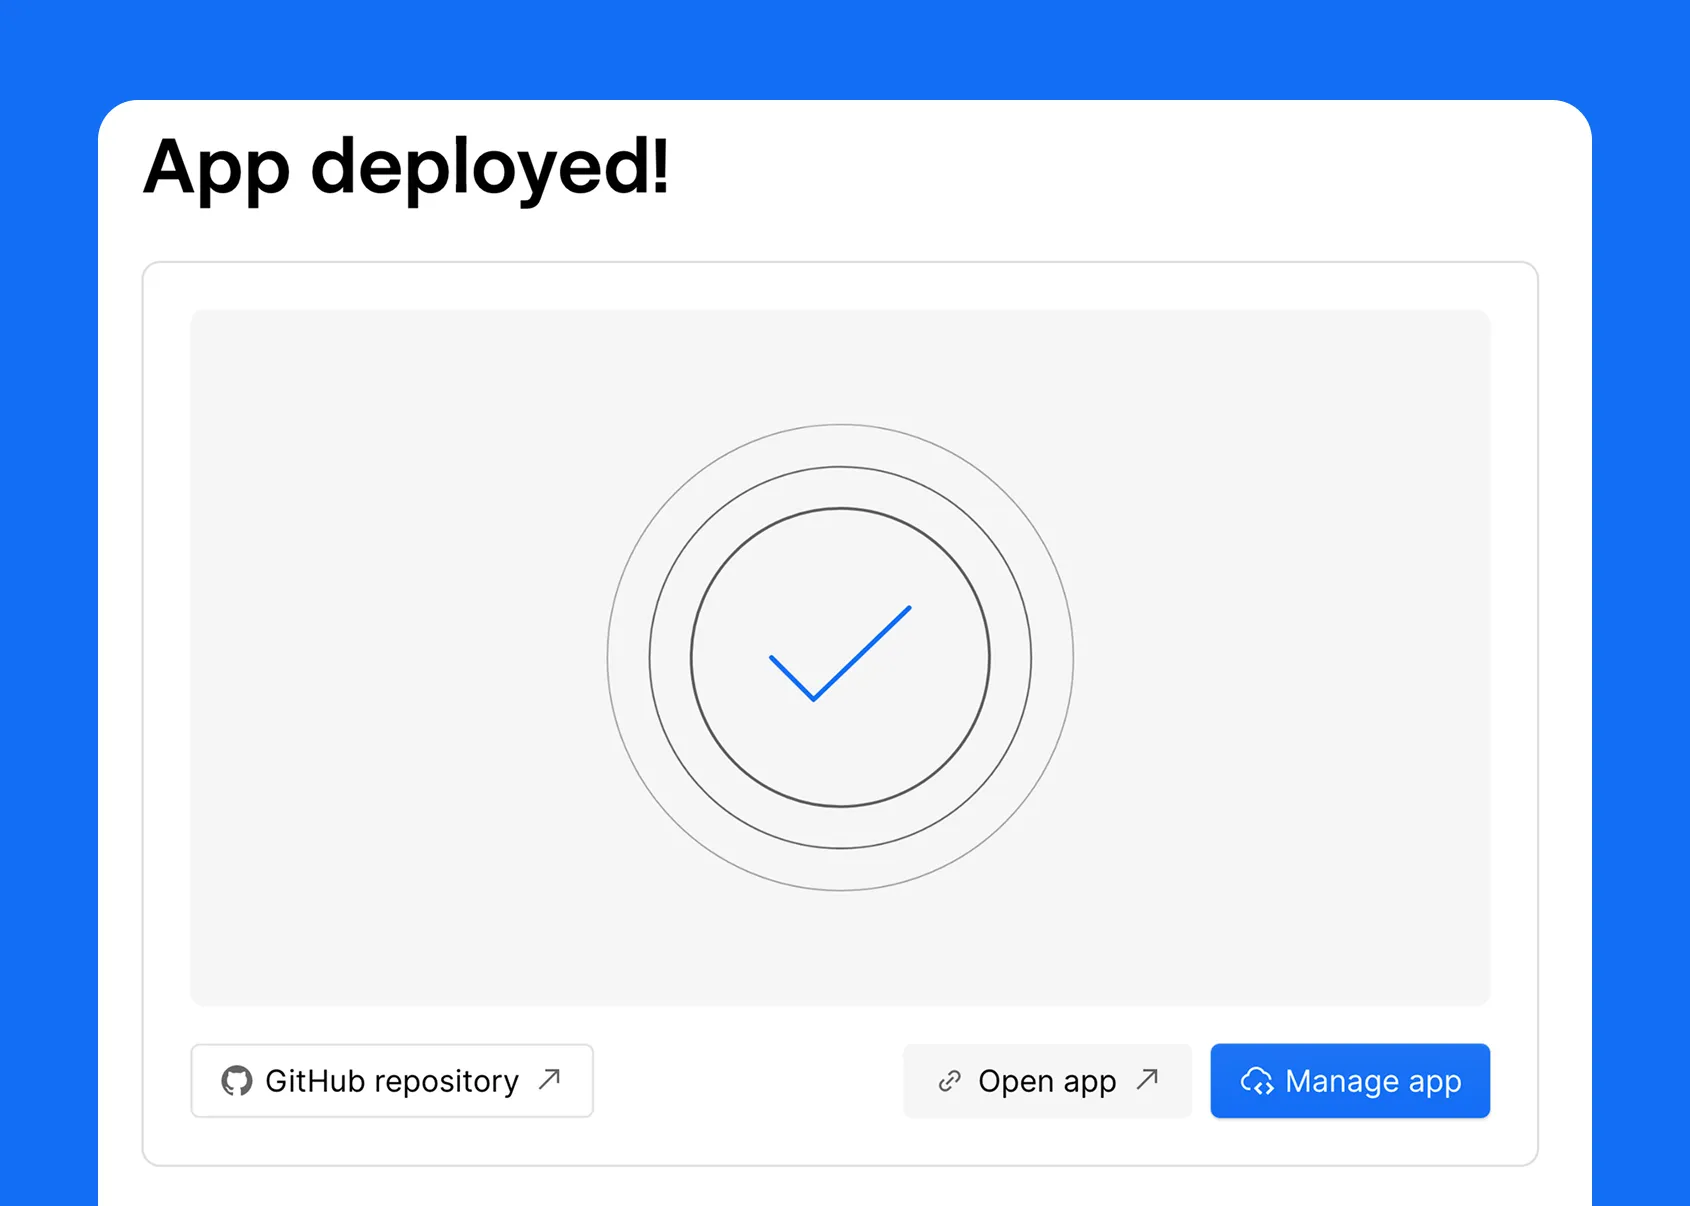
No repo yet? Pick a Webflow starter, choose Astro or Next.js, name it, and deploy. You get a working app on Webflow that you can clone and build from. It is the fastest way to kick the tires and see the loop end to end before you commit a real project to it.
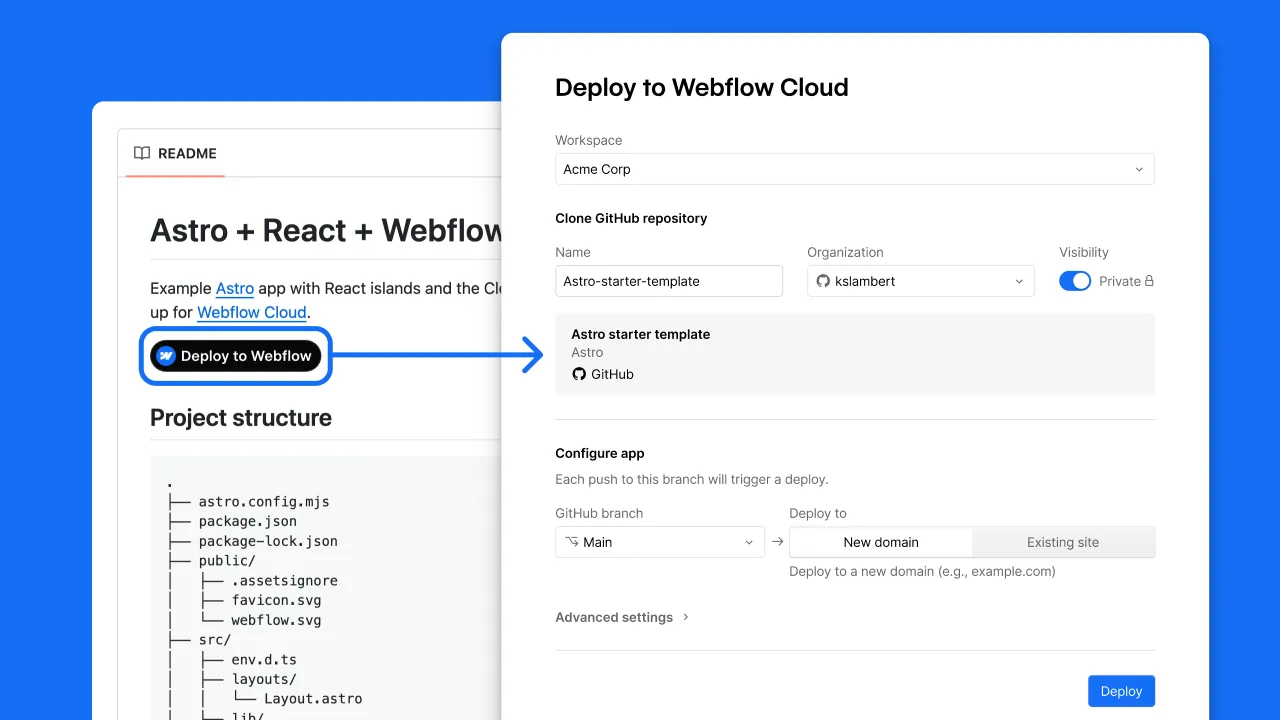
Prefer the terminal?
The Webflow CLI does everything the dashboard does. A command to scaffold a new app from a template, and a command to ship a project you already built. Either way the result is identical. Your app builds on Webflow infrastructure and you get a live URL back. For teams who live in the terminal, nothing about Cloud forces you into a UI you did not ask for.
webflow cloud init # start a new app from a template
webflow cloud deploy # ship a project you've already built
init scaffolds a starter (Next.js or Astro) similar to how the UI does it and wires it up to a new Cloud project. deploy takes a repo you already built and pushes it onto Cloud. Either way the result is the same. Your app builds on Webflow's infrastructure and you get back a live URL.
A live URL is the floor, not the ceiling. Once deployed, your app gets a real runtime plus a set of services that would otherwise be separate line items on your infrastructure bill.
Storage, in three flavors
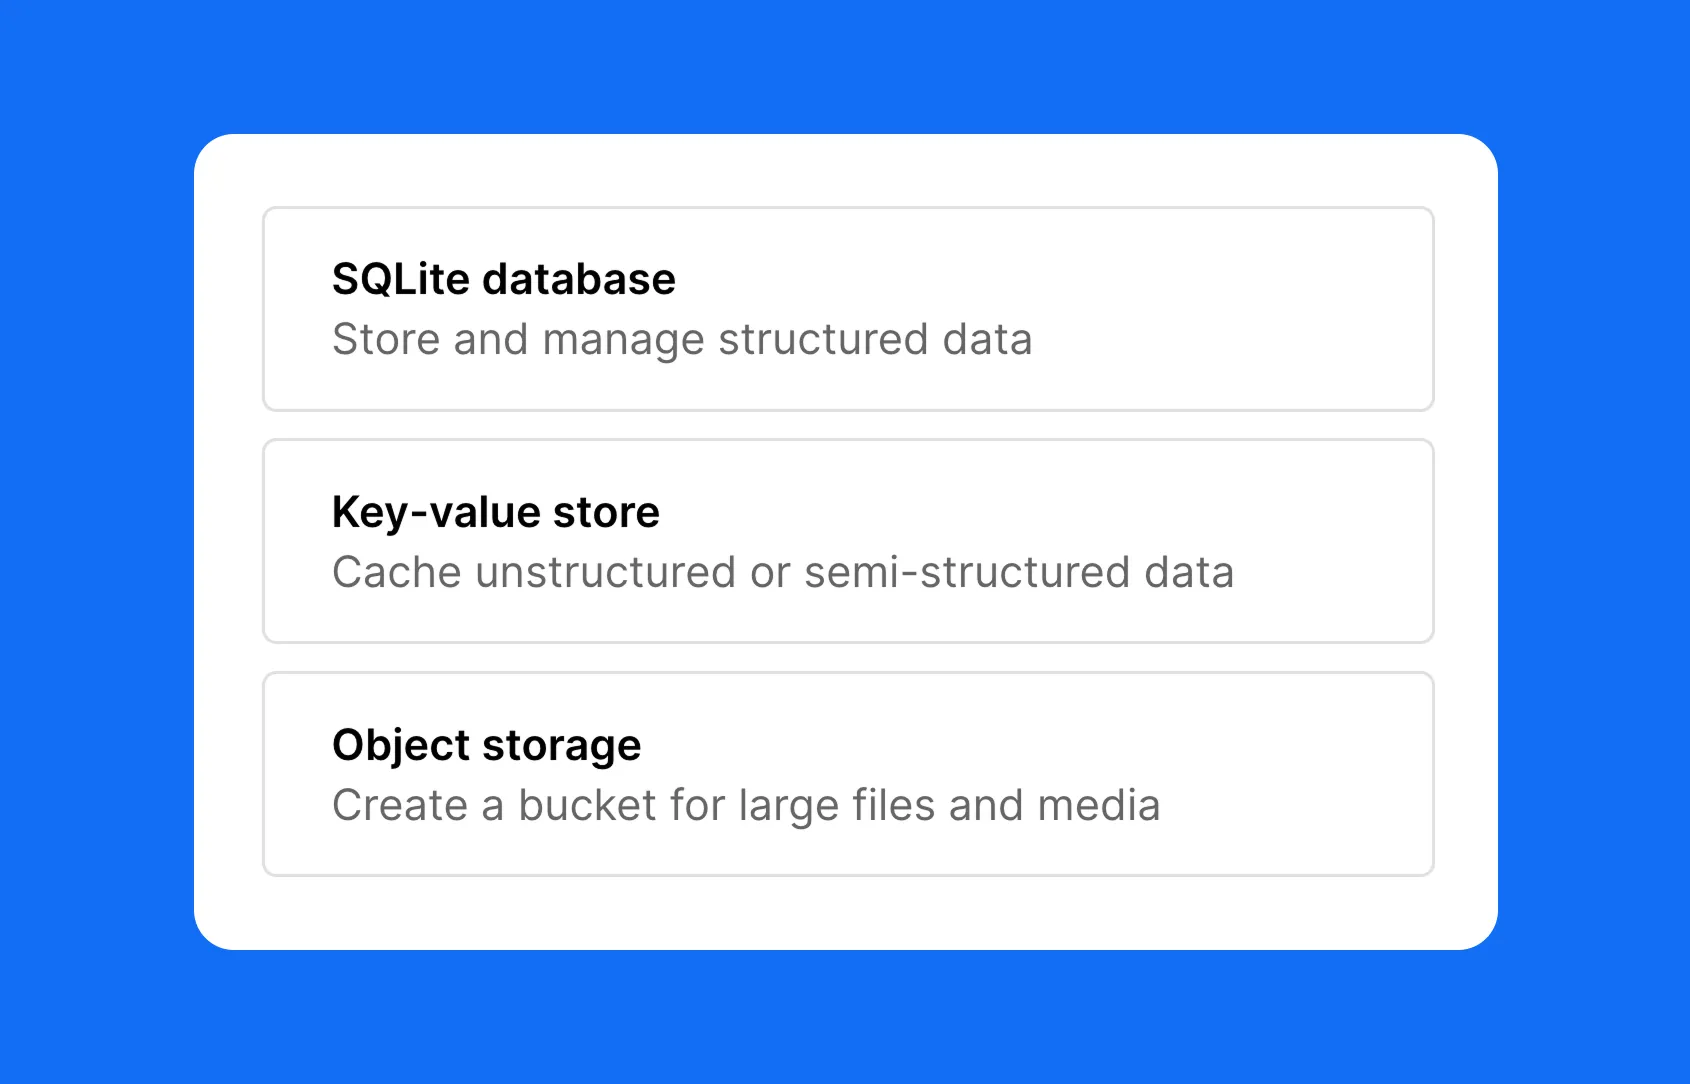
Storage on Cloud comes in three shapes, and between them they cover the large majority of what an app needs to persist:
These are built on Cloudflare's infrastructure underneath but exposed as native Webflow Cloud services, so you are not signing up for a third party, copying credentials around or maintaining a separate dashboard. The data layer lives where the app lives.
Environment variables, secrets and logs
Beyond storage, the operational basics are all present and accounted for. You get plaintext environment variables for configuration, encrypted secrets for the values that must never leak, and live runtime logs streaming from production so you can see what your app is doing in real time. There are no extra services to wire up for any of it. This is the unglamorous plumbing that decides whether a platform is usable in practice, and Cloud has it.
Here is the feature that makes the alongside arrangement genuinely work, and it is the one people underestimate. When your Cloud app sits next to your Webflow site, you do not want visitors to feel a jolt when they cross from one into the other. The header should be the same header. The footer should be the same footer. The buttons should look identical because they are identical.
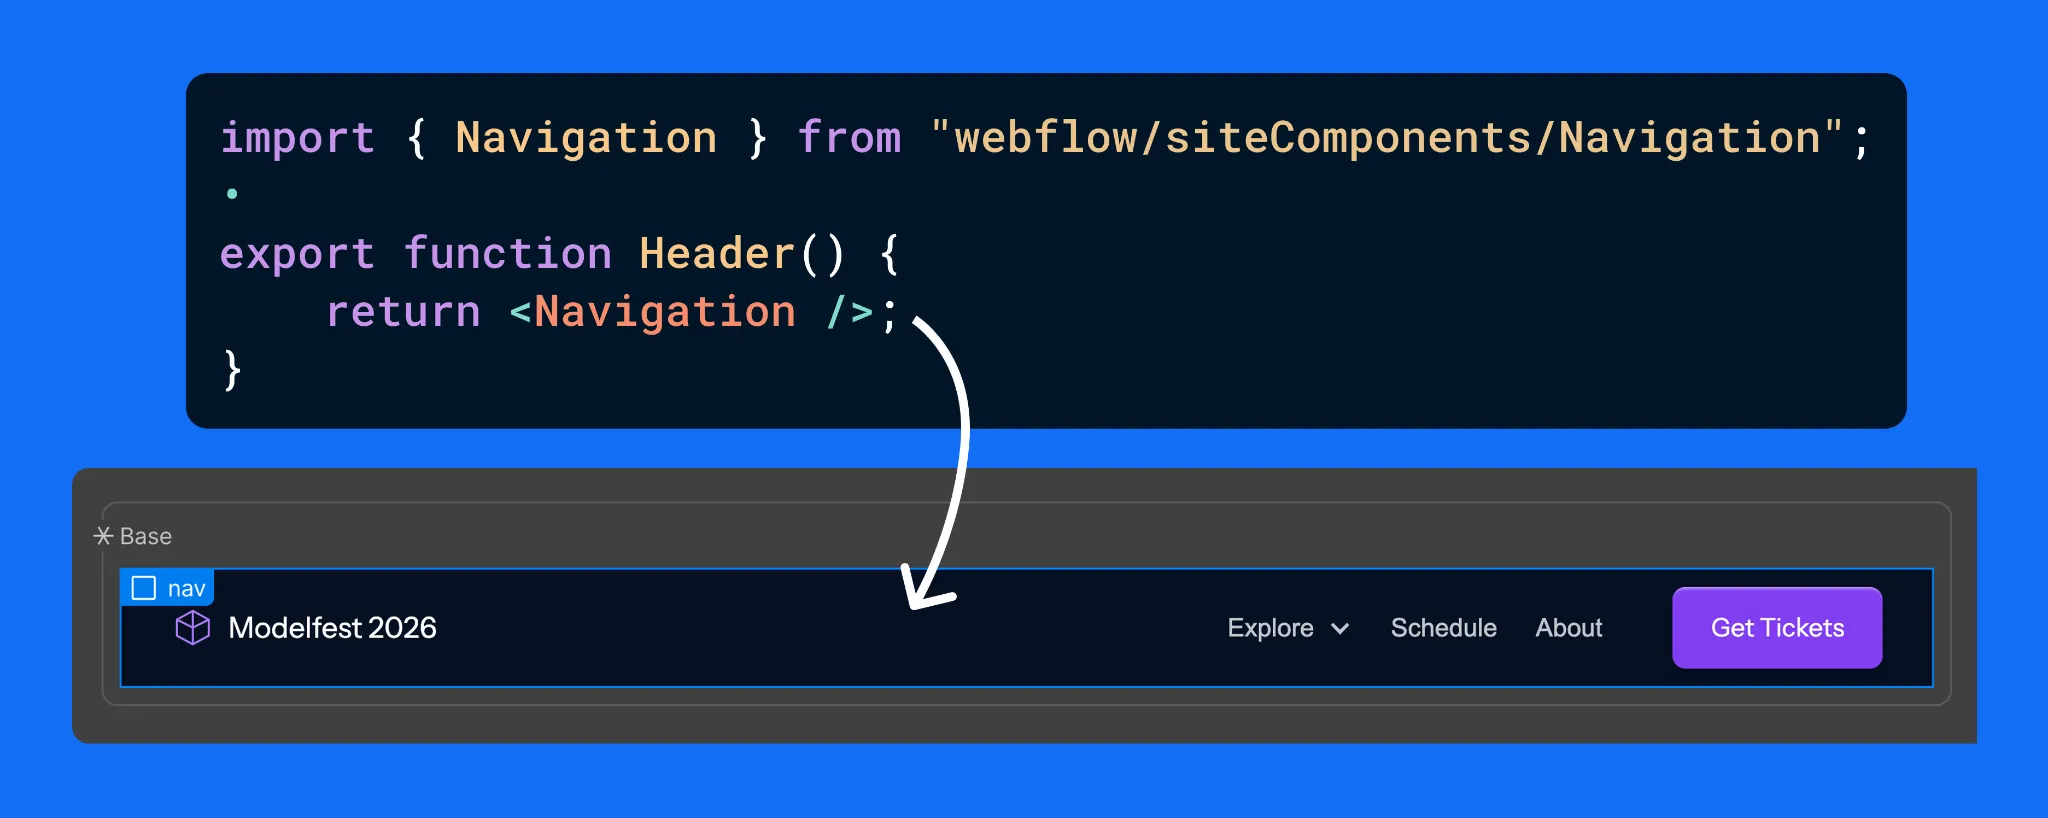
Design once in Webflow, export as React with DevLink, import into the app.
DevLink is how you get there. You design a component on the Webflow canvas, a header, a hero, a footer, whatever you need, and DevLink exports it as a React component. Your Next.js or Astro app then imports it like any other component in your codebase. The result is that your app reuses the exact same components your marketing site is built from, because they literally are Webflow components.
The strategic payoff is that there is only one design source powering multiple surfaces. The marketing site and every supporting app stay visually identical, and you maintain that design in one place rather than rebuilding it in code and then fighting drift forever. And this is not limited to apps living under your site. A standalone app on its own domain can pull those same components too. One canvas, many surfaces, no copy-paste design debt.
Everything above explains the mechanics. The strategic question for an ambitious team is different: can you trust this with real, revenue-carrying work, and can it grow with you? Increasingly the answer is yes, and that is the part worth dwelling on.
Webflow has been building out the enterprise layer of the platform in parallel with Cloud, and the two reinforce each other. On the enterprise tier you get the controls large organizations require before they will put a platform near production: single sign-on, granular user permissions and roles, advanced collaboration workflows, audit and compliance tooling, and the security posture that procurement teams ask hard questions about. None of that is glamorous. All of it is the difference between a tool a startup tinkers with and a platform a serious company standardizes on.
Pair those governance features with Cloud's runtime, storage and deploy pipeline, and the shape of something larger appears. A company can run its marketing site, its documentation, its customer portal and its internal tooling on a single platform, with one set of permissions, one design system and one place to look when something breaks. The usual enterprise web stack is a patchwork of a CMS here, a host there, a separate app platform, a design system that lives in three places and agrees with itself in none. Consolidating that is not just tidier. It removes whole categories of integration risk and hand-off failure.
There is also a cost story that lands well in enterprise budgeting conversations. Fewer platforms means fewer contracts, fewer seats spread across tools, and fewer specialists needed just to keep the integrations alive. The teams we work with through our Webflow development agency engagements consistently find that the real expense of a fragmented stack is not the line-item subscriptions. It is the engineering hours spent gluing things together and the slowdowns when a hand-off between two systems goes wrong.
This is the upmarket signal that matters. Being able to deliver a full-stack product, on its own domain, with enterprise-grade access control and a unified design system, puts you in a different conversation than a shop that only assembles templates. It says you handle the builds where the stakes are real.
For agencies in particular, Webflow Cloud changes the size of the work you can credibly take on. The old boundary was uncomfortable. You could win the marketing site, build it beautifully, and then watch the more lucrative product and application work walk over to an engineering vendor because Webflow could not host it. That handoff was a leak in the relationship and in the revenue.
Cloud closes that leak. You can now keep the full-stack build in house, on the platform you already master, and present it to the client as one coherent system rather than a marketing site plus a black box someone else maintains. That is also why platform depth matters more than ever: the agencies that win this work are the ones who can move fluently from custom Webflow development into framework code, storage design and deploy pipelines without dropping the thread. If you want to see how that fluency shows up in practice, our take on choosing a Webflow development partner digs into what separates a template assembler from a team that ships products.
It is worth being honest about the adjacent skills this surfaces. A full-stack Cloud build still needs the unglamorous disciplines done well: Webflow SEO so the thing can actually be found, careful information architecture, performance budgeting, and a maintenance plan so the app does not rot. None of that is new. Cloud just raises the ceiling on what a single team can own end to end, which makes those disciplines more valuable, not less.
There is a second shift happening on the platform at the same time, and it pairs naturally with Cloud. The official Webflow connector for Claude, built on Webflow's Model Context Protocol server, gives an AI agent governed read and write access to your Designer and Data APIs. In plain terms, you can run SEO audits across hundreds of pages, bulk create and restructure CMS items, clean up a class system and draft localized pages, all from a conversation. We cover the practical setup in our guide to integrating Webflow with Claude AI, and the more hands-on things you can do with the Webflow and Claude connector if you want concrete workflows.
Why mention it in a Cloud article? Because the two together describe where the platform is heading. Cloud gives you a place to run real applications. The AI layer gives you a faster way to build and maintain the content and structure around them. For teams that want help wiring up that side, our Webflow Claude MCP integration services exist precisely for that, with approval workflows and governance built in rather than bolted on after something goes wrong.
No platform is the answer to everything, and pretending otherwise helps nobody. Webflow Cloud is a strong fit when you are already invested in Webflow, when you want your site and your app to share a design system, and when reducing the number of tools you maintain is a real goal rather than a nice-to-have. It is especially compelling for product teams who want marketing and product to feel like one continuous experience.
It is a weaker fit if your app is built on a framework Cloud does not yet support, since framework coverage is still expanding, or if your architecture demands something exotic that the managed runtime does not expose. In those cases a dedicated cloud provider may still be the right home, and that is fine. The useful instinct is to match the tool to the build rather than forcing every build onto one tool, and to talk through the specifics with a team that has shipped on the platform before.
If you are moving an existing property, our Webflow migration services and our process for a WordPress to Webflow migration are built to preserve SEO and structure rather than treat the move as a rebuild from zero.
Webflow Cloud takes the thing that always pushed serious projects off the platform, real application hosting, and brings it home. Standalone apps on their own domains, the same deploys and storage and logs whether the app stands alone or sits beside a site, DevLink keeping one design source across every surface, and an enterprise layer that makes all of it safe to standardize on. Fewer tools to track, one platform to learn, one place to look when you need answers.
If you have a Next.js or Astro app that needs a home, Cloud has earned a look. And if you want the whole thing, marketing site, product, design system and the AI workflows around it, treated as one connected system rather than a pile of integrations, that is exactly the kind of build this platform was quietly growing toward.
Appsrow is a Webflow Premium Partner and Webflow Global Leader based in Ahmedabad, India, serving ambitious brands across the USA, UK, Europe and beyond.
With 8+ years of digital experience and 300+ projects delivered on Webflow across SaaS, AI, healthcare, manufacturing, real estate and e-commerce, we bring deep platform expertise to every build. Our work spans headless and API-first Webflow architecture, Webflow Logic and automation, CRM and tooling integrations, WCAG accessibility for enterprise projects, localization and multi-language development, and SEO and AEO so your pages rank on Google and get cited by AI engines.
We also partner with other agencies and consultancies on a white-label, overflow and retainer basis: confidential, scalable and built around your workflow. From early-stage startups to scaling enterprises, we make Webflow work harder for your business.
Explore: Webflow design and development • Webflow + Claude MCP • Webflow maintenance and support • Why teams choose Appsrow
.webp)
For more than two decades, getting found online meant one thing. You ranked on Google, you earned the click, and you won the customer. The blue link was the prize, and every marketing team in the world optimized for it. That model was so dominant that most of us stopped questioning it.
That world is quietly ending, and faster than most teams realize.
Today, a buyer researching software does not open ten tabs to compare options. They ask ChatGPT. They ask Perplexity. They ask about Google's AI Mode. And the AI gives them a single, confident answer, often naming just two or three brands it considers trustworthy. If your brand is not one of them, you were never in the running. The customer built a shortlist before they ever visited a website, and you simply were not on it. No click was lost, because no click was ever offered.
This is the shift that Answer Engine Optimization, usually shortened to AEO, was built to address. In plain terms, AEO is the practice of structuring and strengthening your content so that AI-powered answer engines choose it, trust it, and cite it when they respond to a user's question. The old goal was to rank. The new goal is to be the answer. Those are not the same thing, and the gap between them is where a lot of brands are quietly losing visibility right now without even seeing it happen.
The reason this matters in 2026 specifically, rather than as some distant trend, is that the numbers have crossed a threshold. ChatGPT alone now handles billions of queries a day. More than half of Google searches already end without a traditional click because the answer is delivered on the page. And nearly half of some high-value buyer groups now fold AI search into how they evaluate vendors. AI is no longer an experimental channel sitting beside search. For a growing share of your audience, it has become the front door.
There is one more reason the timing is sharp. The biggest platforms are now building AEO directly into their products. On April 13, 2026, Webflow made the shift impossible to ignore when it launched Webflow AEO, a closed-loop, agentic system for AI discovery that promises to measure how a brand shows up in answer engines, recommend improvements, and help ship them, all in one place. When a platform of that scale bets on something, it is a strong signal that the discipline has moved from optional to foundational. We will unpack exactly what that launch means, and what it tells you about the near future, later in this guide.
This guide is written to be genuinely complete, the kind of resource you can return to as a reference rather than skim once and forget. By the end of it, you will understand what AEO actually is and how it differs from SEO and GEO, why the search landscape has changed so quickly, and how answer engines decide whose content to cite. You will know how the major engines differ from one another, what the Webflow launch signals about where things are heading, and, most importantly, the exact, platform-agnostic playbook you can use to get your own brand cited. We will cover the content formats that earn citations, a technical checklist you can run this quarter, a realistic ninety-day roadmap, how to measure results, and the common mistakes that quietly hold teams back.
A quick note on how to read it. None of what follows requires a specific tool or platform. The principles apply to any website. When we cite a statistic, we name its source, both because that is simply honest and because, as you will see, attributing your claims is itself one of the habits that earns trust from answer engines. We have tried to write the guide the same way we recommend you write yours: clear, useful, and grounded.
So let us start with the fundamentals, because most teams are still quietly optimizing for a search era that is already fading.
Answer Engine Optimization is the practice of structuring and strengthening your content so that AI-powered search platforms select it as a trusted source when they generate an answer.
The goal is no longer just to rank. The goal is to get cited. When someone asks an answer engine a question, you want your brand, your product, or your expertise to be part of the response the AI gives back.
Think of the difference this way. Traditional search hands the user a list of links and asks them to do the work of choosing. An answer engine does the choosing for them. It reads, synthesizes, and presents a finished answer. AEO is how you make sure your content is the material that the answer is built from.
The core principle is simple, even if the execution is not: write content that AI engines can easily find, clearly understand, and confidently trust. Everything else in this guide is a practical expansion of those three verbs.
You will hear three acronyms thrown around, and the overlap causes a lot of confusion. Here is the honest, plain-language version.
SEO (Search Engine Optimization) is what most teams have done for two decades. It optimizes for rankings in a list of results, measured through positions, clicks, and organic traffic.
AEO (Answer Engine Optimization) optimizes for being the direct answer. Success is measured through citations and mentions in AI responses, featured snippets, and voice results, not just clicks.
GEO (Generative Engine Optimization) is a closely related term that focuses specifically on being referenced inside generative AI engines like ChatGPT, Perplexity, and Gemini. In practice, most people use AEO and GEO interchangeably, and the tactics heavily overlap.
Here is the part that matters most. These are not competing strategies. They are layers of the same foundation. As one widely shared framing puts it, SEO gets you found and AEO gets you chosen. You need both.
The encouraging news is that the work compounds. Well-structured, authoritative, data-backed content tends to rank better in Google and also gets cited more often by AI engines. Both reward clear structure. Both value credible expertise. Both benefit from organized topic clusters. So the investment you make in AEO rarely comes at the expense of your existing search performance. More often, it strengthens it. It is the reason our own SEO and AEO marketing services are run as a single program rather than two separate efforts.
It is tempting to file AEO under "interesting, but later." The data makes a strong case for "now."
Consider how search behavior has already changed. Google has noted that roughly 15 percent of daily searches are completely new queries, many of them longer and more conversational. People increasingly type and speak the way they think, in full questions, and they expect a full answer in return.
That expectation is reshaping click behavior. More than half of all Google searches now end without a click on a traditional result, because the answer appears directly on the page. Industry analyses put the share of searches that end in a click-through at around 35 percent. If your content is not part of the answer, you can lose visibility entirely, even when you technically rank.
The volume of AI search is staggering. ChatGPT alone now fields well over two billion queries a day, and AI-referred sessions to websites grew by several hundred percent year over year through 2025. This is not a fringe channel anymore.
And it is changing buying decisions. HubSpot reported in January 2026 that 42 percent of CRM software buyers now use AI search as part of how they evaluate vendors. That is nearly half of a high-intent, high-value audience making decisions partly based on what an AI tells them about your category.
There is also a quality angle that often gets missed. Yes, AEO can lead to "zero-click" moments where the user gets their answer without visiting your site. But the traffic that does click through tends to be far more qualified. Some 2026 analyses suggest visitors arriving through AI citations convert at three to four times the rate of traditional search visitors. The reason is intuitive. By the time they reach you, the AI has effectively vetted you and pre-sold them on your authority.
So AEO is not about chasing a smaller pie. It is about making sure you are the brand the AI trusts enough to recommend, which turns out to be one of the most valuable positions in modern marketing.
To optimize for answer engines, it helps to understand what is happening under the hood. You do not need to be an engineer, but a working mental model will save you from a lot of wasted effort.
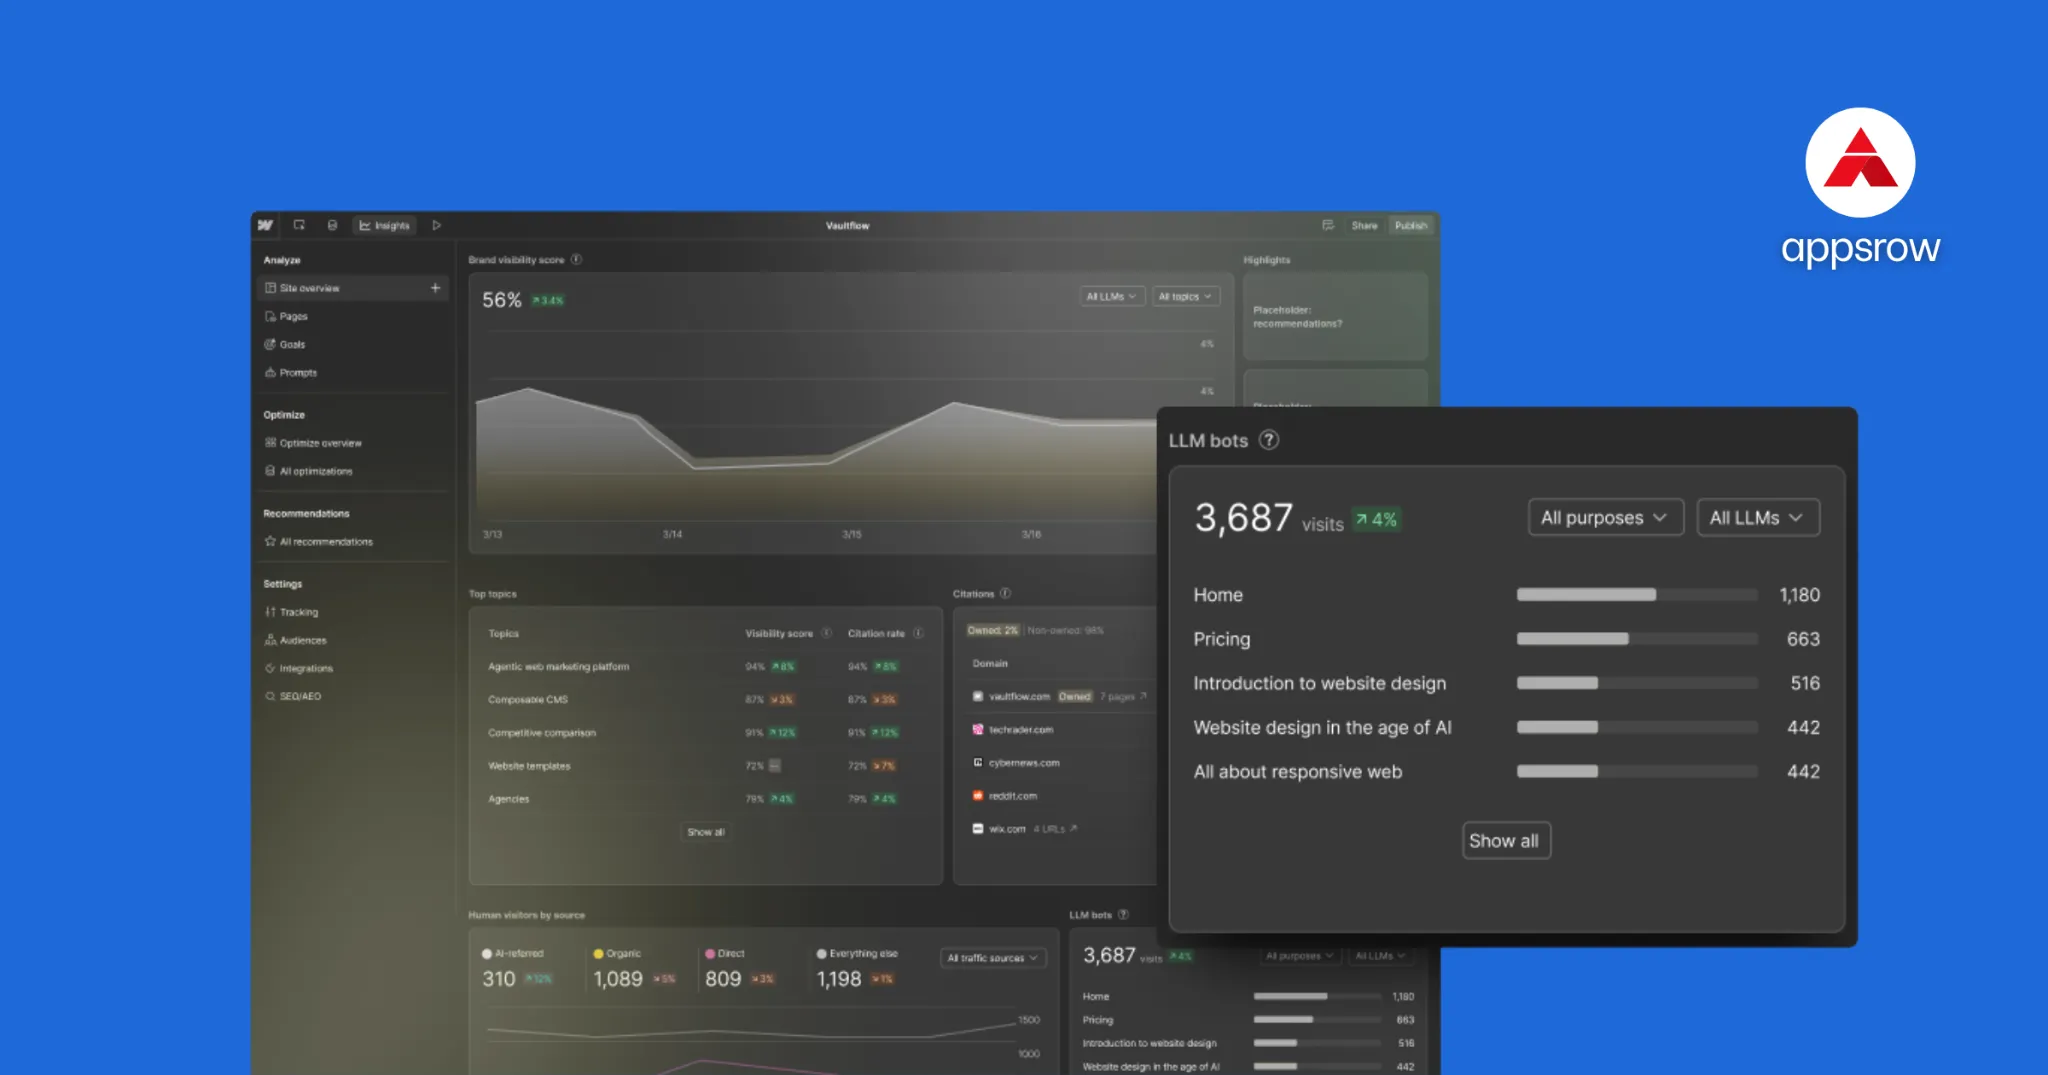
Large language models answer questions in two broad ways.
The first is from their training. The model is, at its core, a very sophisticated predictor of the next word, generating responses based on patterns it absorbed during training. This works beautifully for well-established topics where lots of consistent information already exists. It works poorly for fresh, niche, or fast-moving subjects, which is exactly where models are prone to making things up.
The second way is retrieval. Modern answer engines increasingly use a technique often described as retrieval-augmented generation. Instead of relying only on what the model memorized, the system actively searches the live web, pulls in relevant sources, and grounds its answer in that retrieved material. This is the moment your content can be selected as a citation.
Two practical lessons fall out of this.
First, structured, unambiguous content gets extracted more accurately. There is a widely cited benchmark from Data World showing that language models grounded in structured data produced up to 300 percent higher accuracy than those working from raw, unstructured text. When you make your meaning explicit, you reduce the chance the AI misreads or skips you.
Second, your reputation across the wider web matters enormously. Answer engines lean on signals of authority and consistency. If your brand is described the same way across your site, your profiles, and third-party sources, the model becomes more confident citing you. If your information is contradictory or thin, it hedges or ignores you.
Keep that mental model in mind. Almost every tactic below maps back to making your content easier to retrieve, easier to extract, and easier to trust.
"Answer engine" is not one thing. The major platforms behave differently, and understanding those differences helps you prioritize. Here is a practical, plain-language tour of the ones that matter most in 2026.
ChatGPT (OpenAI). The largest by raw query volume, now handling billions of questions a day. With browsing enabled, it retrieves live web sources and cites them. Because so many buyers start their research here, being part of ChatGPT's answers for your category questions is often the single highest-value target.
Perplexity. Built from the ground up as an answer engine, Perplexity is unusually transparent about its sources, listing citations prominently beneath each answer. That makes it a useful place to test your AEO work, because you can literally see whether you are being cited and for which prompts.
Google AI Overviews and AI Mode. Google's AI-generated summaries now sit at the top of a large share of results, synthesizing several sources into a direct answer. This is where your existing SEO and your AEO work overlap most, because the same structured, authoritative content tends to feed both the classic results and the AI summary.
Gemini (Google) and Copilot (Microsoft). Both are deeply integrated into ecosystems people already use, from Android and Workspace to Windows and Office. They pull from web and, increasingly, from a user's own connected data, which makes consistent public information about your brand all the more important.
You do not need a different strategy for each one. The encouraging reality is that the fundamentals travel well. Clear structure, accurate and consistent information, strong authority signals, and genuinely helpful content tend to lift your visibility across all of them at once. The differences mostly affect where you measure first and which prompts you prioritize, not the underlying work.
Now back to that launch, because it is a useful signpost.
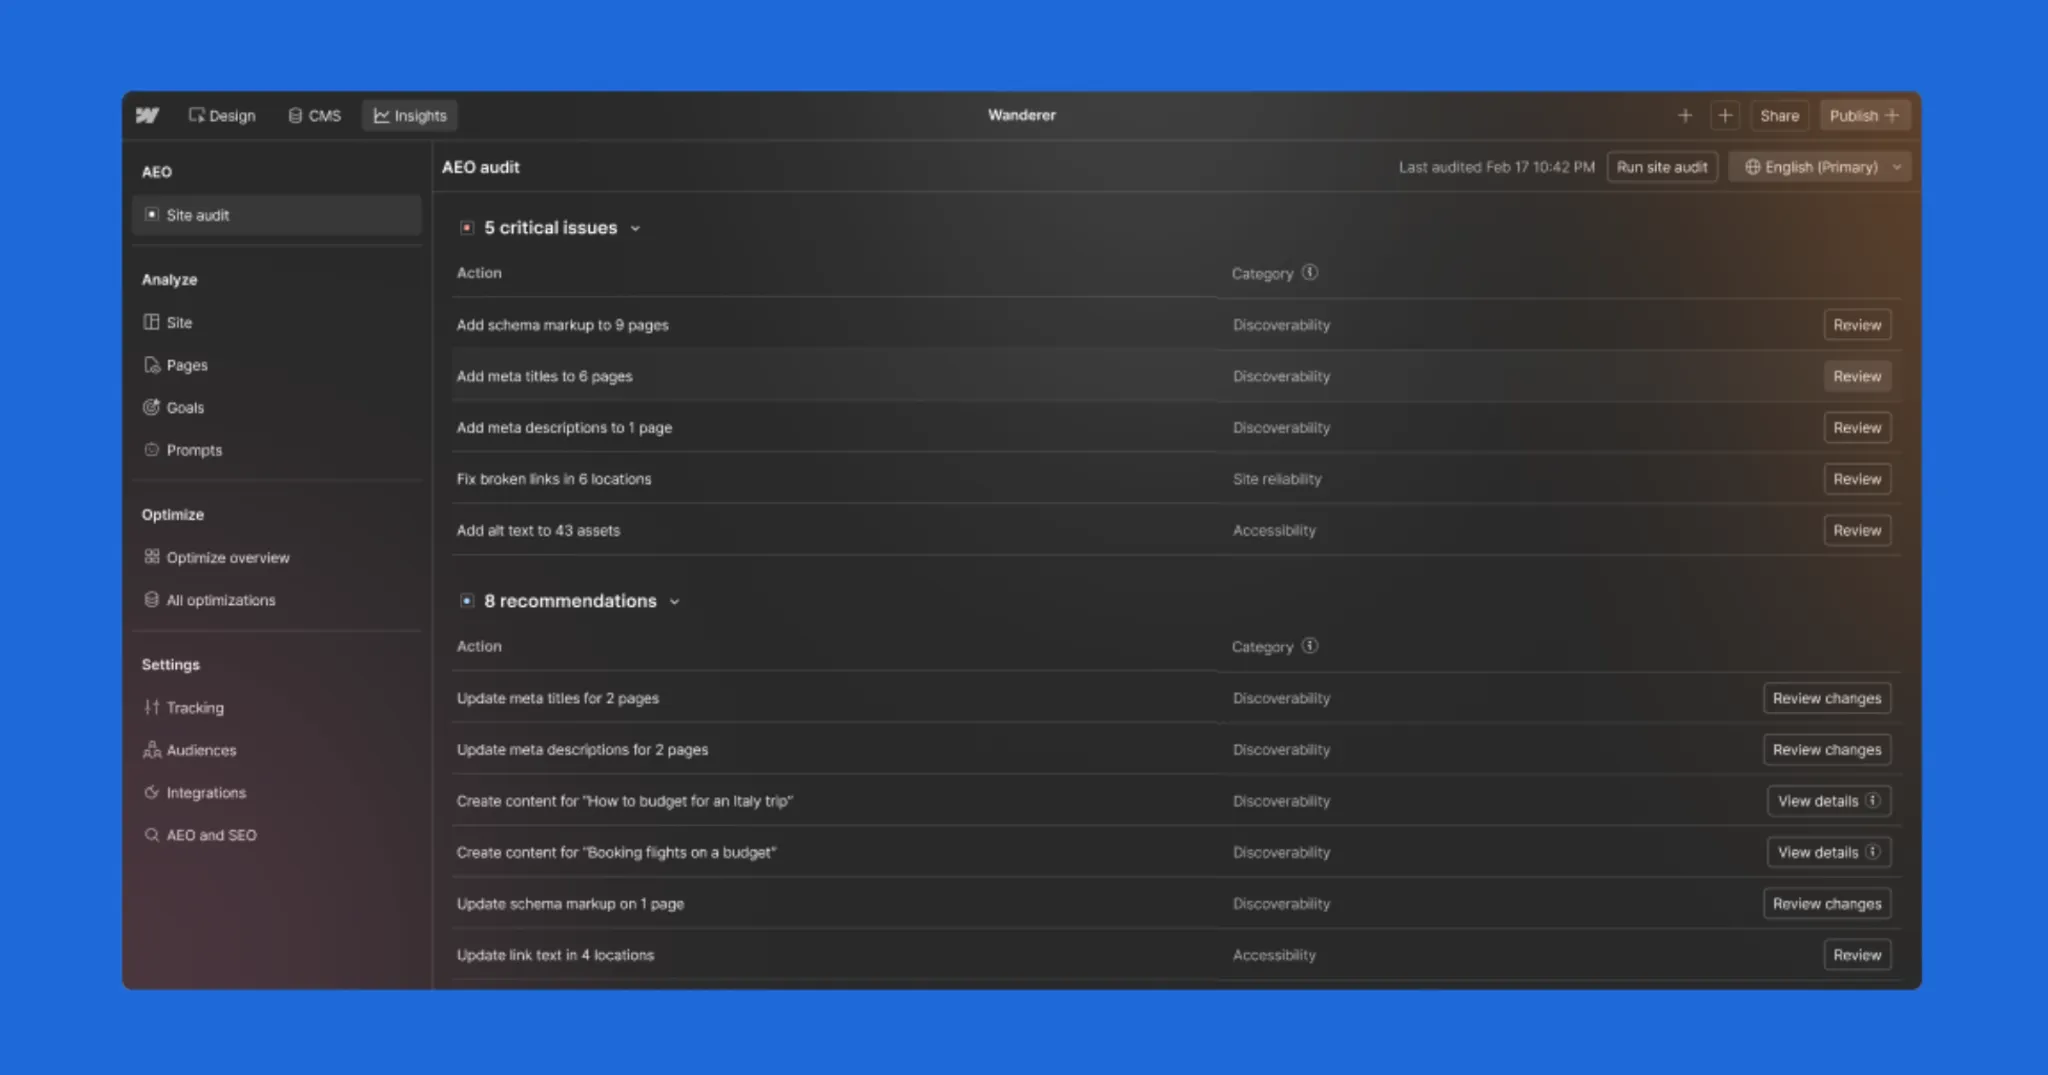
On April 13, 2026, Webflow announced Webflow AEO, describing it as a closed-loop answer engine optimization solution that helps marketing teams get discovered, understood, and cited by AI answer engines. It entered private beta and became available to Enterprise customers.
What makes it interesting is not the marketing language. It is the shape of the system. Webflow built AEO around three connected functions that form a loop:
Measure. Webflow Analyze was expanded with dedicated AEO analytics, so teams can see how often their brand is cited in answer engines, which prompts they show up in, and how that AI visibility connects to on-site engagement and conversions. The pitch is that you do not need a data team or custom instrumentation to see it.
Recommend. AEO agents surface prioritized, brand-specific recommendations. These range from technical fixes like broken links and outdated metadata to fresh content opportunities that are likely to earn citations for the prompts a team is tracking.
Act. The agents then help teams turn those recommendations into shipped changes across the site, with a review-before-publish safeguard so humans stay in control while still moving quickly.
Webflow's Chief Product Officer, Rachel Wolan, framed the core problem neatly: most teams know AEO matters but cannot execute on it fast enough, and the company positioned agents as the way to close that execution gap.
You do not need to use Webflow to take the lesson here. The direction of travel is clear. AEO is moving from a one-time content exercise to a continuous, measurable, partly automated discipline. Measure your AI visibility, get prioritized recommendations, ship improvements, then measure again. That loop is the future, whether you run it with a platform, an agency, or your own team.
It is also worth noting that this launch did not appear from nowhere. Webflow built it on a year of foundational work, including support for llms.txt, Markdown for AI agents, and an AI-assisted technical SEO tool the company says drove 75 percent more monthly organic traffic for customers who adopted it. AEO rewards the teams that started early.
This is the part you came for. Below is the practical framework. None of it requires a specific platform. All of it can be applied to your existing site today.
Answer engines reward content that gets to the point. The single highest-impact habit you can build is the answer-first structure.
For every important question your audience asks, open the relevant section with a direct, complete answer in two or three sentences. Then expand with context, nuance, examples, and evidence below it. This mirrors how an AI wants to extract information: a clean, quotable answer it can lift, supported by depth it can use to verify.
Write your headings and subheadings the way people actually ask questions. "What is AEO?" works better than "Understanding the concept." "How much does it cost?" beats "Pricing considerations." Conversational, question-shaped headings line up with how people query AI, and they make your structure obvious to a machine.
Schema markup is the closest thing AEO has to a technical cheat code, though it is not magic on its own.
Schema is code, usually written in JSON-LD format and built on the shared vocabulary at Schema.org, that explicitly tells machines what your content is. It removes ambiguity. Instead of hoping the AI infers that a block of text is a frequently asked question, you label it as one.
The results are well documented. Pages with FAQPage markup have been reported as roughly 3.2 times more likely to appear in Google's AI Overviews, according to Frase research, and SE Ranking data put FAQ schema's citation rate in AI answers at around 41 percent, compared with 15 percent for pages without it. Google explicitly prefers JSON-LD over older formats.
A few schema types deliver most of the value for AEO:
One important caveat keeps implementations honest. Schema is best understood as a last-mile optimizer, not a foundation. It helps AI accurately extract and trust content that already deserves to be cited. It cannot rescue thin or low-authority content. Mark up only what is genuinely visible on the page, connect your entities consistently, and validate your markup so errors do not quietly pile up after every template change.
The llms.txt file is an emerging standard. It is a simple file you place on your site that points AI systems and agents toward your preferred, authoritative source material, much as robots.txt and sitemaps did for traditional crawlers.
Used with realistic expectations, it helps. It can reduce ambiguity across overlapping pages and make your most important content easier for agents to identify. Pairing it with strong schema, clear headings, citation-worthy summaries, and consistent internal linking creates a stronger overall footprint than content alone.
A word of honesty here, because trust matters. Adoption of llms.txt across AI crawlers is still uneven, and it is not a guaranteed lever the way schema is. Treat it as a useful, low-cost addition to a complete strategy, not a silver bullet. For most sites, prioritize schema and content quality first, then layer llms.txt on top.
Answer engines do not cite isolated pages. They cite brands they perceive as authorities on a subject. That perception is built through depth and coverage, not a single great post.
This is where pillar and cluster content earns its keep. A comprehensive pillar page, much like the one you are reading, covers a topic broadly. Supporting cluster articles then go deep on each subtopic and link back to the pillar. Together they signal to both search engines and answer engines that you have thoroughly covered the territory.
The practical move is to map the full set of questions your audience asks across their journey, from "what is this" all the way to "how do I choose a provider," and to systematically answer each one with genuine substance.
E-E-A-T stands for Experience, Expertise, Authoritativeness, and Trustworthiness. It is a framework Google has used for years to evaluate content quality, and it has become central to AEO because answer engines are, at their core, trust machines. They are constantly deciding whose information is safe to repeat.
You cannot fake your way through this, and you should not try. Here is how to demonstrate each signal honestly:
A small but powerful habit: when you state a statistic or claim, attribute it. Saying where a number came from, as this guide does throughout, signals to both readers and answer engines that your content is grounded rather than invented.
AI systems build an internal understanding of your brand as an entity, assembled from everywhere you appear. The more consistent and well-connected those mentions are, the more confidently an engine can represent you.
Practically, that means your company name, description, founding details, locations, and core offerings should match across your website, your structured data, your business profiles, and reputable third-party listings. Connect them with sameAs references in your Organization schema. Contradictions create doubt, and doubt gets you left out of answers.
If you want a concrete starting point, here is a sequence that consistently moves the needle, ordered roughly by impact and effort.
You will not finish all of this in a week, and you should not try. AEO is a loop, not a launch.
Not all content is equally citable. Through repeated testing and the patterns reported across the industry, a handful of formats consistently earn more AI citations than plain prose. If you want to give your content the best chance of being picked up, lean into these.
Direct definitions. A clean, one or two sentence definition of a term, placed right after a question-style heading, is extremely easy for an engine to lift. "What is X? X is..." is a pattern answer engines love.
Comparison content. Buyers constantly ask AI to compare options, so "X vs Y" content and clear comparison tables get pulled into answers often. Lay out the differences plainly, and be honest about trade-offs, because balanced comparisons read as more trustworthy.
Step-by-step instructions. Numbered, sequential how-to content maps neatly onto the way people ask procedural questions. Mark these up with HowTo schema where it fits.
Statistics and original data. Engines reach for specific, attributable numbers. If you can publish original research, survey results, or benchmarks, you become a primary source that others cite too, which compounds your authority.
Frequently asked questions. A genuine FAQ section, written in natural question form and marked up with FAQPage schema, remains one of the highest-return formats for citations.
Lists and summaries. Concise, scannable lists and short summary boxes near the top of a page give engines a tidy block to extract.
The underlying principle is the same one running through this whole guide. Make the answer easy to find, easy to lift, and easy to trust. Strong content paired with a fast, cleanly structured site does the rest, which is exactly why the technical quality of your build matters as much as the words on the page. If your foundation is shaky, our Webflow design and development team rebuilds sites specifically for performance, clean structure, and search readiness.
Big strategies stall without a sequence. Here is a realistic ninety-day plan that turns everything above into action without overwhelming a small team.
Days 1 to 30: measure and fix the foundation. Run your AI visibility audit and record a clear baseline. Identify your ten most important category questions and the pages that should answer them. Restructure those pages to lead with direct answers, and clean up the obvious technical issues: broken links, outdated metadata, slow pages, and missing titles. The goal this month is an honest picture and a solid base.
Days 31 to 60: structure and markup. Add FAQ sections to your priority pages and implement FAQPage and Article schema. Set up your Organization and Person schema with consistent entity details and verified profile links. Publish or upgrade one comprehensive pillar resource on the topic you most want to own. Add your llms.txt file. The goal this month is making your best content unmistakably clear to machines.
Days 61 to 90: build authority and measure again. Produce two or three supporting cluster articles that link to your pillar and answer adjacent questions in depth. Pursue a few credible external mentions or references. Then return to your baseline audit and rerun it. Compare. Note what improved, what did not, and what to prioritize next. The goal this month is to close the loop and prove momentum.
After ninety days, you do not stop. You repeat, with sharper priorities each cycle. That is the rhythm of AEO done well.
Measurement is where many teams stall, because AEO does not show up cleanly in the old dashboards. Here is how to think about it.
Traditional SEO measures rankings and clicks. AEO measures presence and influence inside AI answers. The questions you are really trying to answer are: How often is my brand cited? For which prompts? And does that visibility lead to qualified engagement and conversions?
There are a few practical approaches. Specialized AEO and AI-visibility tools can track mentions and citations across answer engines, and established SEO platforms like Semrush and Ahrefs have been adding AI-search visibility features. You can also do lightweight manual checks by regularly querying the major engines with your priority prompts and logging where you appear.
The signal that ties it together is the loop we keep returning to. Webflow's own framing of measure, recommendation, and act is a good template even if you never touch their product. Treat every change as a hypothesis. Ship it, watch whether your citations and qualified traffic improve, and feed what you learn back into the next round. Running that loop reliably is what ongoing Webflow maintenance and optimization is built for, since AI visibility rewards consistent iteration far more than one big push.
The early evidence that this works is encouraging. HubSpot reported that beta customers using its AEO tooling drove around 20 percent more traffic from AI than non-users, and that its own AEO strategy contributed to a dramatic rise in qualified leads. Separately, customer data from one AEO platform suggested that brands running comprehensive programs, combining schema, answer-first content, and E-E-A-T signals, saw their AI citation rates improve several times over within about six months. Timelines vary, but a common rule of thumb is that foundational schema work can show up in a matter of weeks, while authority building plays out over three to six months.
A few patterns trip teams up repeatedly. Steering around them will save you months.
Treating AEO as a one-time project. It is a continuous loop. Answer engines change, competitors adapt, and your content needs to keep pace.
Marking up content that is not on the page. Schema should describe what a user can actually see. Misleading markup undermines trust and can be ignored or penalized.
Chasing llms.txt as a magic fix. It is a helpful supporting tactic, not a foundation. Prioritize content quality and schema first.
Writing for machines and forgetting humans. Answer engines are getting better at rewarding genuinely helpful, well-written content. Keyword-stuffed, robotic pages do not earn citations or trust. Write for the person first.
Ignoring measurement. If you are not tracking your AI visibility, you are guessing. Establish a baseline early.
Neglecting your wider reputation. Your on-site work matters, but so does how you are described across the web. Authority is earned everywhere, not just on your domain.
Step back and the trajectory is clear. Search is becoming answer-first. Discovery is moving upstream of the click, into the moment an AI decides which brands are worth mentioning. And the work of staying visible is becoming continuous and increasingly agentic, where systems measure, recommend, and help execute on a loop.
Webflow's AEO launch is one signal of that future arriving. It will not be the last. The teams that thrive will be the ones who start now: structuring content around real questions, making their expertise explicit and verifiable, earning genuine authority, and treating AI visibility as something to measure and improve rather than hope for.
The good news is that none of this is exotic. At its heart, AEO rewards the same thing great content always has: being genuinely useful, clearly organized, and trustworthy. The tools are new. The principle is old. Be the most helpful, most credible answer to the questions your audience is asking, and make that answer easy for both people and machines to find.
That is a goal worth building toward. And it is one you can start on today.
This guide is grounded in work we do every day. AppsRow is a Webflow Certified Premium Partner based in Ahmedabad, India, and since 2016 we have helped startups and growing companies build digital experiences that perform. We have delivered 300-plus B2B SaaS websites and hold a 4.8-star client rating, with deep experience serving SaaS companies, AI startups, fintech, and e-commerce brands.
Our perspective on AEO is not theoretical. As a full-service team that combines design, development, and marketing under one roof, we build the technical foundations that AI discovery depends on: answer-first content architecture, structured data and schema implementation, llms.txt setup, clean and fast Webflow builds, and the kind of consistent entity and authority signals that help brands get cited. Our marketing services already pair traditional SEO with Answer Engine Optimization, because we believe the two belong together.
We also live the closed-loop philosophy this article describes. From discovery and design through development, QA, and ongoing maintenance, we measure what we ship, recommend improvements, and iterate. It is the same loop that now defines modern AI visibility.
If your team is ready to move from understanding AEO to actually implementing it, on a platform built for the agentic web, we would be glad to help. You can reach the team at appsrow.com to start a conversation about making your brand the answer your customers find.
If you have visited webflow.com/pricing recently, you already know the page is dense. Site plans, Workspace plans, Ecommerce plans, add-ons, seats, AI credits, and now a brand new pricing structure that rolled out on May 13, 2026. For founders, marketing leaders, and agencies trying to budget a real website, the question is not "what is Webflow's cheapest plan" but "what will my final invoice actually look like once we publish, scale, and collaborate."
This guide breaks down every layer of Webflow pricing in 2026, explains the recently announced changes, compares Webflow head to head with the other five major platforms, and helps you decide which plan fits your team. By the end, you will know exactly how Webflow charges, where the hidden costs hide, and when the platform pays for itself in saved engineering hours.
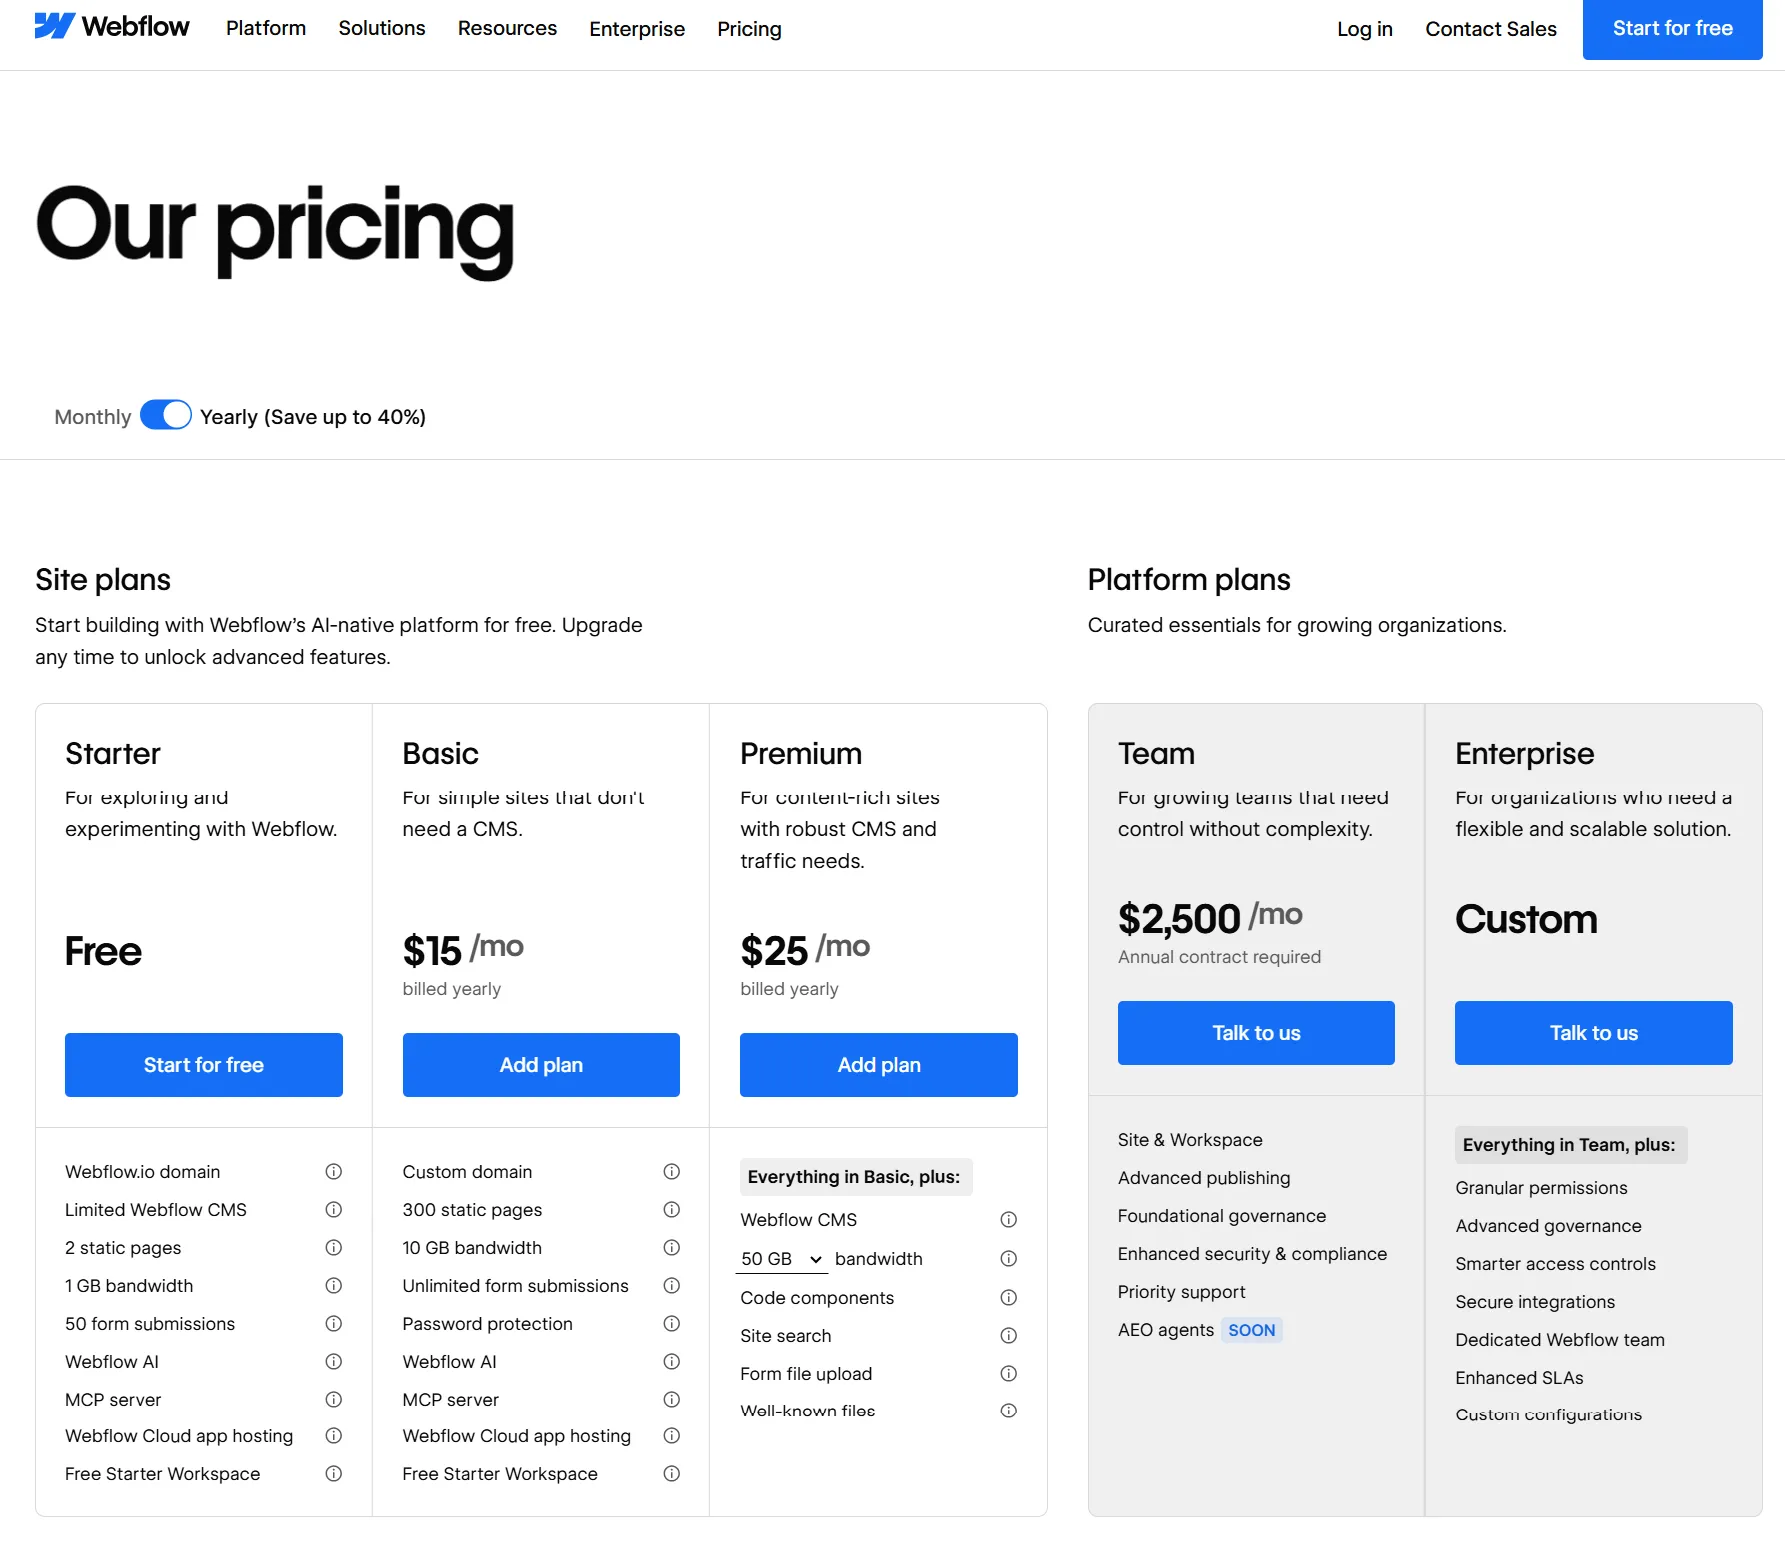
On May 13, 2026, Webflow announced its biggest pricing overhaul since the December 2024 seat restructure. The company is doing three things in one move.
First, it is simplifying the Site plan lineup. The old CMS plan ($23/mo) and Business plan ($39/mo) are being merged into a single new tier called the Premium Site plan, priced at $25/mo billed yearly or $39/mo billed monthly. According to Webflow's official announcement, "Today, we're introducing a new Premium Site plan by combining the CMS and Business Site plans into one. This helps simplify our overall lineup so it's easier for customers to understand which plan is right for them. The Premium plan is priced at $25/month for a yearly plan or $39/month for a monthly plan."
Second, Webflow is raising the CMS ceiling and removing add-ons. The Premium plan now includes 20,000 CMS items and 40 CMS Collections by default, removing the need for separate CMS item add-ons. If you currently pay for a CMS items add-on on a Business plan, that add-on cost gets removed at your next renewal because the new limit covers it.
Third, Webflow is introducing the Team plan, an all-in-one package designed for fast-growing teams that have outgrown self-serve but are not ready for Enterprise. "The Team plan bundles all into a single all-in-one plan designed for fast-growing teams that have outgrown self-serve but aren't quite ready for Enterprise. It includes a site with 100 CMS Collections, 10 seats, Localization, and features previously not available on self-serve like our new AEO agents, page branching, single-page publishing, and so much more."
A fourth quieter change: starting May 13, 2026, AI credits are included in all Workspace plans, with paid add-ons available for teams that need more. Credit limits will not be enforced until June 29, 2026, which gives existing customers a runway to study their usage.
The rollout is phased. For all new Site plan purchases, changes take effect starting May 13, 2026. For all other existing sites, changes take effect on your next renewal or billable change on or after June 29, 2026. Site owners can switch to yearly billing before then to lock in their current Site plan for another year.
If you are already on a CMS or Business plan, your site will be automatically migrated to Premium at your next renewal or whenever you make a billable change after June 29, 2026. You do not need to take action. The community reaction, however, has been mixed: some users will pay less under the new model, some the same, and some more, depending on bandwidth usage and whether they were paying for CMS add-ons.
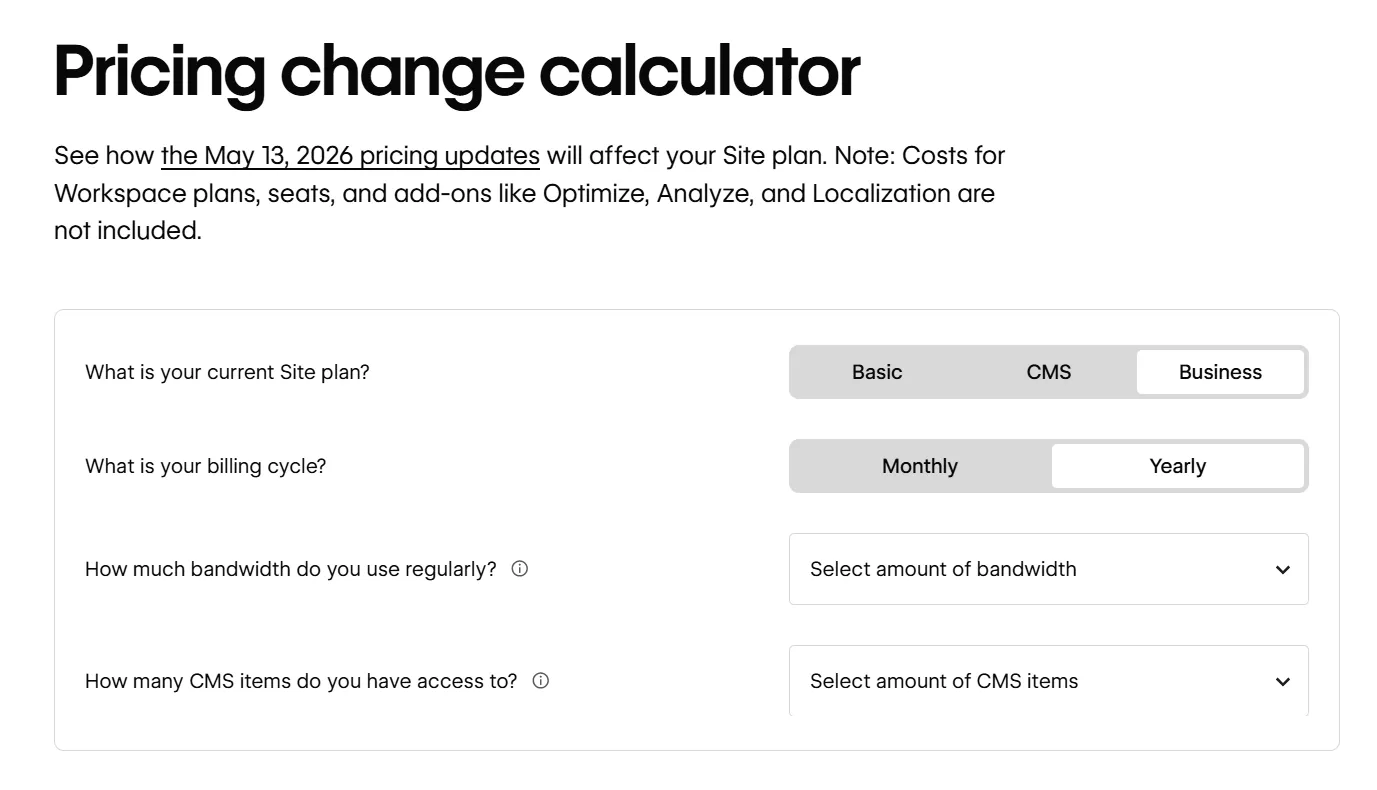
The single most confusing thing about Webflow's pricing is that you are almost always paying for two things at once. This trips up nearly every first-time buyer.
A Site plan is what lets your website go live on a custom domain. It covers hosting, CDN, SSL, CMS capacity, bandwidth, and site-level features like form submissions and page password protection. You pay one Site plan per published website. If you run five client sites, you pay five Site plans.
A Workspace plan is what lets you build, collaborate, and stage sites before publishing. It controls how many people can edit, how many unpublished staging sites you can run, and what advanced features your design team can access (like code export, Shared Libraries, page branching, and role-based permissions). You pay one Workspace plan per team, not per site.
Both run on independent billing cycles, and the distinction matters because solo founders building one site can often skip the paid Workspace entirely. But the moment you bring on a content writer, a marketing manager, or a freelance designer, the Workspace tier becomes non-optional.
There is also a third category, add-ons, which are usage-priced features that stack on top of any Site or Workspace plan. We will get to those after we walk through the core plans.
Let us look at each general Site plan, with both the legacy structure (for context, since many customers are still on it) and the new post-May 13 structure.
Every Webflow account begins on the free Starter plan. It is genuinely useful for learning the platform, prototyping, or wireframing client concepts, but it has hard limits that make it impractical for production.
You get a webflow.io subdomain (no custom domain), 2 pages, 20 CMS Collections, 50 CMS items, 1 GB bandwidth, and 50 lifetime form submissions. The Webflow badge stays visible in the bottom right corner. For a quick prototype or a personal landing experiment, it works. For anything you plan to publish to a real domain, you will need to upgrade.
The Basic plan is for static sites that do not need a CMS. Think single-page landing pages, simple portfolios, or brochure sites.
Under the legacy structure, Basic is $14/mo billed yearly with 150 static pages and 10 GB bandwidth. Under the May 13, 2026 update, the Basic plan moves to $15/mo billed yearly with 300 static pages (up from 150), 10 GB bandwidth, and unlimited form submissions. The trade-off some users have flagged: while the page count doubles, the price ticks up slightly.
The catch with Basic remains the same: zero CMS features. If you ever want a blog, a team page powered by structured data, or any content you will update regularly, you will need the next tier.
This is the headline change in 2026. Webflow has merged the CMS plan ($23/mo) and the Business plan ($39/mo) into one Premium Site plan at $25/mo billed yearly, or $39/mo billed monthly.
What Premium includes:
This is a significant simplification. Before the change, teams running content-heavy marketing sites had to choose between the CMS plan and the Business plan based on bandwidth and CMS limits, and they often had to layer in CMS item add-ons (priced at $25/mo for +5,000 items and $50/mo for +10,000 items billed annually). Now those add-ons are gone, included in the base price.
The community reaction has been split. As one blog put it, "The Price Jump: The new Premium plan is set at $25/mo (billed yearly) or $39/mo (billed monthly). Mandatory Migrations: Current CMS plan users are being moved directly into this higher-priced tier." Some CMS customers paying $23/mo will see their bill go up to $25/mo, while many Business customers paying $39/mo with no add-ons will see their bill drop to $25/mo. The actual financial impact depends on your bandwidth usage and previous add-ons.
Webflow Enterprise is custom-priced and built for organizations needing guaranteed SLAs, SSO, custom security headers, audit logs, advanced collaboration, design approvals, page branching, and dedicated customer success. There is no published price; you talk to sales. Customers like Dropbox, Discord, Lattice, and The New York Times sit here.
For years, running a Webflow site meant clicking through the Designer, updating CMS items one by one, and pulling in developers every time the work moved beyond drag and drop. That equation just changed. With the official Webflow connector for Claude, you can now talk to your site in plain English and watch it respond. Pages get audited. CMS items get created in bulk. Style systems get cleaned up. Localized landing pages get drafted in minutes instead of hours. The connector is built on Webflow's Model Context Protocol (MCP) server, which gives Claude real, governed access to your Designer and Data APIs. In practical terms, that means Claude is no longer just a brainstorming partner sitting next to your browser tab. It is an operator inside your site, executing tasks you would normally schedule across multiple team members and several days of work.

This shift matters because the bottleneck in most Webflow projects has never been ideas. It has been execution. Every team has a backlog of SEO fixes, content updates, class cleanups, and new pages waiting for someone to find the time. The Webflow + Claude connector compresses that backlog dramatically. Below are five concrete things you can do with it today, the kind of work that pays for itself the first week you turn it on.
SEO maintenance is one of those tasks that everyone agrees is important and almost no one keeps up with. Meta titles drift past 60 characters. Descriptions go generic. Images get uploaded without alt text. Slug structures lose their logic as the team grows. On a 50 page site this is annoying. On a 200 page site with hundreds of CMS items, it is a full week of focused work that rarely gets prioritized.
With Claude connected to Webflow, the entire audit collapses into a single working session. You can ask Claude to list every page and CMS item on the site, flag any meta title over 60 characters, flag any description over 155 characters, identify missing alt tags on CMS images, and check whether the main keyword from the slug actually appears in the title. Claude returns the findings in a structured table, proposes corrected versions for each problem case, and waits for your approval before touching anything. Once you sign off, it applies the fixes directly to Webflow through the Data API.
Example prompt to try:
The real win is consistency. A human auditor gets tired around row 80 and starts approving things they would have rejected at row 10. Claude does not. It applies the same rules with the same precision across the entire site, and the savings on a mid-sized project typically land somewhere between four and eight hours of senior time.
The CMS is where most Webflow sites actually live. Blog posts, case studies, products, team members, locations, FAQs, all of it sits in collections that need constant attention. Adding 20 new product entries the old way meant either manual entry or a CSV import that often broke on reference fields. Updating one field across an entire collection meant clicking into each item, making the change, and saving. For content teams, this was the slowest part of the job.
The Claude connector turns CMS work into a conversation. You can ask Claude to create new items from a list, update specific fields across an entire collection, change category assignments based on rules you define, rewrite portions of existing items to match a new tone, or restructure a blog by reassigning posts to different topic clusters. Because Claude reads the collection schema before acting, the data it writes already conforms to your field types, your reference relationships, and your slug conventions. No broken imports. No fields ending up in the wrong place.
Example prompt to try:
"In my Blog Posts collection, find every item still tagged with the old category 'News' and reassign it to either 'Product Updates' or 'Company News' based on the content of the post. Show me your proposed reassignments in a table before applying."
This is particularly powerful for e-commerce operators and content-heavy sites. Inventory adjustments, price changes, seasonal product launches, blog reorganizations, all of these become tasks you describe rather than tasks you click through.
Any Webflow site that has been live for more than a year tends to accumulate technical debt in its style system. Duplicate classes pile up because two contributors named the same thing slightly differently. Hardcoded color values appear where a CSS variable already exists. Spacing values drift from your design tokens. Component variants multiply for no real reason. The site still looks fine, but the foundation has become hard to maintain, and onboarding a new designer to it costs real time.
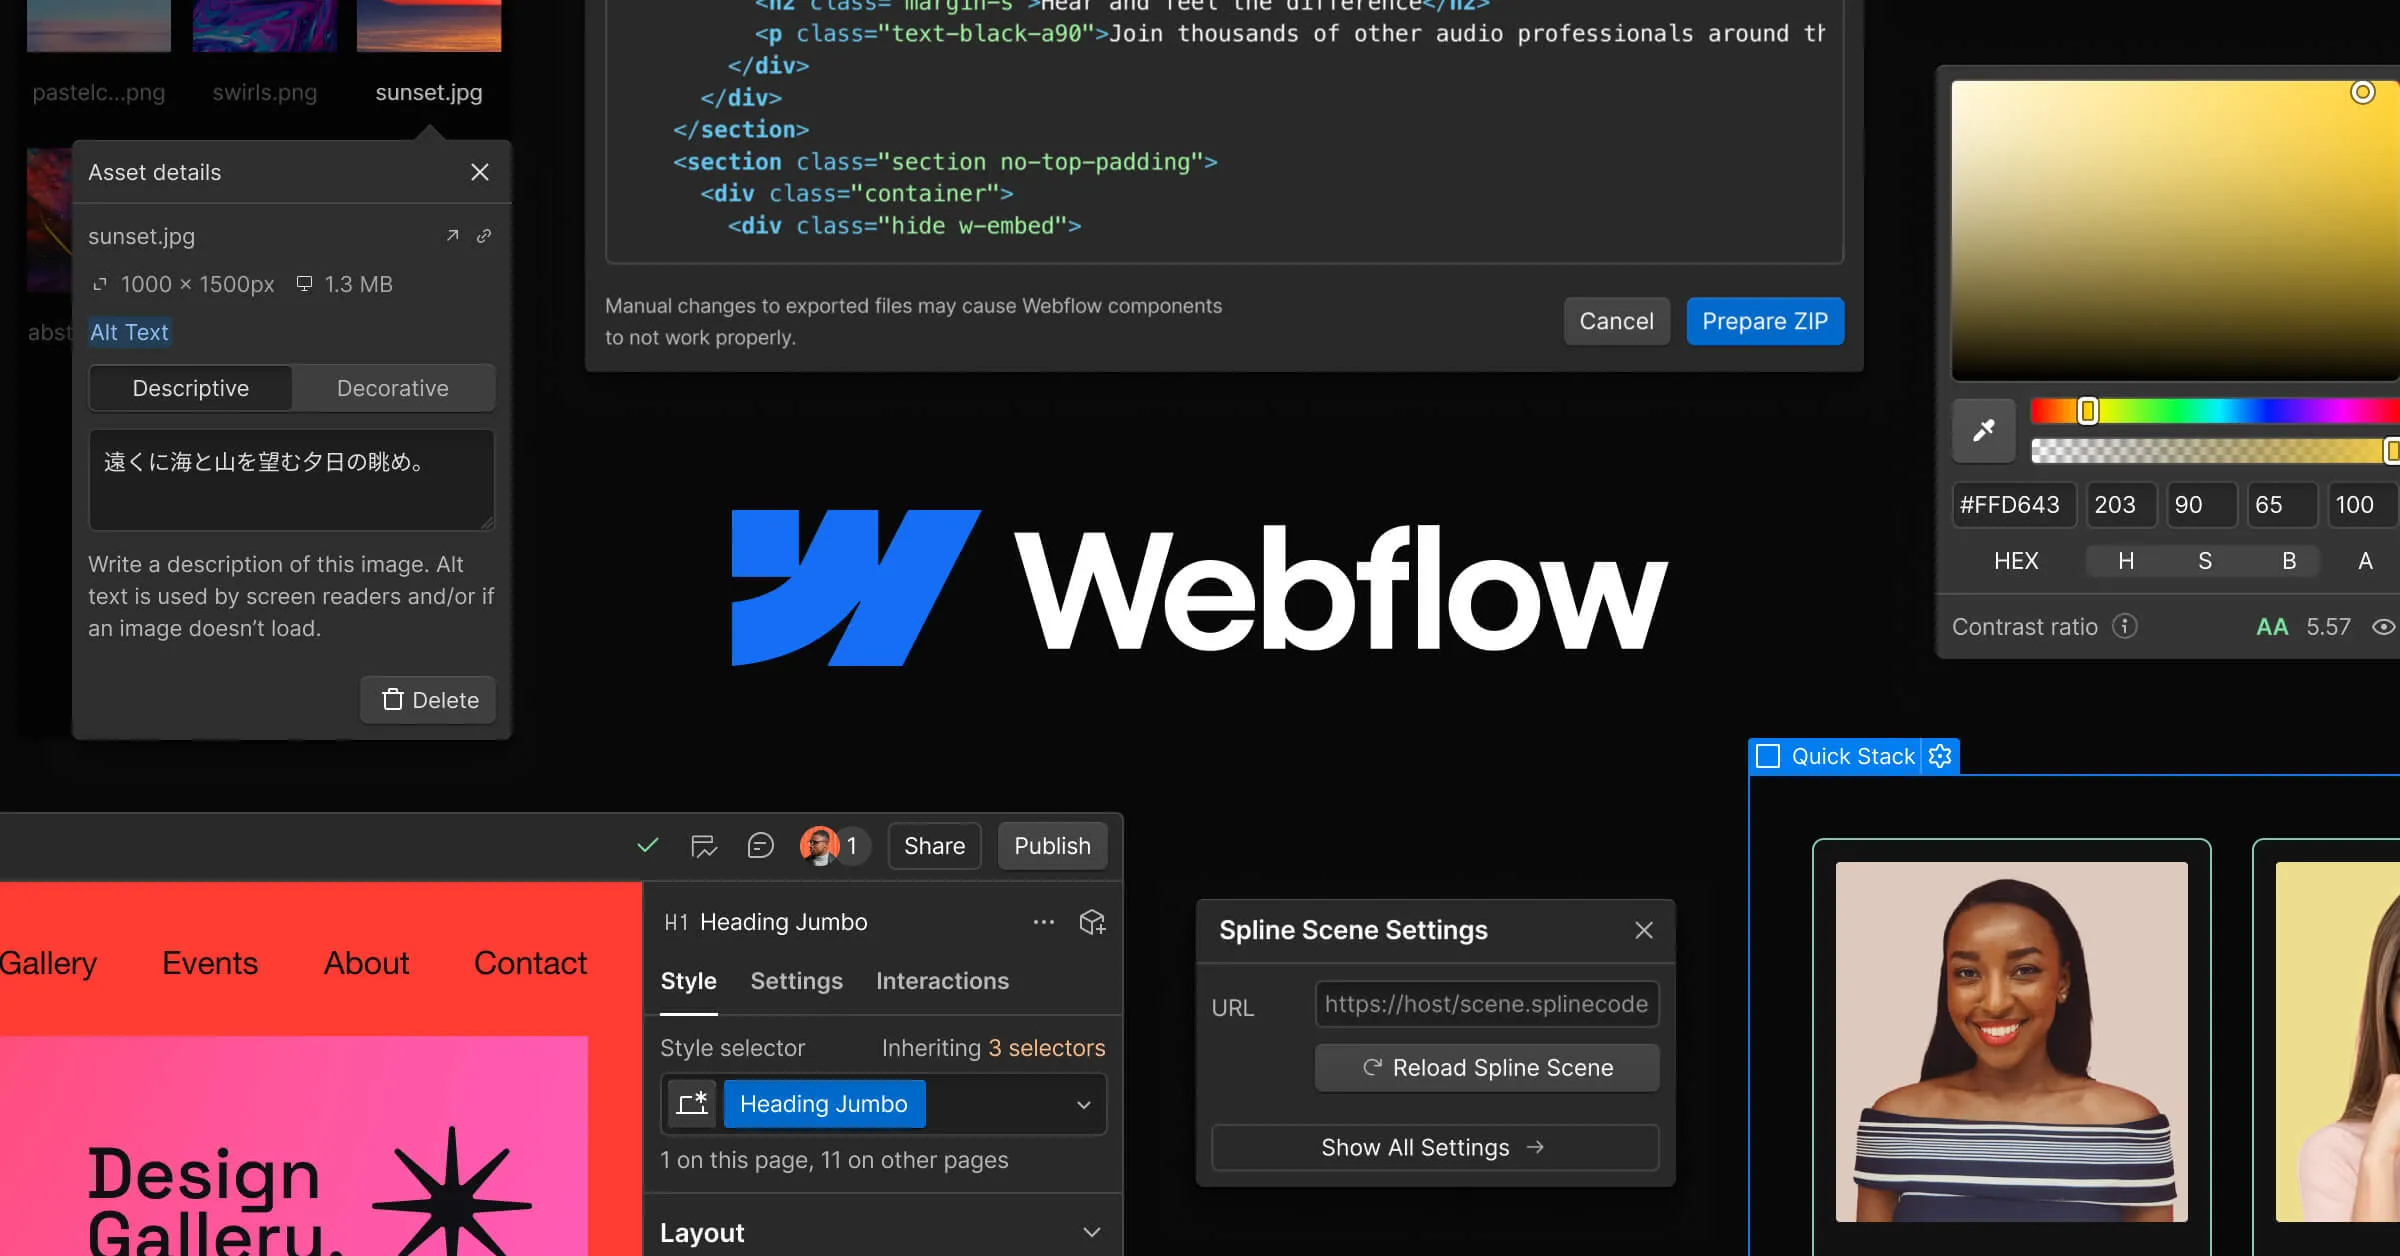
Claude can audit the entire class and variable system through the Designer API. Ask it to list every class on the site, identify duplicates or near duplicates, flag naming inconsistencies, find hardcoded values that should be tokens, and surface unused styles that can be safely removed. Claude produces a clean report you can review before any changes are made. With your approval, it can then consolidate duplicate classes, replace hardcoded values with the right CSS variables, and standardize naming across the site.
Example prompt to try:
"Audit all classes and variables in my Webflow site. List duplicate or near duplicate classes, any hardcoded color or spacing values that should be replaced with existing variables, and classes that appear unused. Produce a structured cleanup report with your recommendations, ranked by impact."
For agencies inheriting client sites, this single capability shortens the audit phase of new engagements significantly. For in-house teams, it gives you a way to keep design system hygiene as part of regular maintenance rather than a one-time crisis project.
Most AI writing tools produce generic output that needs heavy editing before it can sit alongside your existing content. Tone is off. Internal linking is missing. Headers do not match your taxonomy. The article reads like an article from somewhere else, which is exactly the problem the Webflow connector solves.
Because Claude can read your existing CMS content directly, it can analyze the structure, voice, and formatting patterns of your published work, then generate new content that replicates those patterns precisely. If your blog uses a specific header hierarchy, embedded tables, internal anchor links, and a recurring section structure, Claude picks that up and applies it to the new piece. If you have a comparison series with a consistent format, it follows that format. If your product pages have a specific layout with consistent fields, it generates new entries that match.
The workflow looks something like this. You give Claude access to the relevant collection. You point it at two or three published items as reference. You provide source material or a brief. Claude drafts a new entry in the CMS as a draft, with the correct structure, the correct metadata, and internal links to related items already in place. You review, adjust a line or two, and publish.
Example prompt to try:
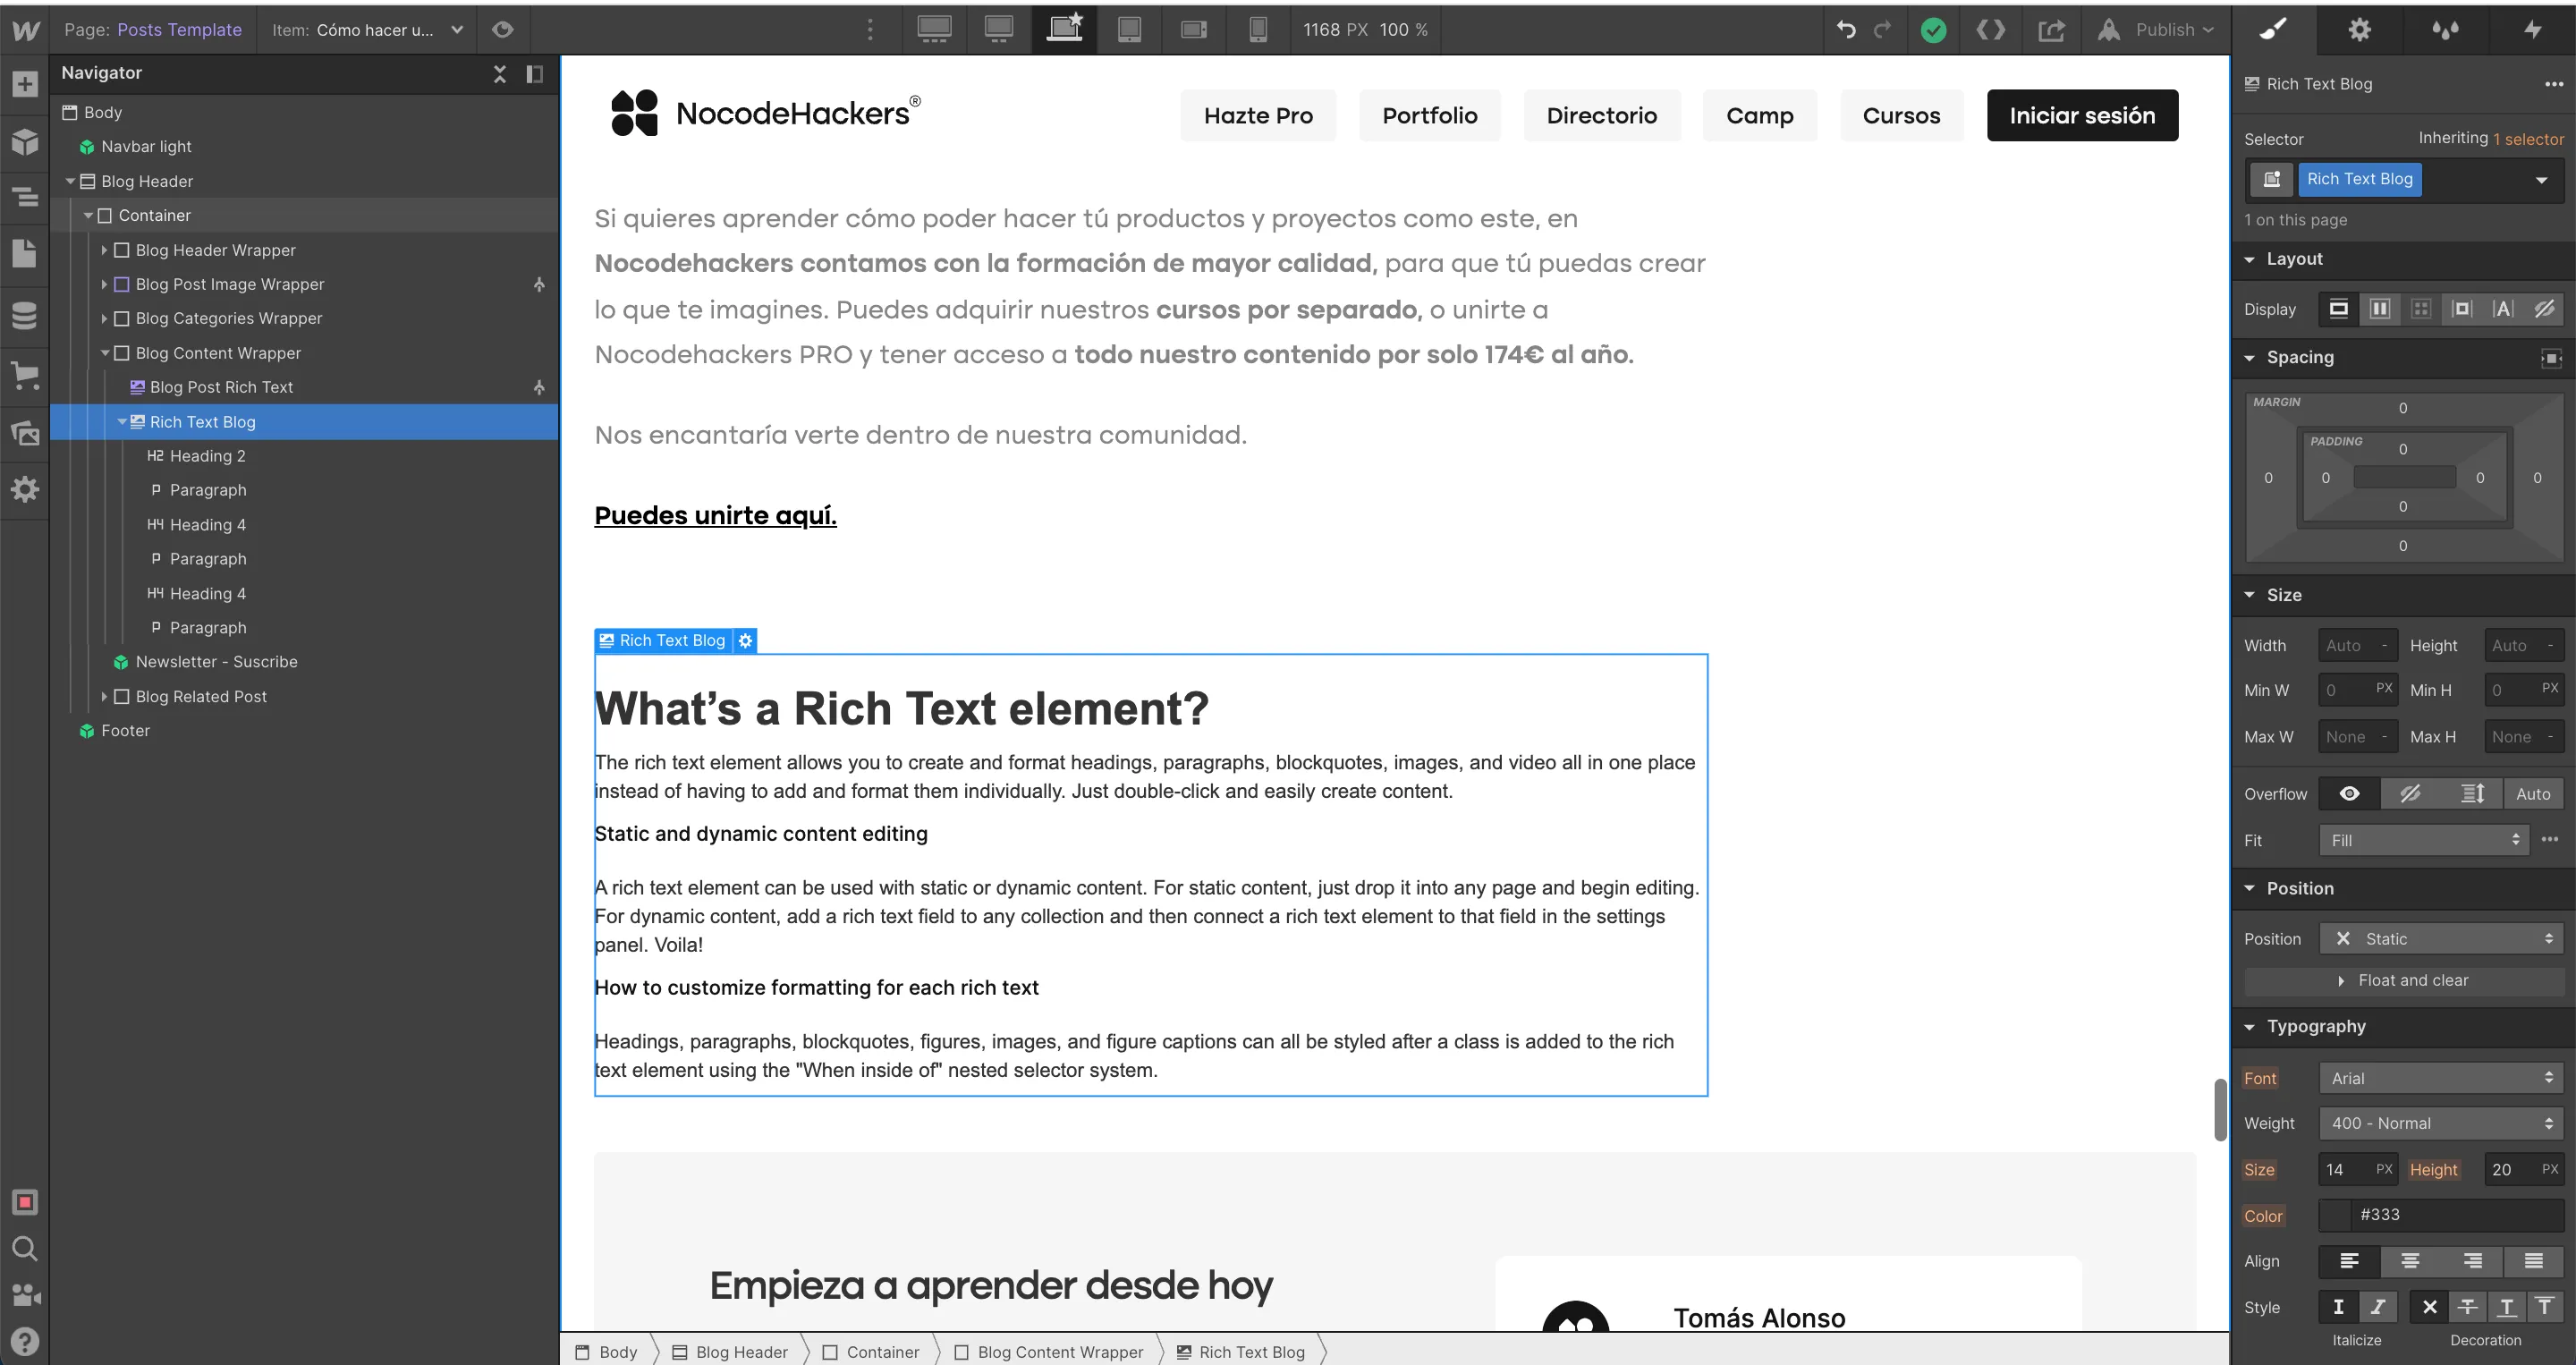
A comparison article that used to take two hours of structural work plus the actual writing now takes 30 minutes total.
Two of the most painful Webflow projects share the same underlying problem: repeating a structure many times with small variations. Local SEO pages are the classic example. You need 20 location specific landing pages, each with the same skeleton but localized data, examples, and language. Done manually, that is two to three days of work. Done with the connector, it is an afternoon.
The flow is straightforward. Claude reads your pillar page and the most relevant case studies or proof points from the CMS. It identifies the sections that need adapting for each target city or region. It generates a localized version for each target with the right examples, statistics, and contextual language. It creates the draft in the CMS with correct metadata. You review the batch, make adjustments, and publish.
Example prompt to try:
Content migration follows a similar logic. Moving 30 consultant pages from WordPress to Webflow used to mean reformatting HTML, cleaning up shortcodes, mapping fields, and configuring redirects, all by hand. Claude can read source pages provided via HTML export, reformat them into clean Webflow compatible structure, push them into the target CMS with proper metadata, and generate the full list of 301 redirects in one pass. The grinding parts of migration disappear from the project scope, which means you can quote migration work more aggressively and deliver it faster.
A few practical notes worth knowing before you turn this on. The Webflow connector requires a paid Claude plan. Setup takes about three minutes from the Connectors menu inside Claude, using standard OAuth to authorize the sites you want to connect. For CMS, metadata, and content operations through the Data API, you do not need the Webflow Designer open. For operations that touch the canvas through the Designer API, the companion app needs to be running. Most everyday work falls into the first category, which is part of why this is so usable for marketing and content teams who do not live inside the Designer.
The other thing to set correctly is approval mode. Claude can run in automatic mode, where it executes changes directly, or manual mode, where it lists each intended change and waits for confirmation. For production sites, manual mode is the right starting point. You see exactly what is about to happen before it happens, which keeps you in control while you learn what the connector is good at.
The interesting part of the Webflow + Claude connector is not any individual feature. It is the closing of the gap between deciding to do something and seeing it live on the site. For most teams, that gap is where projects die. SEO audits sit in spreadsheets nobody acts on. Class system cleanups get pushed to the next quarter forever. Content backlogs grow because the bottleneck is execution capacity, not strategy. By giving Claude real, governed access to your Webflow site, that bottleneck loosens significantly. The work that used to require a sprint now fits inside an afternoon.
This does not mean Webflow becomes a black box you stop understanding. The connector is built around Webflow's existing structure, so everything Claude does is editable, reviewable, and reversible in the same Designer your team already uses. You get speed without giving up control. For agencies, that means more projects shipped per quarter. For in-house teams, it means the maintenance and optimization work that always slipped to the bottom of the list finally starts getting done. If you run a Webflow site and have not turned the connector on, the five minutes of setup is the most lopsided ROI investment available to you this year.
This blog is brought to you by Appsrow, a team with deep, hands-on expertise in Claude integrations and Webflow development. We help businesses connect Claude to Webflow the right way, from setting up the MCP connector and configuring approval workflows, to building custom automations for CMS operations, SEO at scale, content generation pipelines, and full site migrations. If you want to turn the ideas in this post into working systems on your own site, we know the platform, we know the AI layer, and we know how to make the two work together without cutting corners on governance, branding, or design quality. Reach out to talk about your Webflow + Claude project.

From brand identity to Webflow development and marketing, we handle it all. Trusted by 300+ global startups and teams.
The Appsrow blog covers Webflow tips, design trends, development best practices, SEO strategies, and digital marketing insights. We share practical knowledge from our Webflow development and design projects, offering actionable content created by experienced professionals who understand real-world challenges and solutions.
Appsrow publishes new blog articles regularly, typically multiple times per month covering various Webflow and web development topics. Our content often relates to Webflow SEO strategies and industry trends, maintaining a consistent publishing schedule that provides fresh, valuable content for our community of readers.
Yes, you can subscribe to receive notifications when Appsrow publishes new blog content via email or RSS feed. Subscribers get early access to valuable insights about Webflow design trends, development techniques, and exclusive content. Staying subscribed ensures you never miss important updates and expert tips.
Appsrow occasionally accepts high-quality guest posts from industry experts on relevant topics. We maintain strict quality standards to ensure content provides genuine value to our readers. Guest contributors from SaaS companies or agencies must demonstrate expertise and align with our content guidelines and editorial standards.
Yes, all Appsrow blog articles are optimized following best practices including keyword research, meta optimization, and structured content. We practice what we preach about Webflow SEO, and our blog serves as both an educational resource and demonstration of our expertise in content marketing and search optimization.
Absolutely! Appsrow encourages sharing our blog content on social media platforms to help others benefit from the information. Each article includes social sharing buttons, and articles about AI industry trends or Webflow tips often perform well on platforms like LinkedIn and Twitter within professional communities.
Yes, Appsrow occasionally publishes case studies showcasing successful client projects and results achieved. These real-world examples demonstrate our capabilities including Webflow migration success stories and provide practical insights into our methodology, approach to solving specific challenges, and quantifiable business outcomes.
Yes, Appsrow welcomes content suggestions from readers and considers them for future articles. We value community input and want to address topics that matter most, whether about conversion optimization techniques or Webflow best practices. Your suggestions help us create more relevant and valuable content.
Appsrow creates content for various skill levels, from beginners to advanced users, with clear indication of difficulty. Our tutorials include step-by-step instructions for Webflow design and development, with screenshots and practical examples making complex topics accessible without oversimplifying important concepts.
The Appsrow blog provides actionable insights that help improve your website, marketing efforts, and online presence. You can learn best practices for Webflow development, stay updated on industry trends, and discover solutions to common challenges, helping businesses make informed decisions about their digital strategies.
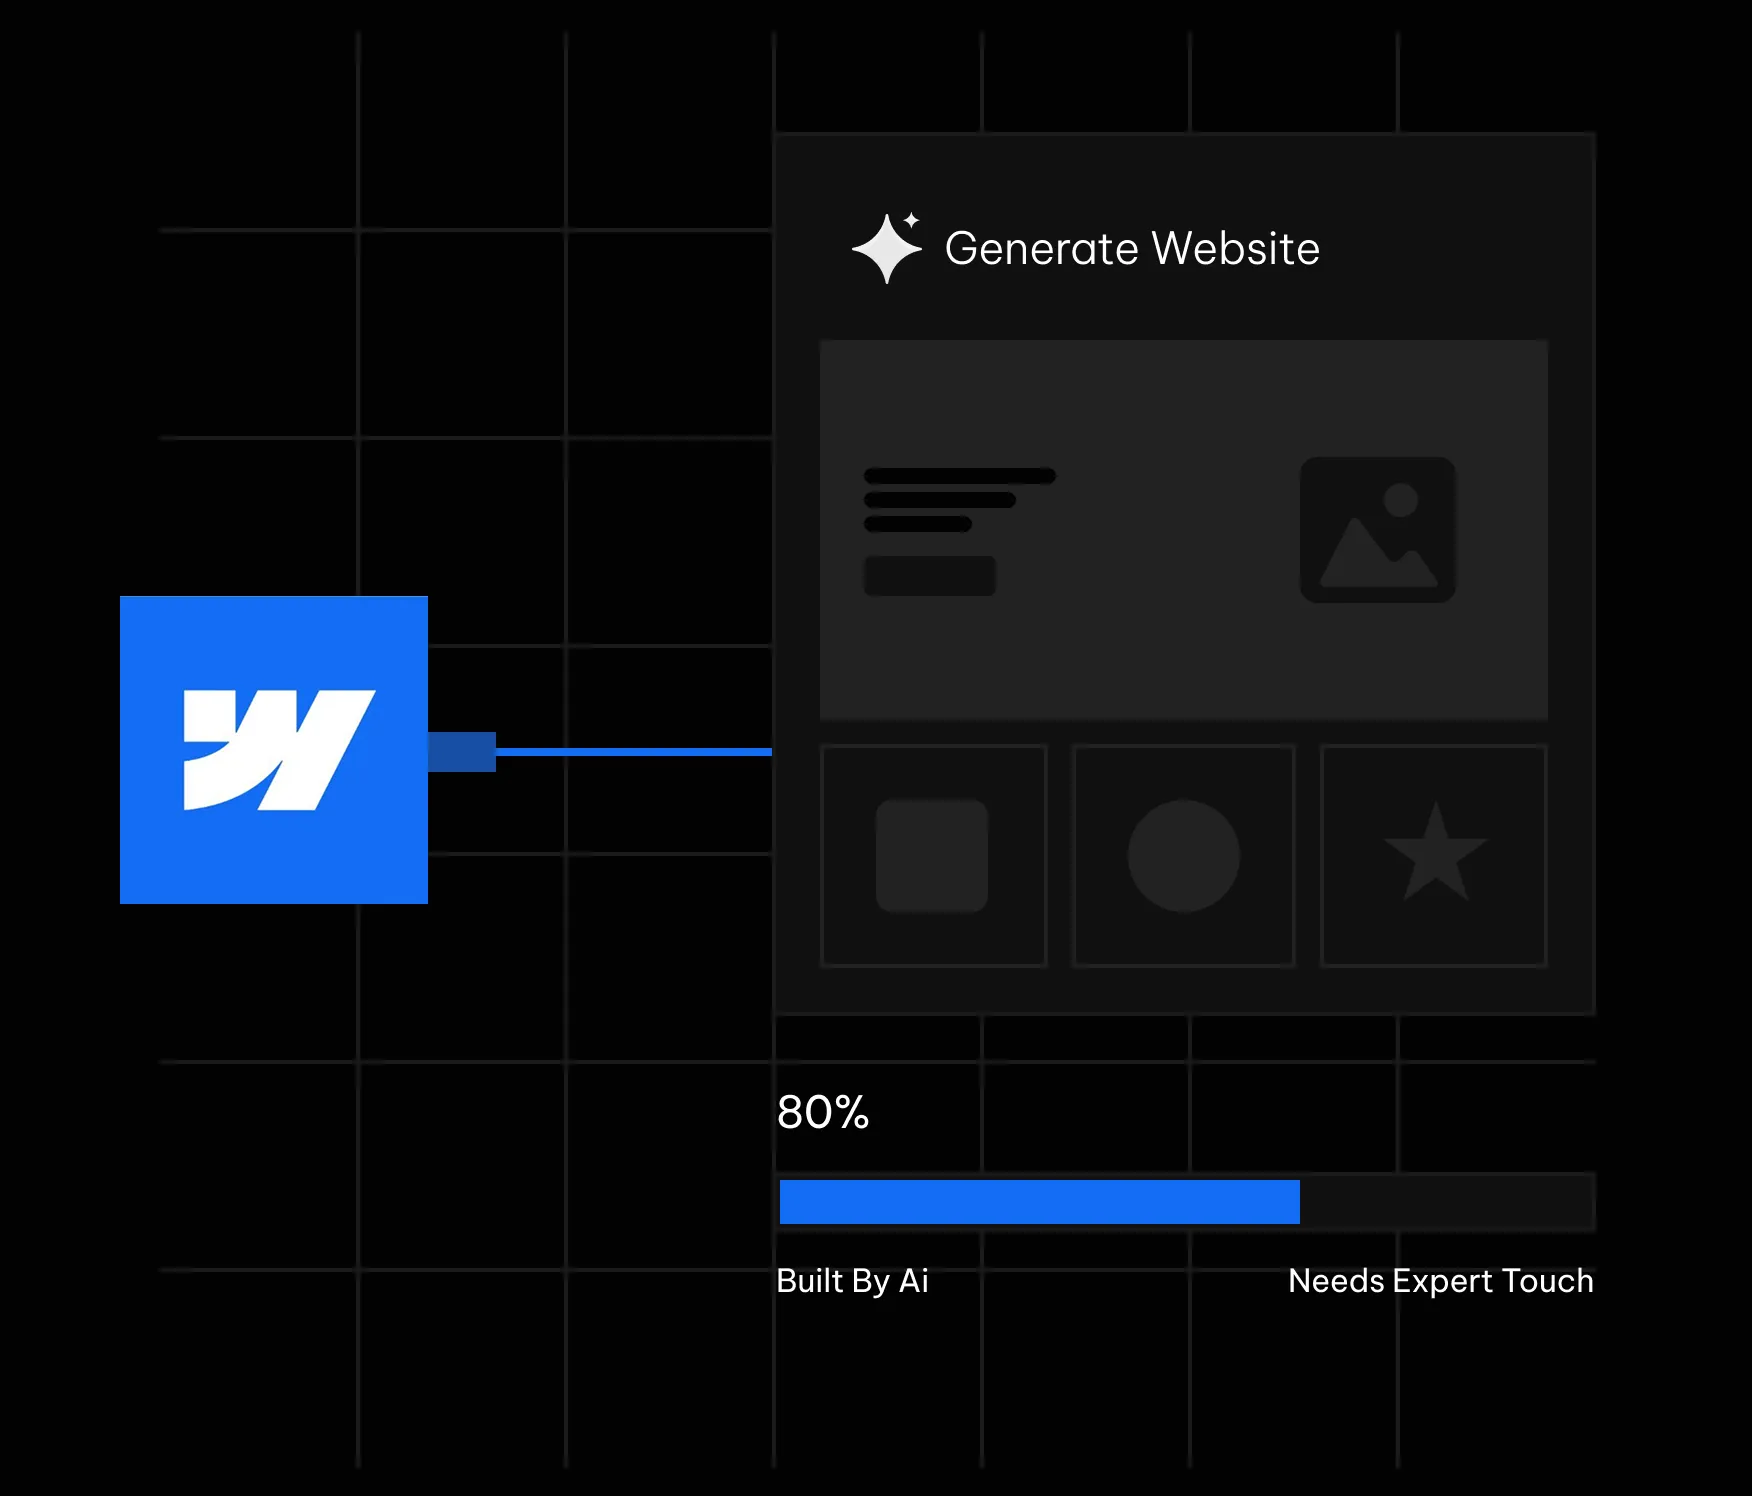
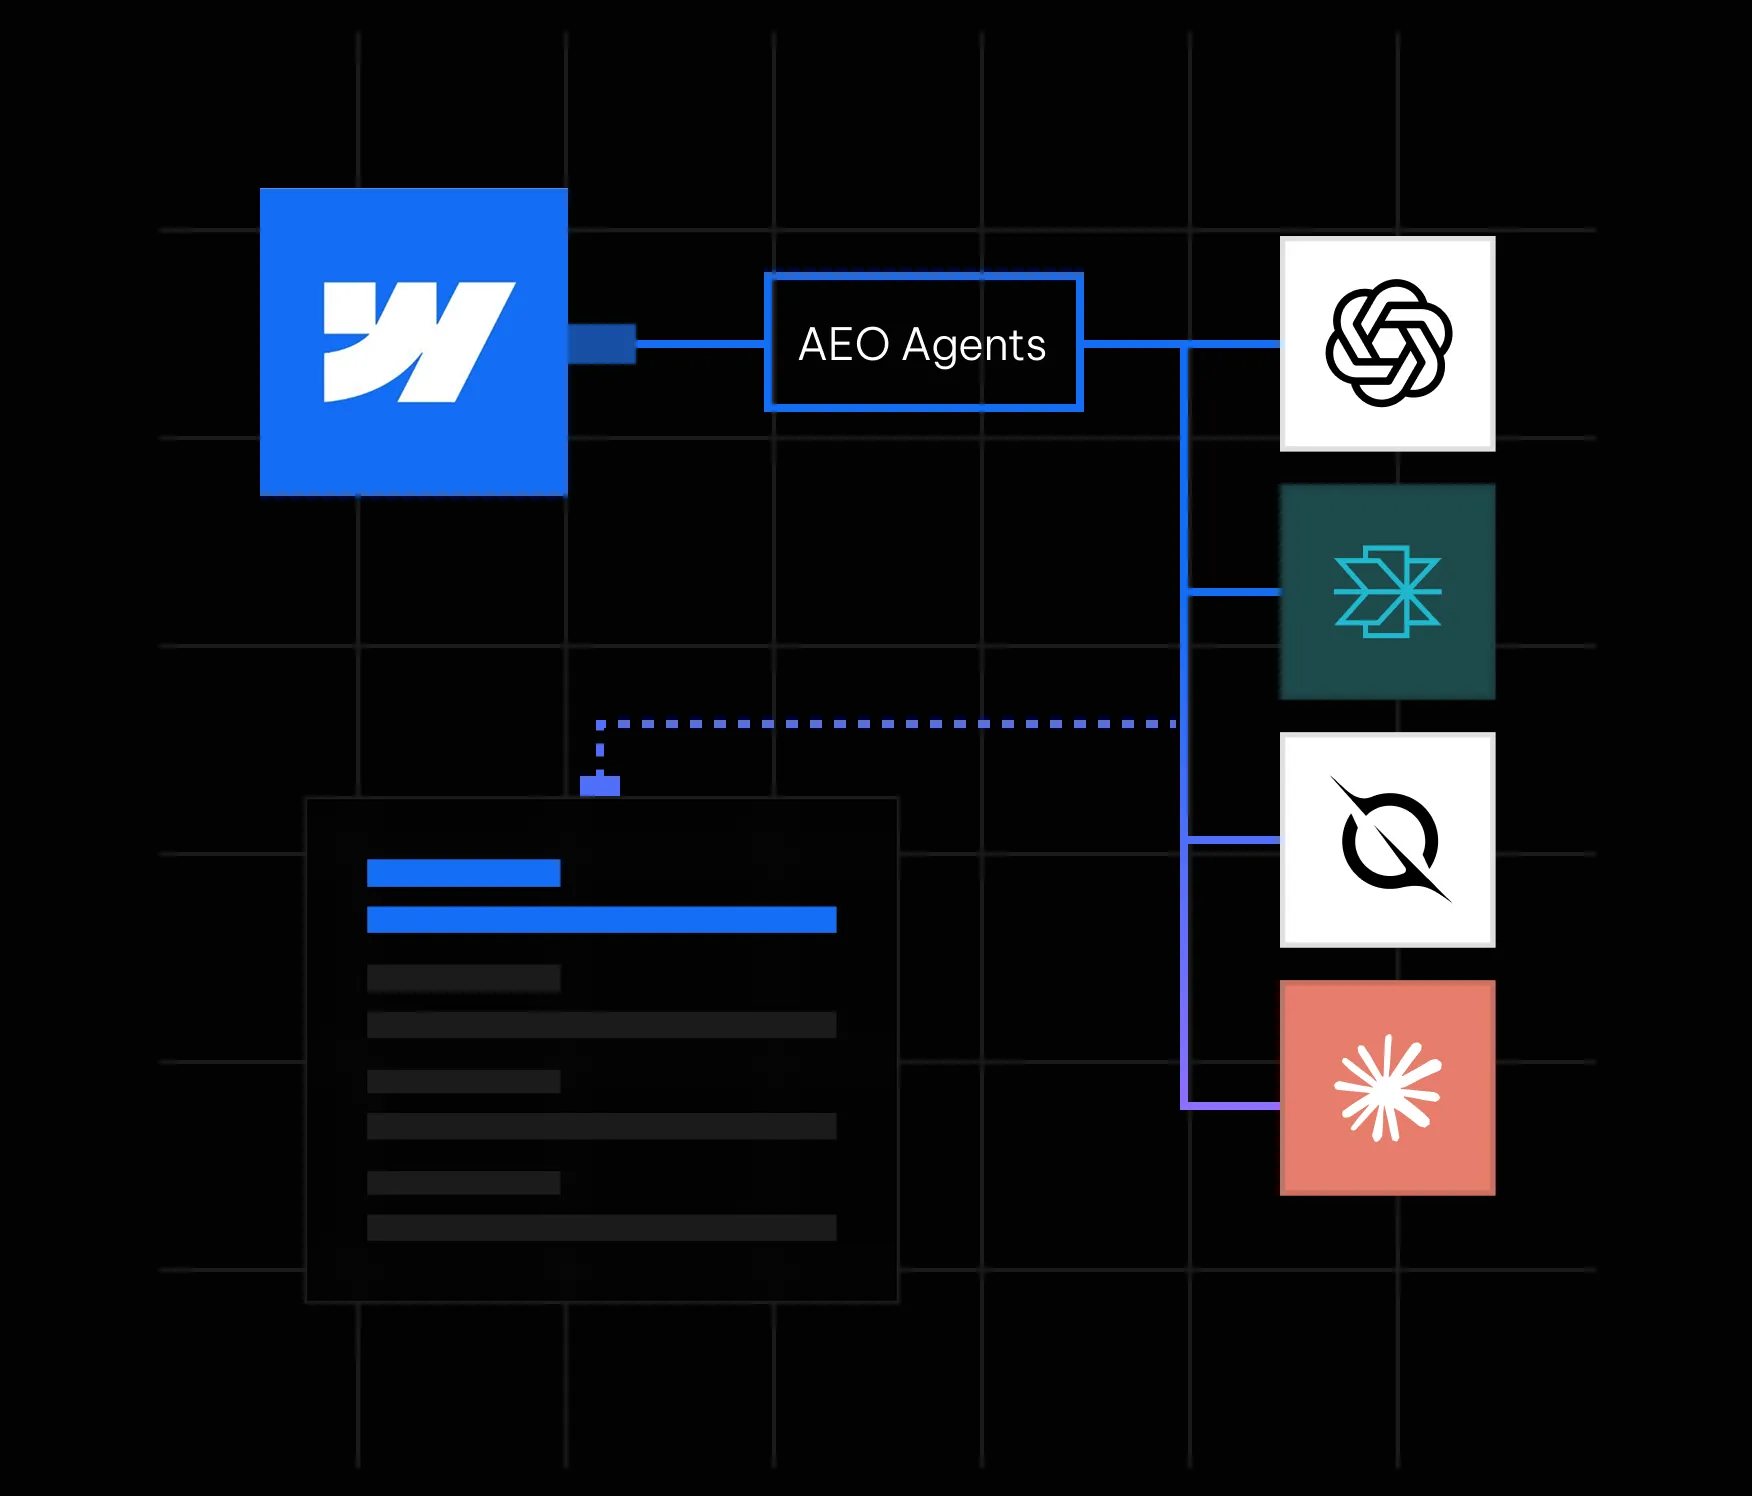
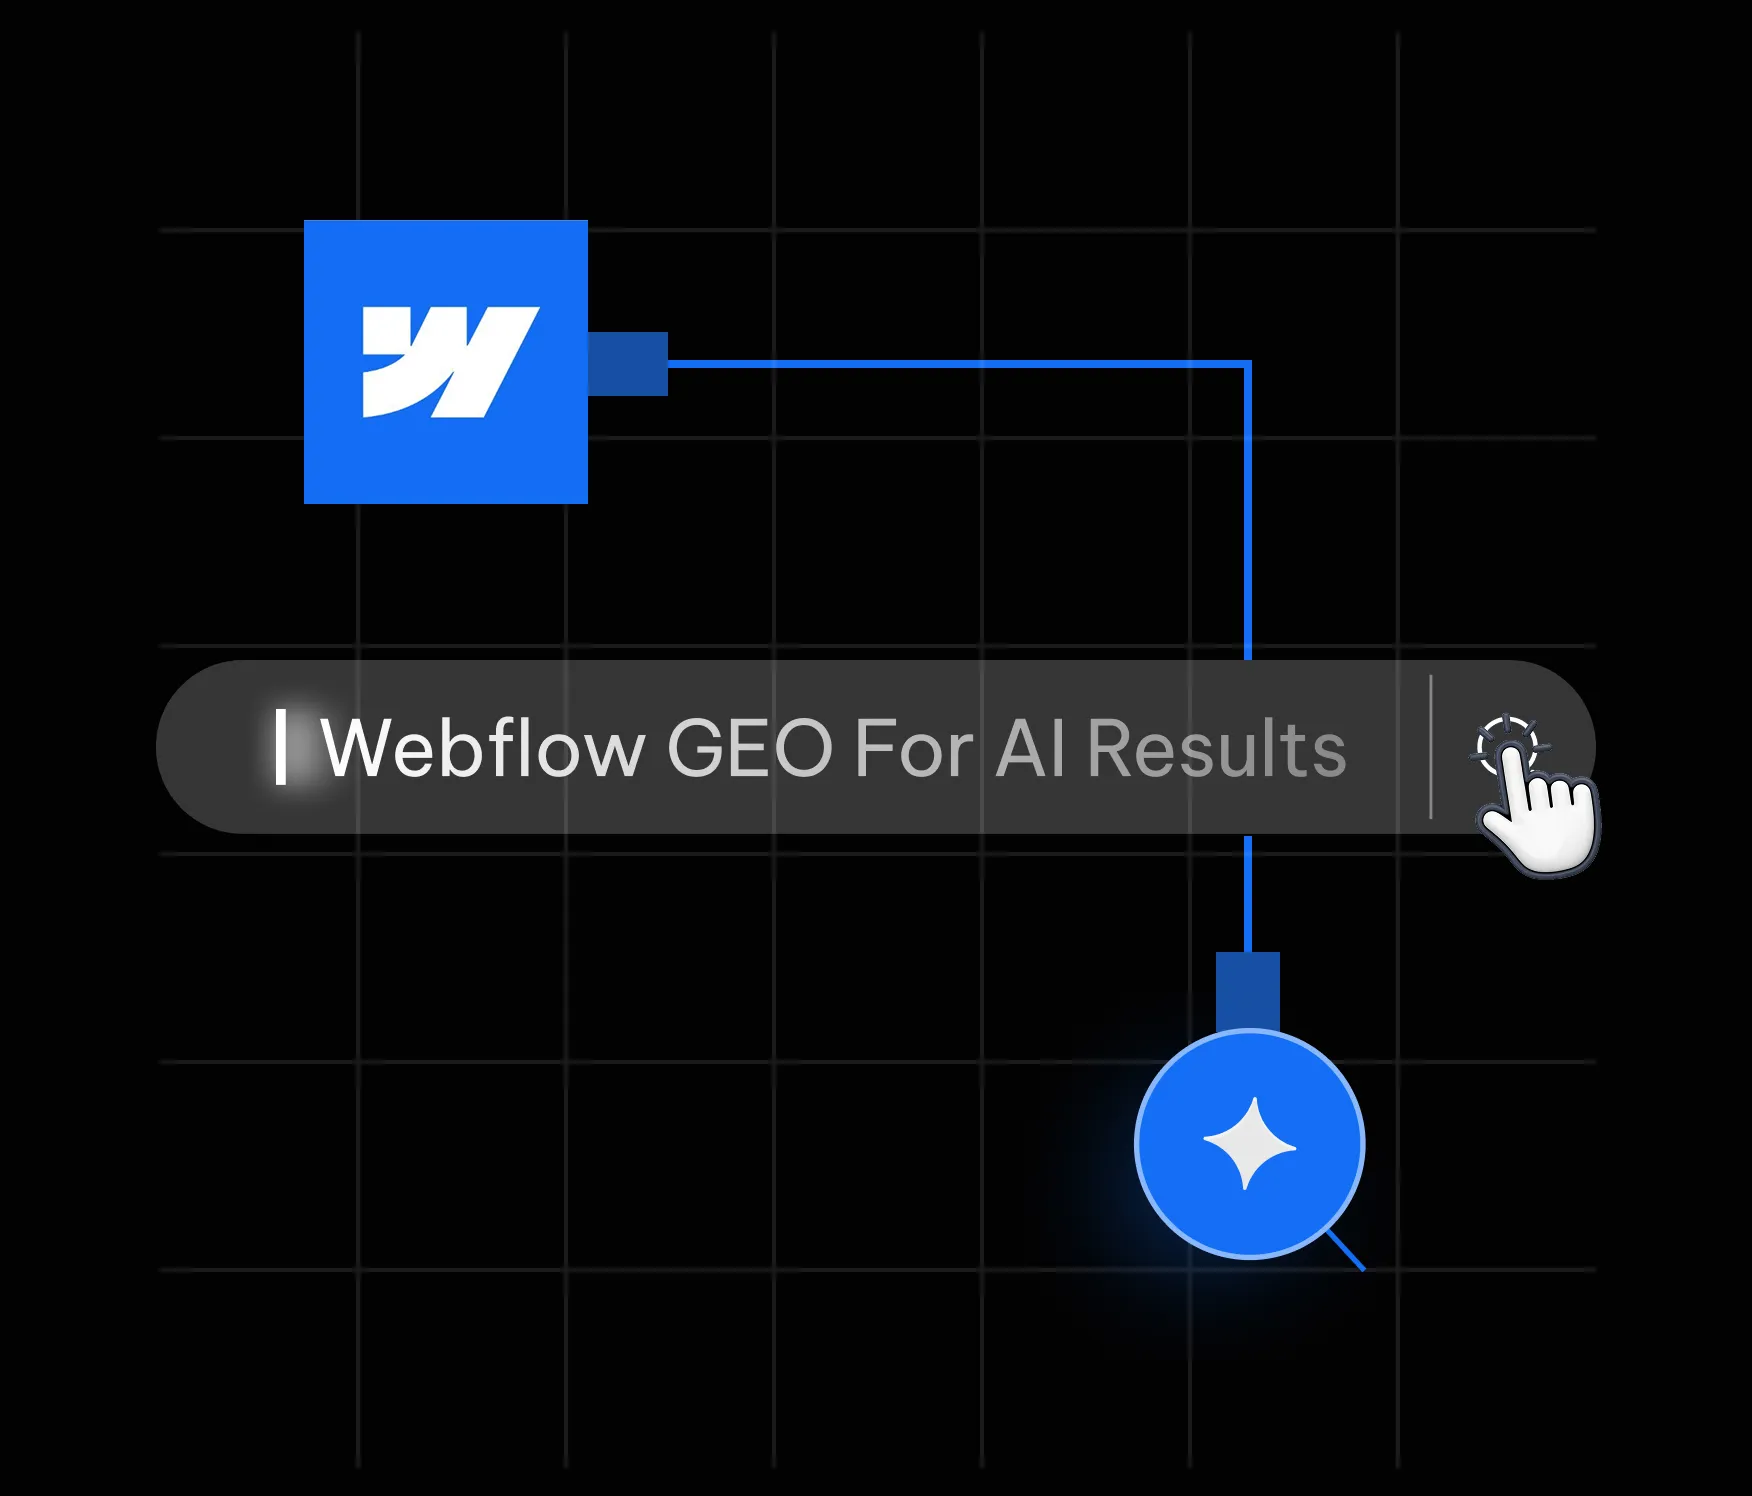
.webp)

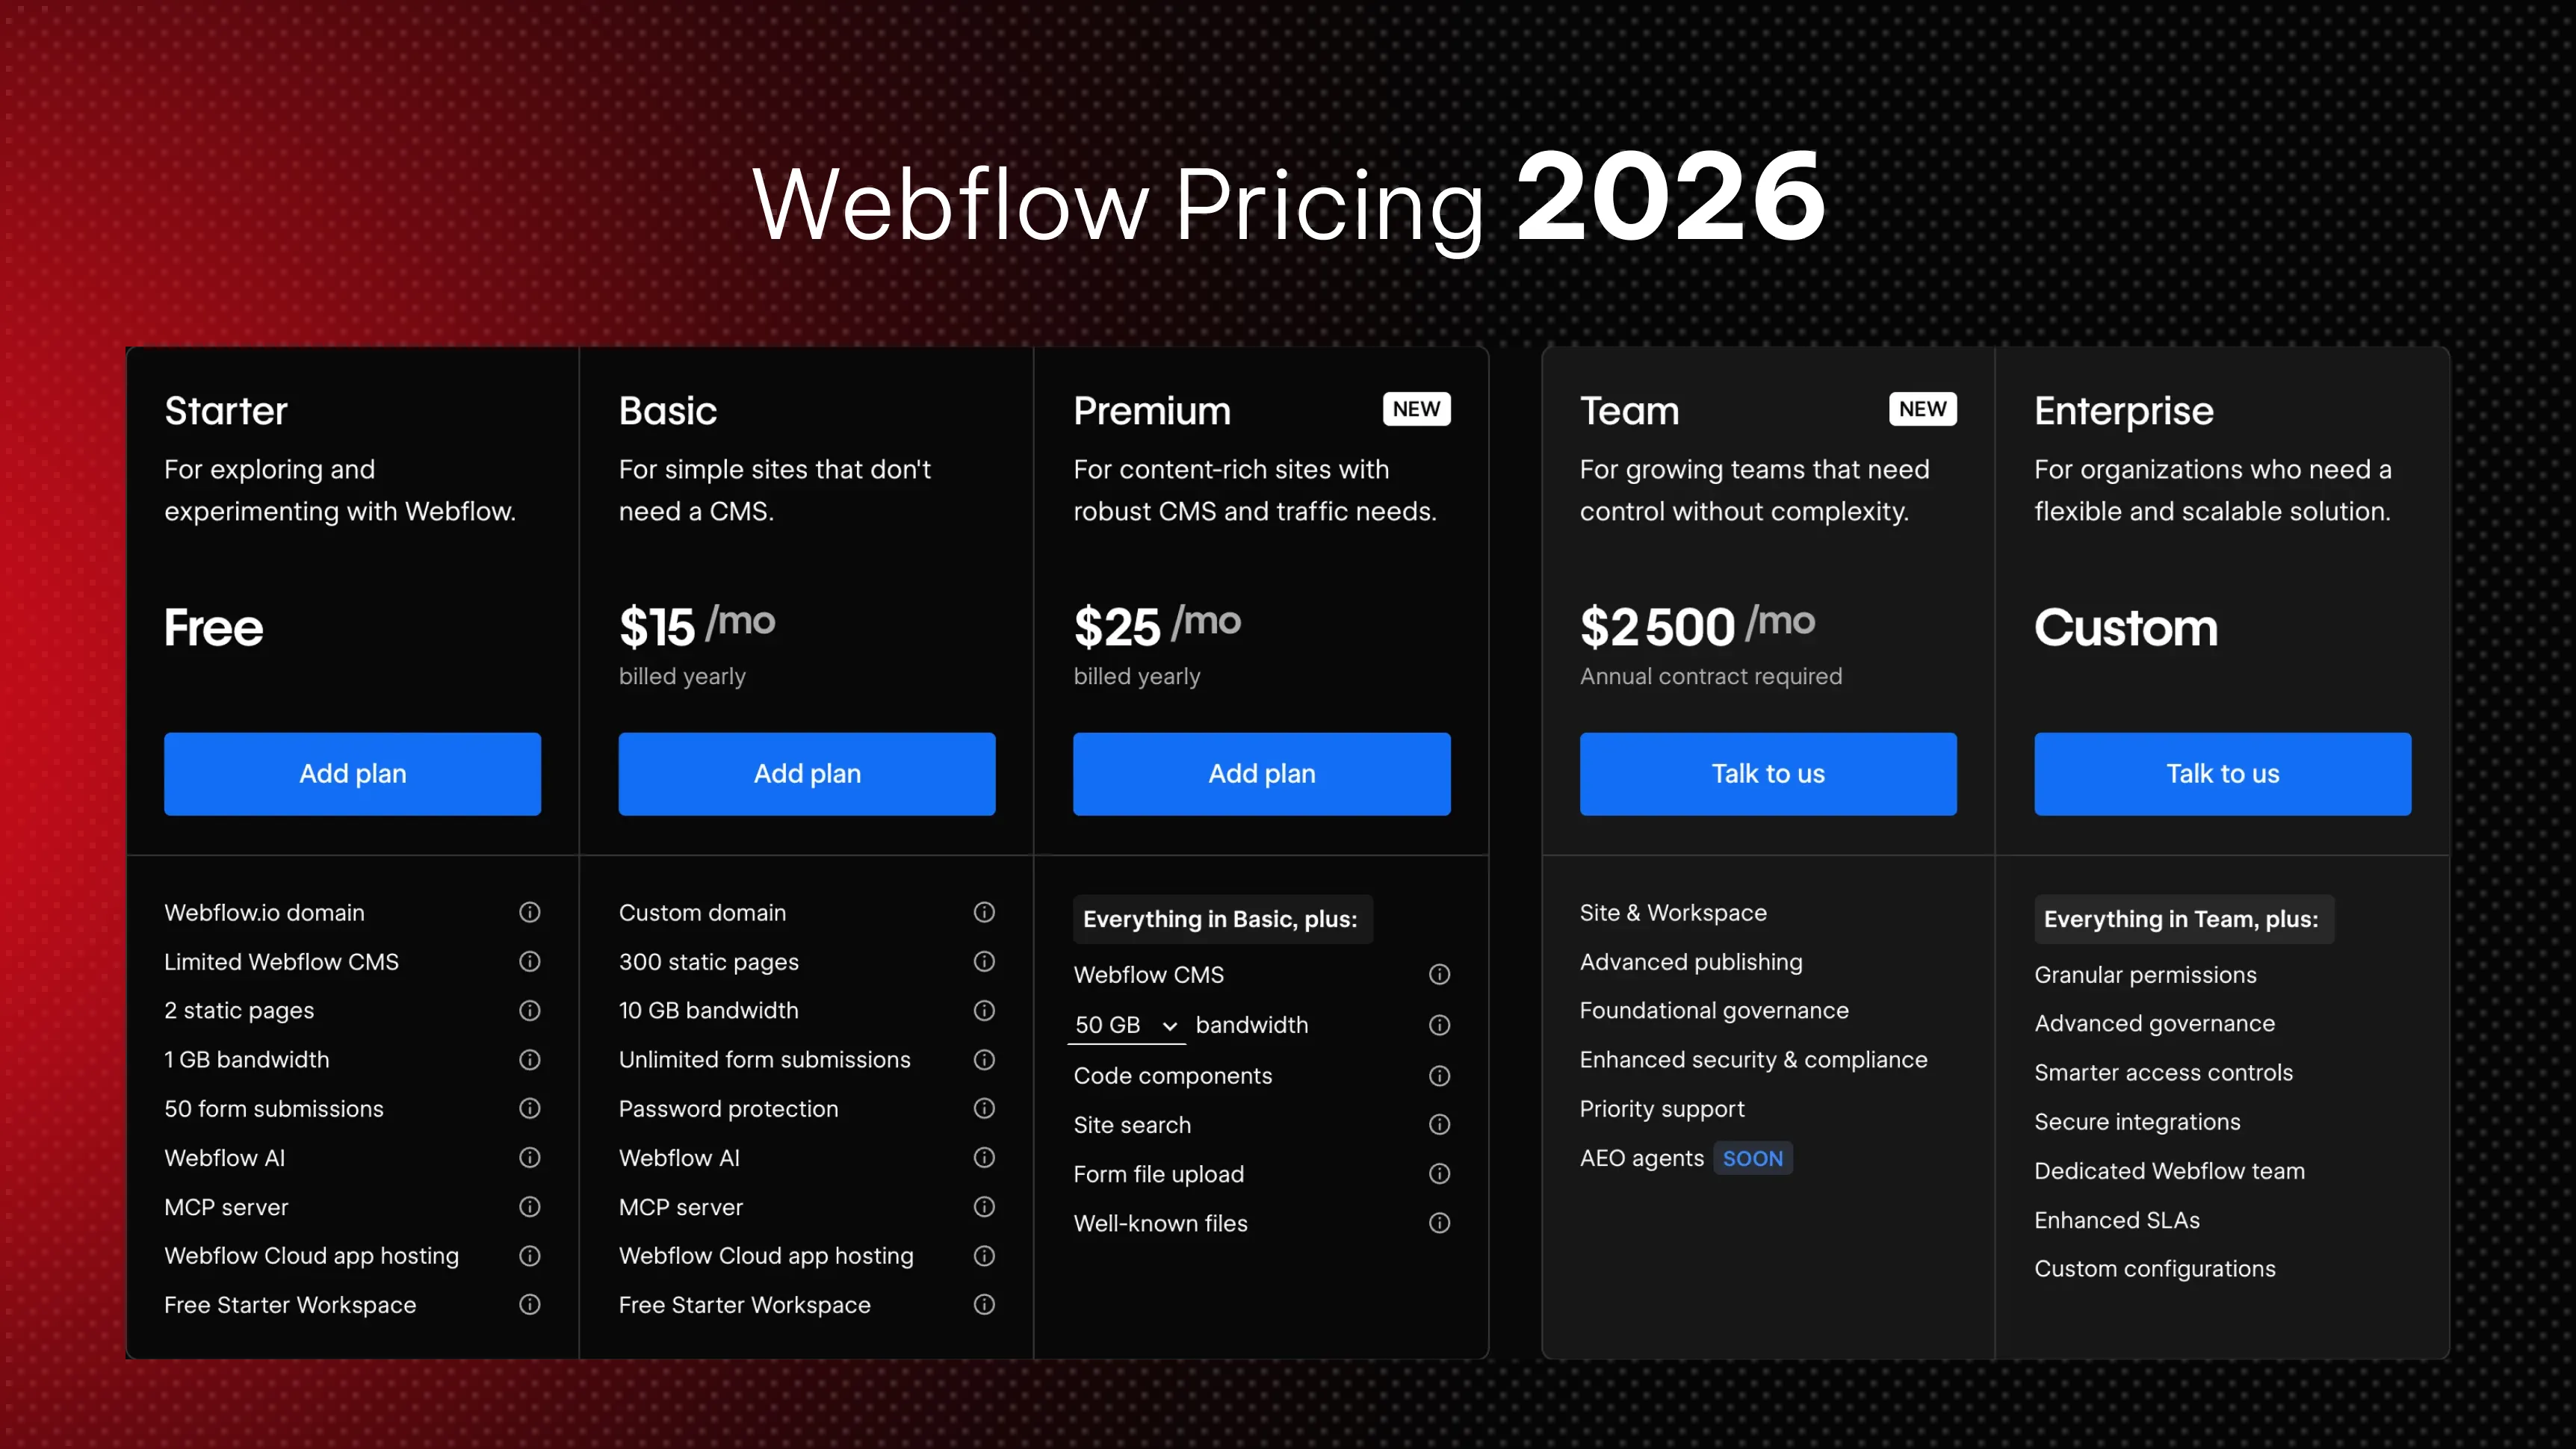
.webp)


