.webp)


July 6, 2026
12 mins read
Ahmedabad Webflow Community Group Meetup, Edition 2: Full Event Recap
Explore appsrow with AI
The way websites deliver information has shifted dramatically over the past decade. Static pages that required manual updates by a developer for every small change are rapidly becoming a relic of the past. Today, businesses and creators expect their websites to reflect real-time content, grow seamlessly alongside their brand, and be manageable by non-technical team members without any friction. Webflow CMS (Content Management System) has emerged as one of the most powerful answers to this demand, offering a visual, no-code approach to building dynamic, data-driven websites that do not sacrifice design quality or developer-level control. Whether you are a solo creator, a growing startup, or an enterprise brand, understanding how to harness the full potential of Webflow CMS can fundamentally change how you build and maintain your digital presence.
Dynamic content is not just a technical feature. It is a strategic advantage. When your website can automatically populate pages, update listings, display personalized information, and scale content without repetitive manual effort, you free your team to focus on strategy, creativity, and growth rather than tedious content management. This is where Webflow CMS excels. It bridges the gap between powerful content architecture and intuitive design tools, making it possible to create sophisticated, data-driven experiences through an entirely visual interface. In this guide, we will walk through everything you need to know about building dynamic content with Webflow CMS, from setting up collections and creating templates to filtering content, building relationships between data types, and preparing your site for publication.
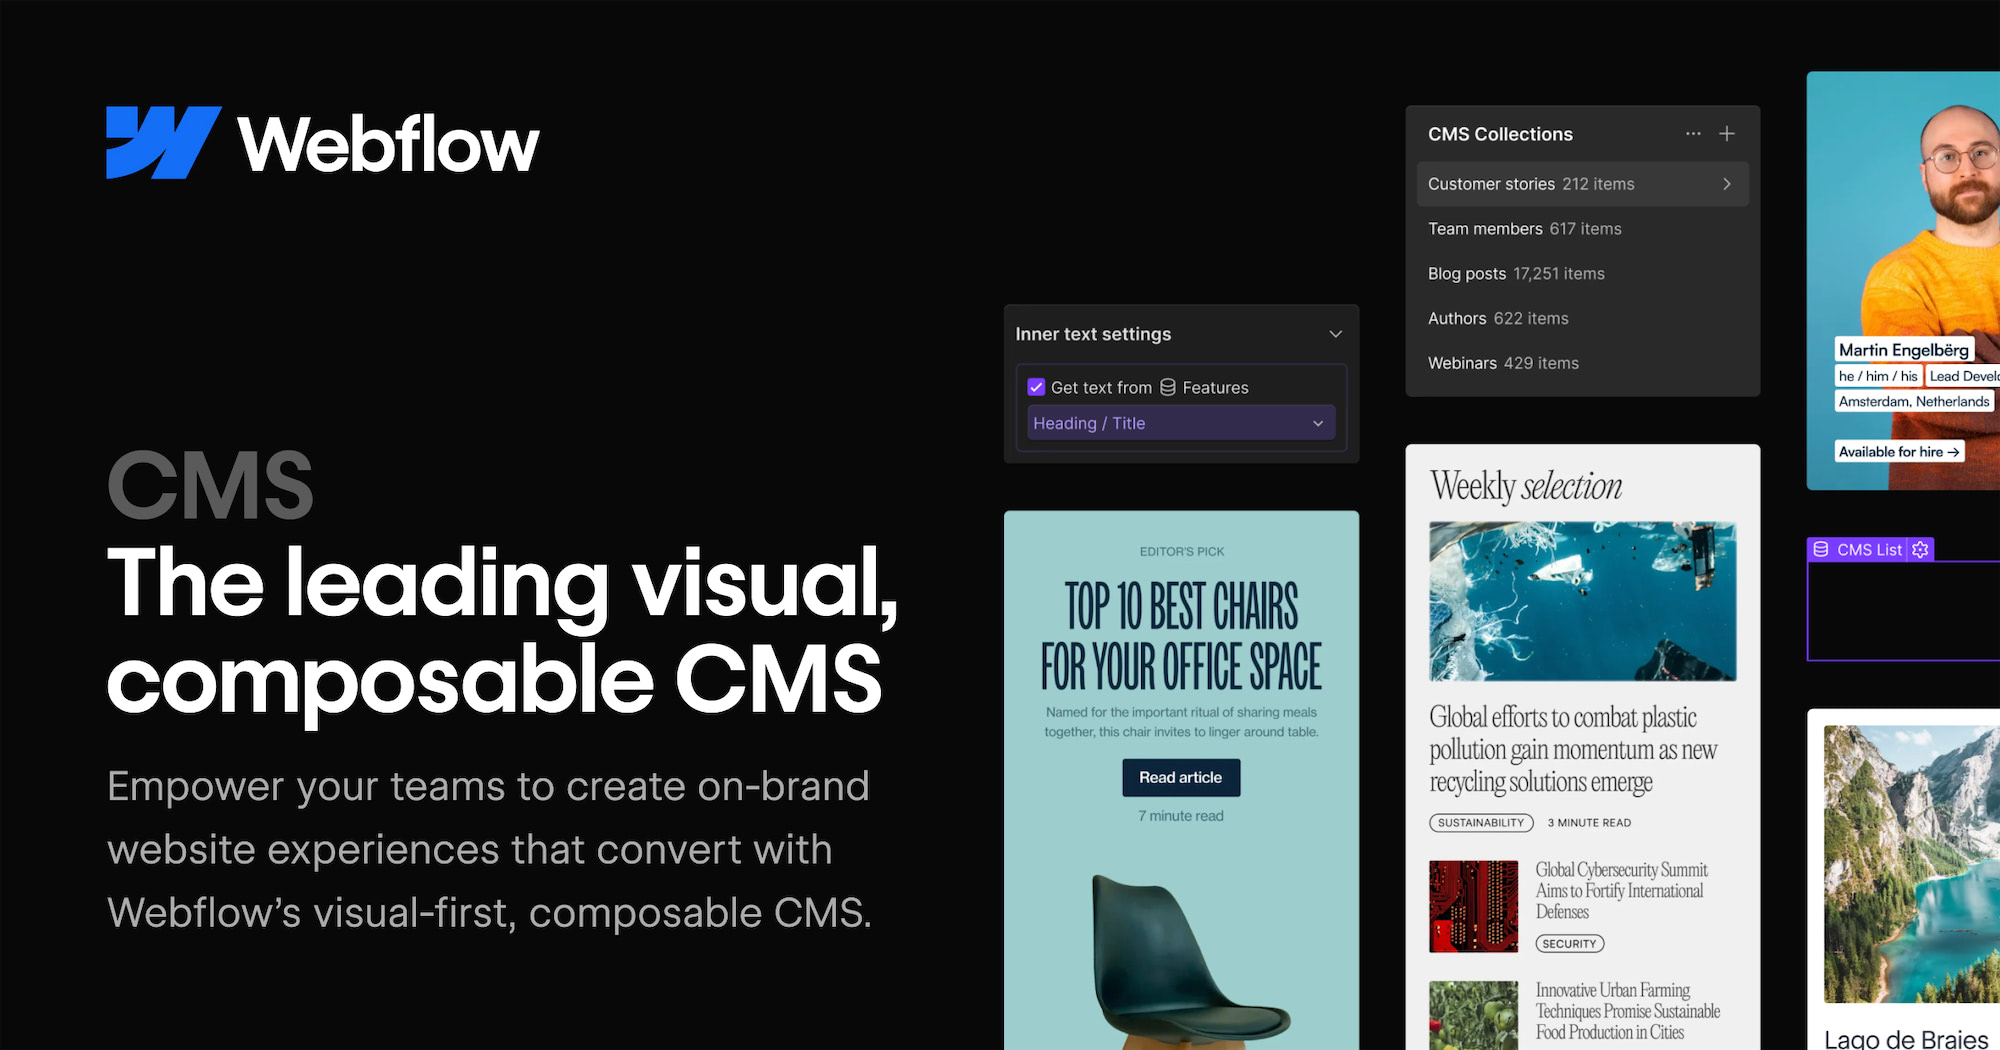
Before jumping into the technical steps, it is important to understand what Webflow CMS actually is and how it differs from traditional content management systems like WordPress or Drupal. Webflow CMS is a structured content layer built directly into the Webflow Designer. It allows you to define custom content types called Collections, which act as databases that hold structured, repeatable content. Think of Collections as spreadsheets where each row is a piece of content and each column is a field that defines the properties of that content. Once you define a Collection, Webflow generates individual pages for each item automatically, based on a design template you create once and apply universally.
This approach is fundamentally different from page-by-page website building. Instead of creating a separate page for every blog post, product, team member, or case study, you create one template that dynamically pulls data from your Collection. This means adding a new blog post is as simple as filling in a form, and your website instantly generates a fully designed, consistent page without any additional design or development work. The power of this model becomes especially apparent at scale. Imagine managing a catalog of 500 products or a blog with 300 articles. With Webflow CMS, all of that content is structured, searchable, filterable, and automatically presented through your design templates.
The starting point for any dynamic content experience in Webflow is creating a Collection. To begin, open your project in the Webflow Designer and navigate to the CMS panel, which is accessible from the left sidebar. Click on the option to create a new Collection and give it a descriptive name that reflects the type of content it will hold. Common Collection names include Blog Posts, Team Members, Projects, Products, Testimonials, Services, and Events. The name you choose should clearly describe the data structure you are building.
After naming your Collection, you will define its fields. Webflow offers a rich library of field types to accommodate virtually any kind of content. Plain text fields are suitable for titles, names, and short descriptions. Rich text fields support formatted long-form content with headings, bold text, images, links, and embedded media. Image fields hold visual assets and can be configured with alt text and dimensions. Number fields work for pricing, ratings, quantities, and similar numerical data. Date fields allow you to capture publication dates, event schedules, deadlines, and more. Option fields let you define a fixed list of choices, like a category selector or status indicator. Reference fields are one of the most powerful features, allowing you to link items in one Collection to items in another, creating relational data structures that mirror how real-world information connects.
Once your fields are defined, you can begin adding content items. Each item in a Collection represents one piece of content, such as one blog post or one team member profile. You fill in the field values for each item through a clean, form-based editor that requires no technical knowledge. Webflow also provides a CSV import option, which is invaluable when migrating existing content from another platform or populating a large Collection quickly.
With your Collection populated with content, the next step is designing the pages that will display that content. Webflow CMS introduces two page types specifically for dynamic content: Collection List pages and Collection Template pages. Understanding the difference between these two is essential for building a well-structured dynamic site.
A Collection List page is a page that displays multiple items from your Collection, typically in a grid or list format. This is the kind of page you would use for a blog index, a portfolio overview, a product catalog, or a team directory. On this page, you add a Collection List component from the Add panel. Once placed, you bind it to your chosen Collection, and Webflow automatically populates it with your Collection items. You then design a single repeating item inside the Collection List, and Webflow mirrors that design across all items in your Collection. You can connect any element inside the list item to a field in your Collection by clicking on the element, opening its settings, and selecting the appropriate field to bind. For example, you might bind an image element to your featured image field, a heading to your title field, a paragraph to your excerpt field, and a link to your post's URL.
A Collection Template page is automatically generated when you create a Collection. It represents the individual page for each item in your Collection. This is where you design the full, detailed view of a single piece of content, such as an entire blog post, a complete product detail page, or a full team member biography. On the Collection Template page, every element you add can be bound to a field from that Collection. This means every blog post in your Collection will be displayed using the same visual structure, with the dynamic data filling in the content specific to each post. Once you design the template, you never need to touch it again unless you want to change the visual design. Adding new content items automatically creates new pages following the same template.
One of the most visually satisfying aspects of working in Webflow CMS is the way it allows you to bind real data to design elements without writing a single line of code. This is done through the Get Text From or Get Image From panels that appear when you select an element inside a Collection List or Collection Template page. Webflow calls this process connecting elements to fields.
To connect a text element, you select the element in the canvas, open its settings panel, and click the field binding icon. A dropdown appears showing all the text-compatible fields from your Collection, and you simply select the one you want. Webflow immediately replaces the placeholder text with the field name, indicating the connection is live. When viewing the actual item pages, that placeholder is replaced with the real content from your database. The same process applies to images, video links, background images, visibility toggles, color swatches, and even class names, giving you a remarkable degree of dynamic control over the visual presentation of your content.
You can also bind data to styling properties, which opens up creative possibilities. For example, if your Collection has a color field for each category, you can bind that color field to the background color of a tag element, so each category automatically displays with its associated color. This kind of data-driven design is what separates Webflow CMS from simpler page builders. Your design adapts to your content rather than requiring manual design updates every time the content changes.
Displaying all items in a Collection on a single page is sometimes exactly what you need, but often you will want to show a curated subset of your content. Webflow CMS provides powerful filtering and sorting controls built directly into the Collection List settings. These controls allow you to define which items appear in a given list, in what order, and in what quantity, all without writing any code.
Sorting allows you to control the sequence in which items appear. You can sort by any date field, alphabetically by any text field, numerically by any number field, or by the order items were created or updated. For example, a blog Collection might be sorted by publication date in descending order so that the most recent posts appear first. A product catalog might be sorted alphabetically by name, or by price from lowest to highest.
Filtering allows you to restrict which items appear based on field conditions. You can filter to show only items where a toggle field is set to true, where a reference field matches a specific item, where a text field contains a specific value, or where a date field falls within a defined range. This becomes especially powerful when you want to show contextually relevant content. On a blog post template page, for example, you can include a Collection List of related posts filtered to show only items in the same category as the current post, creating an automatic related content section that updates dynamically based on what the reader is viewing. Working with a skilled webflow development agency can help you design these filtering strategies in ways that maximize engagement and content discoverability.
The item limit control lets you cap how many items appear in a list. A homepage section featuring your three most recent blog posts uses this feature. You set the limit to three, sort by date descending, and the section always shows the latest three posts regardless of how many total posts you have in your Collection. This kind of automated content curation dramatically reduces the maintenance burden on your team.
Real-world content rarely exists in isolation. A blog post might be written by a specific author, belong to one or more categories, and relate to a specific product. A project case study might involve multiple team members, showcase several services, and belong to an industry vertical. Webflow CMS supports relational content through Reference fields and Multi-Reference fields, which allow items in one Collection to link to one or many items in another Collection.
A Reference field creates a one-to-one or many-to-one relationship. For example, each blog post might reference one author from an Authors Collection. When you add a Reference field to your blog Collection and link it to the Authors Collection, each blog post item gets a dropdown where you select the associated author. On the blog post template page, you can then pull in data from the referenced author, such as their name, photo, and bio, to display a dynamic author card. This eliminates the need to manually copy author information into each post.
A Multi-Reference field creates a one-to-many or many-to-many relationship. For example, a project might be tagged with multiple service types from a Services Collection. By adding a Multi-Reference field linking your Projects Collection to your Services Collection, each project item can be associated with multiple services. You can then display those associated services on the project template page using a nested Collection List, creating a rich, interconnected content experience. These relational structures are at the heart of sophisticated CMS architectures, and mastering them allows you to build content experiences that rival enterprise-level platforms.
Conditional visibility is a feature in Webflow that allows you to show or hide elements on a page based on the values of CMS fields. This gives you the ability to create content that adapts its presentation depending on the data it contains, without needing JavaScript or custom code. Conditional visibility rules are applied to individual elements through the Visibility panel in the element settings.
For example, if your blog Collection has a toggle field called Featured, you can add a Featured badge element to your Collection List item and set it to only be visible when the Featured field is true. Items that are not featured will display without the badge, while featured items automatically show it. Similarly, if your product Collection has a Sold Out toggle field, you can show a sold out overlay element only when that field is true, automatically indicating unavailability without any manual design updates.
You can stack multiple conditional visibility rules to handle complex scenarios. An element might be set to appear only when a certain category is selected, a specific date has passed, or a text field is not empty. This kind of dynamic content presentation makes your website feel intelligent and responsive to its own data, which significantly improves the user experience while reducing the editorial workload required to maintain it.
One of the significant advantages of Webflow CMS is its deep integration with SEO settings at the Collection level. Each Collection Template page includes SEO fields that can be dynamically populated from your Collection data. This means every item in your Collection can have a unique, SEO-optimized title tag, meta description, Open Graph image, and URL slug, all generated automatically based on the fields you define.
In the Collection settings, you can configure the URL structure for your Collection items. For example, blog posts might follow a pattern like /blog/[post-slug], while team members might follow /team/[member-name]. Webflow auto-generates the slug from the item name by default, converting it to a URL-friendly format, but you can override it manually for any individual item. The ability to fine-tune SEO metadata at the Collection level, including setting dynamic title formulas like [Post Title] | [Site Name], ensures that every piece of dynamic content is optimized for search engines without requiring manual SEO configuration for each individual page.
Rich text fields in Webflow also render as proper HTML on the published site, preserving heading hierarchy, internal links, image alt text, and semantic markup that search engines use to understand content structure. Combined with Webflow's clean code output and fast hosting infrastructure, this makes Webflow CMS a strong platform choice for content-heavy sites where organic search traffic is a priority. Professional webflow development services recognize these SEO capabilities as a major factor when recommending Webflow to content-driven clients.
Once your Collections are structured and your templates are designed, the day-to-day workflow of managing CMS content in Webflow is straightforward and requires no technical knowledge. Content editors can add new items, update existing ones, and manage the publishing status of any item directly from the Webflow Editor, which is a simplified interface that overlays the live site. Editors can click on any CMS element on the page and edit its content inline, making it feel intuitive and visual rather than abstract and form-heavy.
Each Collection item has a published and draft status. Items in draft status are not publicly visible on the site but can be previewed by logged-in collaborators. This workflow supports content review processes, allowing writers to prepare content in draft, have it reviewed, and then publish it when it is ready. Items can also be scheduled for future publication by setting a publish date, which is useful for editorial calendars and timed announcements.
Webflow also provides a robust collaboration system. Multiple team members can be granted Editor access, allowing them to manage content without access to the design environment. This separation of concerns, where designers control the visual system and editors control the content, is a hallmark of professional content management workflows. It ensures that the visual integrity of your site is protected while giving content teams the autonomy they need to move quickly.
Webflow CMS does not operate in isolation. It integrates with a growing ecosystem of tools and platforms that extend its capabilities significantly. Through Zapier, Make, or native integrations, you can connect Webflow CMS to CRMs, email marketing platforms, analytics tools, form processors, and project management systems. New items added to a Collection can automatically trigger actions in other tools, such as sending a notification email, creating a task in Asana, or posting to a Slack channel.
Webflow Logic, the platform's built-in automation builder, allows you to create workflows triggered by form submissions and other site interactions. These workflows can create or update CMS items, send emails, and connect to external APIs, bringing a level of automation to your site that would traditionally require custom backend development. For example, a job application form might automatically create a new item in a Job Applications Collection, complete with all the submitted data, while simultaneously notifying the hiring team via email.
For developers who want to go even further, the Webflow CMS API provides programmatic access to your Collections and items. You can read, create, update, and delete CMS items through REST API endpoints, enabling custom integrations, headless content architectures, and sophisticated data pipelines. This is particularly valuable for brands running complex digital operations where Webflow serves as the front-end presentation layer while specialized backend systems handle data processing and storage. This level of extensibility is one of the core reasons businesses choose to work with a professional webflow development agency when building complex, scalable digital experiences.
Webflow CMS represents a genuinely transformative approach to dynamic content on the web. By combining a structured, relational database with a fully visual design environment, it removes the traditional barriers between content architecture and design execution. You no longer need to choose between a powerful CMS that requires developer intervention and a beautiful design tool that lacks content management sophistication. Webflow gives you both in a single platform. The features covered in this guide, from Collection setup and template design to filtering, relational data, conditional visibility, SEO configuration, and publishing workflows, represent a comprehensive toolkit that supports everything from simple blogs to complex, enterprise-scale content platforms.
What makes Webflow CMS especially compelling is the way it scales with your ambitions. You can start simple, with a single Collection and a straightforward template, and incrementally add sophistication as your content needs grow. The platform rewards investment in learning its systems by unlocking increasingly powerful capabilities. Whether you are managing a personal portfolio, running a content marketing operation, or overseeing a multi-brand digital ecosystem, the skills you develop working with Webflow CMS will serve you consistently. The future of web content is dynamic, personalized, and scalable, and Webflow CMS is built precisely to deliver that future in an accessible, design-forward way that puts creative teams in full control of their digital presence.
If your website isn't easy to understand, you're giving away opportunities
before the conversation even starts.
Get a free review of how your website appears to AI-powered search and discovery tools.
GOT QUESTIONS ?
How does dynamic content work in Webflow CMS?
Webflow CMS dynamic content lets you create collection-based pages where each CMS item automatically generates its own page with consistent design, making it ideal for blogs, case studies, team pages, and product listings. Changes to the template instantly apply to all collection pages, saving enormous amounts of time compared to manually updating static pages. Appsrow designs scalable Webflow CMS architectures that make dynamic content creation fast and manageable for any team.
What types of content are best managed through Webflow CMS?
Webflow CMS is ideal for blogs, resource libraries, team directories, job boards, case study pages, event listings, and any content type that needs to scale without requiring a developer to build each new page. Its reference and multi-reference fields allow you to create complex content relationships between collections, just like a relational database. Appsrow builds advanced Webflow CMS structures that power content-rich websites with hundreds or thousands of items.
How do I set up dynamic content in Webflow CMS step by step?
Webflow CMS dynamic content is set up by creating a Collection with custom fields matching your content type, designing a Collection template page that references those fields, and then adding Collection items that automatically populate the template to create individual pages. This system means adding 100 blog posts or case studies never requires building a single new page manually. Appsrow designs Webflow CMS architectures that scale from 10 to 10,000 items without requiring structural changes or developer involvement.
How do reference fields work in Webflow CMS for relational content?
Webflow CMS reference fields allow one collection item to link to another, such as a blog post linking to its author profile or a case study linking to its industry category, enabling relational content structures similar to a database. Multi-reference fields extend this to allow one item to reference multiple items in another collection simultaneously. Appsrow builds advanced Webflow CMS relational architectures using reference and multi-reference fields to create rich, interconnected content experiences.
How do I filter and sort Webflow CMS collection items on my site?
Filtering and sorting Webflow CMS collection lists can be done in the Designer using Webflow's native filter settings on the Collection List element, which allows you to filter by any field value and sort by date, name, or custom number fields. For more advanced filtering that users can control in real time, third-party tools like Finsweet CMS Filter or custom JavaScript solutions are required. Appsrow implements both native and advanced CMS filtering solutions on Webflow sites depending on the complexity of filtering behavior your content requires.
How do I update Webflow CMS content efficiently at scale?
Webflow CMS content can be updated by the site owner or designated editors through the Webflow Editor mode without needing to access the Designer, or by connecting to an external content source like Airtable or Google Sheets through Zapier to automatically sync content updates. For large-scale CMS updates, the Webflow API can be used to programmatically update multiple items simultaneously. Appsrow sets up the most efficient Webflow CMS update workflow for each client based on their team's technical skills and content update frequency.
What are the limits of Webflow CMS and how do I plan around them?
Webflow CMS has a limit of 20 collection fields per collection, up to 10,000 items per collection on the Business plan, and up to 10 nested collection lists per page with the Next-Gen CMS. Understanding these limits before architecting your CMS structure prevents hitting boundaries that require costly restructuring later. Appsrow designs Webflow CMS architectures that work efficiently within platform limits while giving you maximum flexibility for content growth and future feature additions.
How does Webflow CMS support SEO for large content libraries?
Webflow CMS is excellent for SEO because every CMS collection template page can have unique, dynamically generated meta titles, meta descriptions, OG images, and canonical URLs pulled from CMS fields, making it easy to create hundreds of individually optimized pages at scale. The clean semantic HTML output of CMS template pages also ensures search engines can efficiently crawl and index every item. Appsrow builds Webflow CMS SEO infrastructure including dynamic meta fields, schema markup, and sitemap configuration for every collection type on client sites.

Parth Parmar is a Webflow Expert and Co-Founder & CTO at Appsrow Solutions. He has delivered 300+ Webflow projects for 25+ global B2B brands, helping SaaS companies, AI startups, and tech businesses build conversion-focused websites with scalable CMS, AEO-ready architecture, and measurable growth.
CURATED READING